
We present a method for computing alias-free, smooth shadows for alpha-tested geometry using a single ray per pixel. Without mipmap filtering, hard shadows from alpha-tested geometry appear very noisy under camera motion. Typically, many ray samples are required to soften the shadows and reduce noise. We propose using mipmaps instead, to achieve a fast and temporally stable solution. To determine the appropriate mipmap level, we introduce novel ray cone operations that account for directional and point light sources.
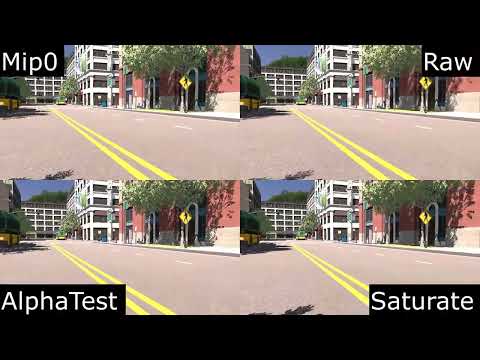
Video featuring simple Mip 0 texture filtering for shadows rays and our ray cone texture filtering (Raw, AlphaTest, Saturate). We recommend using Saturate for best performance and least aliasing.
Comparison of simple Mip 0 texture filtering and its application to popular anti-aliasing techniques:
- SMAA T2X
- TAA
- DLSS (DLAA)
Our ray cone texture filtering is not applied in this video. It can be applied to further decrease shadow aliasing, if the AA method itself is not sufficient.

A code snippet for the ray cones is listed below:
struct RayCone
{
    float width;
    float angle;

    RayCone propagate(float hitT)
    {
        return RayCone(angle * hitT + width, angle);
    }

    RayCone hit(float3 rayDir, float3 normal)
    {
        return RayCone(width / abs(dot(rayDir, normal)), angle);
    }

    RayCone reflect(float3 rayDir, float3 normal)
    {
        return RayCone(width * abs(dot(rayDir, normal)), angle);
    }

    RayCone focus(float focusT)
    {
        return RayCone(width, -width / focusT);
    }

    RayCone orthogonalize()
    {
        return RayCone(width, 0);
    }

    // triLODConstant: Value computed by computeRayConeTriangleLODValue()
    float computeLOD(float triLODConstant)
    {
        return triLODConstant + log2(width); // part of Eq. 5 (missing log2(sqrt(Tw*Th)))
    }
};

float computeRayConeTriangleLODValue(float3 vertices[3], float2 txcoords[3], float3x3 worldMat)
{
    float2 tx10 = txcoords[1] - txcoords[0];
    float2 tx20 = txcoords[2] - txcoords[0];
    float Ta = abs(tx10.x * tx20.y - tx20.x * tx10.y);

    float3 edge01 = mul(worldMat, vertices[1] - vertices[0]);
    float3 edge02 = mul(worldMat, vertices[2] - vertices[0]);

    float3 triangleNormal = cross(edge01, edge02);
    float Pa = length(triangleNormal);
    return 0.5f * log2(Ta / Pa); // part of Eq. 5 (missing log2(w * sqrt(Tw*Th)))
}

struct RayConesLodTextureSampler
{
    float rayConeLOD; // initialize with RayCone::computeLOD

    float4 sampleTexture(Texture2D t, SamplerState s, float2 uv)
    {
        uint txw, txh;
        t.GetDimensions(txw, txh);
        float lambda = 0.5 * log2(txw * txh) + rayConeLOD; // full Eq. 5 from paper
        return t.SampleLevel(s, uv, lambda);
    }
};
A simplified shader for tracing the shadow ray is below:
float traceShadowRay(float3 posW, float3 normalW)
{
    if (dot(normalW, posW.xyz - gScene.camera.getPosition()) > 0)
        normalW = -normalW;

    LightData light = gScene.getLight();
    RayDesc ray;
    ray.Origin = posW.xyz;
    ray.TMin = gScene.camera.data.nearZ * 0.1;

    float3 V = gScene.camera.getPosition() - posW.xyz;
    float lenV = length(V);

    // RAY_CONE_SPREAD (Eq. 1): atan(2.0 * tan(FOVradians * 0.5f) / windowHeightInPixels)
    RayCone rc = RayCone(0.0, RAY_CONE_SPREAD);
    rc = rc.propagate(lenV); // travel t
    rc = rc.hit(V / lenV, normalW); // hit surface

    if (light.type == uint(LightType::Point))
    {
        ray.Direction = normalize(light.posW - posW.xyz);
        ray.TMax = distance(light.posW, posW.xyz) - gPointLightClip;

        rc = rc.reflect(ray.Direction, normalW);
        rc = rc.focus(distance(light.posW, posW.xyz));
    }
    else if (light.type == uint(LightType::Directional))
    {
        ray.Direction = -light.dirW;
        ray.TMax = gScene.camera.data.farZ;

        rc = rc.reflect(ray.Direction, normalW);
        rc = rc.orthogonalize();
    }

    if (dot(ray.Direction, normalW) <= 0.0)
        return 0.0; // backfacing surface

    float visibility = 1.0;
    // visibility below this threshold is considered to be zero
    float visibilityCutoff = 0.01;

    RayQuery<RAY_FLAG_ACCEPT_FIRST_HIT_AND_END_SEARCH> rayQuery;
    rayQuery.TraceRayInline(gScene.rtAccel, RAY_FLAG_NONE, 0xFF, ray);
    while (rayQuery.Proceed())
    {
        if (rayQuery.CandidateType() == CANDIDATE_NON_OPAQUE_TRIANGLE)
        {
            float t = rayQuery.CandidateTriangleRayT();
            // alpha test
            const TriangleHit hit = getCandidateTriangleHit(rayQuery);
            const uint materialID = gScene.getMaterialID(hit.instanceID);
            const VertexData v = gScene.getVertexData(hit);

            let material = gScene.materials.getMaterial(materialID);

            RayCone shadowCone = rc.propagate(t);
            shadowCone = shadowCone.hit(ray.Direction, v.faceNormalW);
            float lambda = shadowCone.computeLOD(v.coneTexLODValue);
            let lod = RayConesLodTextureSampler(lambda);
            // sample opacity texture using the computed LOD lambda
            float opacity = material.evalOpacity(gScene.materials, v, lod);

            if (RAY_CONE_SHADOW == RAY_CONE_SHADOW_SATURATED)
                opacity = saturate(opacity * 2.0);
            else if(RAY_CONE_SHADOW == RAY_CONE_SHADOW_ALPHA_TEST)
                opacity = opacity < 0.5 ? 0.0 : 1.0;

            visibility = visibility * (1.0 - opacity);
            if (visibility < visibilityCutoff)
                return 0.0;
        }
        else
            return 0.0; // assume occluded
    }
    // hit opaque?
    if (rayQuery.CommittedStatus() != COMMITTED_NOTHING) return 0.0;

    // scale based on the cutoff
    visibility = saturate((visibility - visibilityCutoff) / (1.0 - visibilityCutoff));

    return visibility;
}
The full shader files can be found in Source/Falcor/Scene/Lighting/RayShadow.slangh (Shadow Ray), Source/Falcor/Rendering/Material/TexLODHelpers.slang (Ray Cone) and Source/Falcor/Scene/Material/TextureSampler.slang (Texture Sampler)
- Windows 10 version 20H2 (October 2020 Update) or newer, OS build revision .789 or newer
- Visual Studio 2022
- Windows 10 SDK (10.0.19041.0) for Windows 10, version 2004
- A GPU which supports DirectX Raytracing, such as the NVIDIA Titan V or GeForce RTX
- NVIDIA driver 466.11 or newer
Optional:
- Windows 10 Graphics Tools. To run DirectX 12 applications with the debug layer enabled, you must install this. There are two ways to install it:
- Click the Windows button and type
Optional Features, in the window that opens clickAdd a featureand selectGraphics Tools. - Download an offline package from here. Choose a ZIP file that matches the OS version you are using (not the SDK version used for building Falcor). The ZIP includes a document which explains how to install the graphics tools.
- Click the Windows button and type
- NVAPI, CUDA, OptiX
Falcor uses the CMake build system. Additional information on how to use Falcor with CMake is available in the CMake development documentation page.
If you are working with Visual Studio 2022, you can setup a native Visual Studio solution by running setup_vs2022.bat after cloning this repository. The solution files are written to build/windows-vs2022 and the binary output is located in build/windows-vs2022/bin.