FIJI plugin that reads .lif files from the Sp8 confocal microscope (including 3D stack images) and outputs a file system with .ome.tif files and a file system with png files. The png files can be directly used for setting up a memento project. Note however that in this plugin the image intensity scaling is done on the image level. If you prefer to scale intensities for all images of a well jointly, making images within a well more comparable, you should rather first export tif files with this plugin and then convert them to JPGs or PNGs by another tool before uploading these files to Memento or using them for another further analysis purpose.
(c) 2022-2025, Jan N. Hansen
Contact: jan.hansen (at) scilifelab.se
The plugin and the source code are published under the GNU General Public License v3.0 contained in this repository.
This software is a plugin for FIJI (an extended version of the open-source image-analysis software ImageJ, including the BioFormats library from OME, which is needed to properly run this plugin). Thus to use the plugin, you need to first have FIJI downloaded to your computer. FIJI is freely available for dowbload here.
The plugin can be installed as follows:
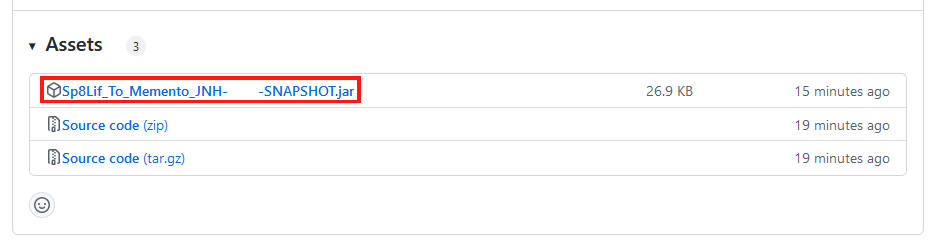
- Download the .jar file from the latest release at the release section.
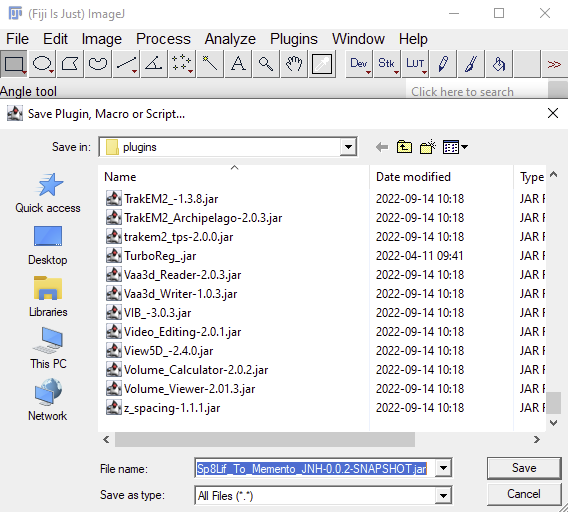
- Launch FIJI and install the plugin by drag and drop into the FIJI status bar (red marked region in the screenshot below)

- Confirm the installations by pressing save in the upcoming dialog(s).
-
Next, ImageJ requires to be restarted (close it and start it again)
-
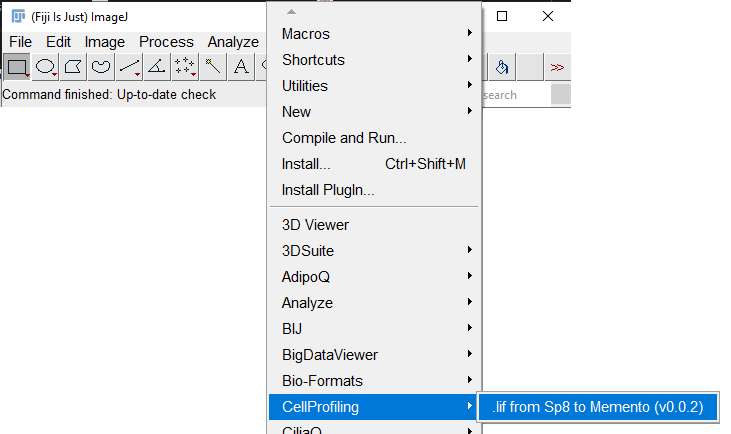
You can now verify that the plugin is installed by launching it through the menu entry: Plugins > CellProfiling >
Launch the plugin via
A settings dialog is displayed that also guides you through the settings

Notes on the settings:
-
You can decide whether you want to export PNGs, JPGs, TIFs, multi-plane and multi-channel tifs (Hyperstacks) or multiple of these output types.
-
The exported background-transparent PNG images (
 ) or non-transparent JPG images can be directly imported into Memento, where these can be installed to allow you to toggle on / off channels. The display ranges (maximum intensity displayed as maximum color brightness) of the images will be based on the intensity in the images. The plugin will set the LUT of the image in a way that the display range is from 0 to the 99.9% percentile of the intensities in the channel, meaning that the conversion to PNG will be created in a way that 0.1% of the pixels in the image will be oversaturated. Note that the percentile calculation and conversion is done on the image level, so different images from the same well may look different, especially if you have large variance in intensity among the regions / cells. Thus, and for improved speed in memento, it is more recommended to export to Tif files (
 ) (which you can also use for image analysis) and then use another tool to convert the Tiffs to PNGs or JPEGs allowing intensity adjustments on the level of a well or column (see TifCs_To_HPA-PNG-JPEG).
 -
If you select
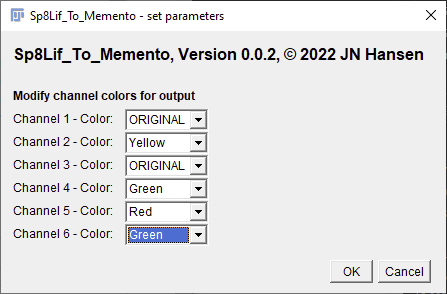
 make sure to also set the number of channels that are contained in your image. When this option is selected after the current settings dialog is confirmed by clicking OK, another dialog will pop up that allows you to modify the colors in which the individual channels are displayed in the output files. The color "ORIGINAL" should be selected if you want to keep the color profile assigned in the .lif file.
- If you select
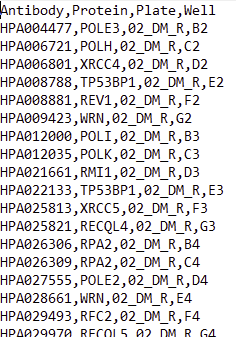
 the software will ask you for a comma-separated csv file after having selected the files to be analyzed. This file should be organized as shown in the screenshot below. This table is then used to link the images in the input .lif file to an Antibody ID, Plate ID, and Protein name. The plugin will retrieve the well coordinate for each image contained in the .lif file and then look up Antibody ID, Plate ID, and Protein name in the table.csv file for the specific well coordinate to produce an output folder strucutre based on Antibody ID, Plate ID, and Protein name.
- The
 function is only useful for debugging the software.
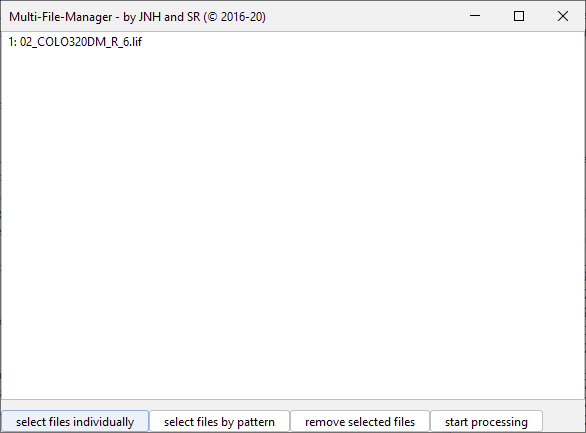
When confirming the settings dialog (and eventually also the channel-color-settings dialog), a dialog pops up that allows you to list the files you want to process. Use it to make a list of files to process. Note that you can only process files from the same plate at the same time since you can only submit one table.csv file which may contain only the information for one plate!
Next a dialog pops up asking you to select the csv file in the next dialog. Confirm this dialog.

In the next dialog select the csv file you want to provide and press "Open".

Now the plugin will automatically run and populate the output folders. Note that there can be a significant delay until you see a progress dialog informing you about progress. This delay appears when you load a big lif file (of several to 10s or 100s of GB). In that case the plugin is opening this large file during the delay, which is taking a lot of time for large files. During this delay, a console may pop up and show a lot of warnings. These warnings can just be ignored. You can minimize the console or close it. The warnings come from problems during metadata import from the .lif into the ome-xml scheme.

Ones all files are preexplored and the plugin runs you are getting informed about the status by another window showing also a progress bar and the series that have been already processes / the series that still need to be processed.

The progress dialog will let you know when it is done in a message written on the progress bar (on Windows the progress bar will turn green when the plugin has finished processing).
If the processing failed you will see a message in the progress bar alerting you about errors and you can see information about the errors in the "Notifications" list. On Windows, the progress bar also turns red when errors occur.

If you cannot conclude on the error reason based on the messages, mark the messages in the log window, copy them to the clipboard (Cmd+C on mac, Ctrl+C in windows) and paste them into an email or document and send it to the developer and ask for help (jan.hansen at scilifelab.se).
Download the new version's .jar file from the release page. Make sure FIJI is closed - if still open, close it. Next, locate the FIJI software file / folder on your computer and go on below depending on your OS.
In Windows or Linux, FIJI is a directory called FIJI.app. Enter this directory and navigate to the "plugins" folder and enter it. Find the old version of the Sp8Lif_To_Memento_JNH-X.X.X-SNAPSHOT.jar file and delete it. Then place the new plugin version in the "plugins" folder. Exit the FIJI.app folder. Start FIJI.
In Mac OS, FIJI is just a software file (FIJI.app). Right click on the FIJI icon (or hold option and do normal click on it), then select "Show Package Content". A folder will open, which contains the contents of the FIJI.app. Navigate to the "plugins" folder folder and enter it. Find the old version of the Sp8Lif_To_Memento_JNH-X.X.X-SNAPSHOT.jar file and delete it. Then place the new plugin version in the "plugins" folder . Exit the FIJI.app folder. Start FIJI.