Unified model of Semantic segmentation and Object detection for Autonomous driving
Paper Link : https://lib.dongguk.edu/search/media/url/CAT000001257272
- Python = 3.8.12
- Pytorch = 1.10.1
- Albumentation = 1.0.3
- OpenCV = 4.0.1
- NVIDIA Driver : 472.47

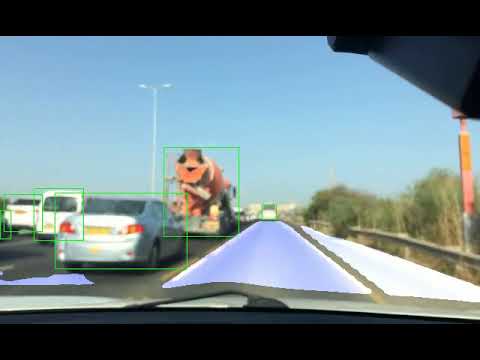
Daytime : https://www.youtube.com/watch?v=rAvok4emD-8
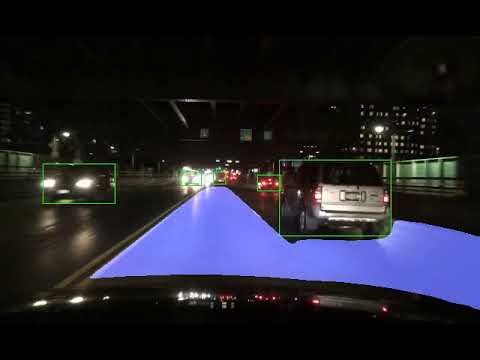
Night : https://www.youtube.com/watch?v=m36-rhSQ4cI
| Model | Size | AP(IOU=0.5) | mIoU | FPS(RTX3090) |
|---|---|---|---|---|
| YOLOP | 640x384 | 76.5 | 91.5 | 46.51 |
| USOA | 640x384 | 76.79 | 92.57 | 41.49 |
Paper Link : (https://lib.dongguk.edu/search/media/url/CAT000001257272)


0. Update Your NVIDIA Graphic Driver
1. Open Anaconda3 prompt
2. conda create -n usoa python=3.8.12
3. conda activate usoa
4. conda install pytorch==1.10.1 torchvision==0.11.2 torchaudio==0.10.1 cudatoolkit=11.3 -c pytorch -c conda-forge
5. conda install -c anaconda cudnn
6. conda install -c conda-forge albumentations
0. git clone https://github.com/tmvhs1004/USOA or Download zip, Unzip, Change folder name USOA-main to USOA
1. Download trained-weight file (File Link : https://drive.google.com/file/d/1oZSQRVQztqOmNqRiVHUy4ZPkl5XkDfLi/view?usp=sharing )
2. Move trained-weight file to './USOA/Weight/END/ ' Folder
3. Open Anaconda Prompt
4. Cd to USOA folder
5. Enter the command 'python test.py'
6. Waiting for testing time
7. Inference image is saved in './USOA/Result/output/' folder
0. git clone https://github.com/tmvhs1004/USOA or Download zip, Unzip, Change folder name USOA-main to USOA
1. Download Dataset (File Link) https://drive.google.com/file/d/1K26G7jKbrsHHoiZ6c-7QRUgo7wFfl5M6/view?usp=sharing
2. Unzip to './USOA/Data/' Folder
3. Change code line 115 at Train.py file
  train_set = './Data/Example/' -> train_set = './Data/Train_640x384_refo+w2h2/'
4. Change hyper-parameter such as 'batch size' in Config.py file
5. Open Anaconda Prompt
6. Cd to USOA folder
7. Enter the command 'python train.py'
8. Waiting for training time
9. The weight file is saved in './USOA/Weight/' folder
0. git clone https://github.com/tmvhs1004/USOA or Download zip, Unzip, Change folder name USOA-main to USOA
1. Download Dataset (File Link : https://drive.google.com/file/d/1Zhe58ERgCIkw9yzQRTR9fmGg7U0EzNuu/view?usp=sharing )
2. Unzip to './USOA/Data/' Folder
3. Change code line 145 at Test.py file
  test_set = './Data/Example/' -> test_set = './Data/Test_640x384_refo/'
4. Download trained-weight file (File Link : https://drive.google.com/file/d/1oZSQRVQztqOmNqRiVHUy4ZPkl5XkDfLi/view?usp=sharing )
5. Move trained-weight file to './USOA/Weight/END/ ' Folder
6. Change hyper-parameter such as 'batch size' in Config.py file
7. Open Anaconda Prompt
8. Cd to USOA folder
9. Enter the command 'python test.py'
10. Waiting for testing time
11. Inference image is saved in './USOA/Result/output/' folder