Chest X-Ray Classification for Pneumonia, COVID-19, and Tuberculosis
This repository hosts an ML-powered chest X-ray diagnosis platform (XAD) that detects pneumonia, COVID-19, tuberculosis, or normal cases using deep learning models like ResNet50, VGG16, DenseNet, and a custom CNN. Designed for rapid, automated screening, the system aids in early disease detection with high accuracy.
| Timesheet | Slack channel | Project report |
|---|
- Timesheet: Excel Timesheet containing our individual hours.
- Slack channel: Slack project channel that we utilized for our project.
- Project report: Overleaf project report document that we submitted as part of the project.
A minimal example to showcase your work

What files are found where
repository/
├── src/                     # Source code and model scripts
│   ├── app.py               # Entry point for the Flask web app
│   ├── resnet50.py          # ResNet50 model training and saving
│   ├── densenet.py          # DenseNet model with regularization
│   ├── vgg16_training.py    # VGG16 model setup and training
│   ├── cnnmodel.py          # Custom CNN model architecture
│   ├── static/              # Static files (e.g. CSS)
│   │   └── css/
│   │       └── style.css
│   └── templates/           # HTML templates for Flask
│       ├── index.html
│       └── result.html
|     ├── Models/                   # Pretrained or newly trained model files (.h5/.pth)
│        ├── resnet_model.pth
│        ├── vgg16_model.pth
│        ├── densenet_model.pth
│        └── ...
├── RawData/                 # Raw datasets (manually downloaded)
├── preprocessed_data/       # Output from results.ipynb after cleaning
├── results.ipynb            # Jupyter notebook to clean & prepare data
├── requirements.txt         # Python dependencies for app.py
└── README.md # Project documentation (you are here)🛑 Python 3.13 is not officially supported (issues with Pytorch and other dependencies). Please use Python 3.11 or below (greater than 3.7) to avoid potential compatibility issues.
⚠️ If you would like to train the models yourself, you will need the dataset — see the note at the end of this section.
git clone https://github.com/sfu-cmpt340/XRAY_CLASSIFIER.git
cd XRAY_CLASSIFIERpython -m venv venv
source venv/bin/activate # On Windows: venv\Scripts\activate
pip install -r requirements.txtDownload the pretrained models from OneDrive:
🔗 Click to Download Models
Create a folder named Models in the src directory (src should have a folder called Models) of the repository and place all the .h5 and .pth model files inside.
cd src
python app.py
Visit http://127.0.0.1:5000 for Web Frontend
To run the project end-to-end (including training or testing with your own data), you must manually download the raw datasets and process them before use. Next section covers the end-to-end process.
To reproduce the full pipeline from data preprocessing to inference, follow the steps below:
- Download all 3 datasets and place them inside a folder named
RawData/in the root of the project. 🔗 Click to Download Datasets
In case you want to download the already cleaned dataset, obtained after executing results.ipynb, you can download it here, 🔗 Click to Download Cleaned Datasets
- Run the notebook
results.ipynbto clean and preprocess the data.
🧪
results.ipynbhas additional dependencies not listed inrequirements.txt, such asjupyter,seaborn, andtqdm. w We recommend creating a separate environment or manually installing these extras if you're working with the data processing notebook.
This will generate a new folder called preprocessed_data/ containing the formatted datasets used by the models.
You can run the notebook using:
jupyter notebook results.ipynbRun the results.ipynb notebook to clean and combine the raw datasets. This will generate the preprocessed_data/ directory containing the final dataset used for training and evaluation.
jupyter notebook results.ipynbIf you'd like to train your own models or evaluate them on the preprocessed dataset, you can do so by running the individual model scripts provided:
python resnet50.py
python densenet.py
...
Each script will train the respective model and output a .h5 or .pth file
Once training is complete, create a folder named Model/ in the root directory and move all the trained .h5 and .pth files into it:
xray-ai-diagnostics/
|── src
|     ├── Models/
│        ├── resnet_model.pth
│        ├── vgg16_model.pth
│        ├── densenet_model.pth
│        └── ...
⚠️ The Flask web app expects these model files to be present inside the Model/ folder. Without them, prediction will not work.
You can then proceed to run the web application using:
cd src
python app.py
Visit http://127.0.0.1:5000 for Web Frontend
- Use git
- Do NOT use history re-editing (rebase)
- Commit messages should be informative:
- No: 'this should fix it', 'bump' commit messages
- Yes: 'Resolve invalid API call in updating X'
- Do NOT include IDE folders (.idea), or hidden files. Update your .gitignore where needed.
- Do NOT use the repository to upload data
- Use VSCode or a similarly powerful IDE
- Use Copilot for free
- Sign up for GitHub Education
DOWNLOAD THE PRE-TRAINED MODELS HERE: 🔗 Click to Download
📂 DOWNLOAD THE DATASET HERE: 🔗 Click to Download
REQUIREMENTS.TXT CONTAINS ALL THE MODULES NEEDED TO RUN THE CODE, SIMPLY EXECUTE: pip install -r requirements.txt
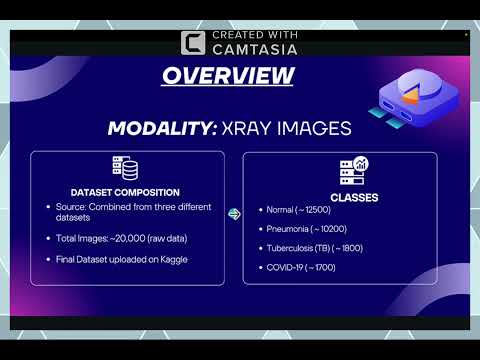
For the data, first download the 3 datasets stored under /RawData from here. The final folder structure should resemble the below, and then you can run /src/results.ipynb to clean and prepare the data, after which it will be stored under a folder called /preprocessed_data:
📦RawData
┣ 📂dataset1
┃ ┣ 📂COVID
┃ ┃ ┣ 📜COVID.png
┃ ┃ ┣ 📜COVID_10.png
┃ ┃ ┣ .....
┃ ┣ 📂NORMAL
┃ ┃ ┣ 📜NORMAL.png
┃ ┃ ┣ 📜NORMAL_10.png
┃ ┃ ┣ .....
┃ ┗ 📂PNEUMONIA
┃ ┃ ┣ 📜PNEUMONIA.png
┃ ┃ ┣ 📜PNEUMONIA_10.png
┃ ┃ ┣ .....
┣ 📂dataset2
┃ ┗ 📂all_images
┃ ┃ ┣ 📂Normal
┃ ┃ ┃ ┣ 📜CHNCXR_0001_0.png
┃ ┃ ┃ ┣ 📜CHNCXR_0002_0.png
┃ ┃ ┃ ┣ .....
┃ ┃ ┣ 📂Pneumonia
┃ ┃ ┃ ┣ 📜BACTERIA-1008087-0001.jpeg
┃ ┃ ┃ ┣ 📜BACTERIA-1025587-0001.jpeg
┃ ┃ ┃ ┣ .....
┃ ┃ ┣ 📂Tuberculosis
┃ ┃ ┃ ┣ 📜CHNCXR_0327_1.png
┃ ┃ ┃ ┣ 📜CHNCXR_0328_1.png
┃ ┃ ┃ ┣ .....
┃ ┃ ┗ 📂universal_test
┃ ┃ ┃ ┣ 📂Normal
┃ ┃ ┃ ┃ ┣ 📜CHNCXR_0153_0.png
┃ ┃ ┃ ┃ ┣ 📜CHNCXR_0158_0.png
┃ ┃ ┃ ┃ ┣ .....
┃ ┃ ┃ ┣ 📂Pneumonia
┃ ┃ ┃ ┃ ┣ 📜BACTERIA-1083680-0012.jpeg
┃ ┃ ┃ ┃ ┣ 📜BACTERIA-1351146-0002.jpeg
┃ ┃ ┃ ┃ ┣ .....
┃ ┃ ┃ ┗ 📂Tuberculosis
┃ ┃ ┃ ┃ ┣ 📜CHNCXR_0333_1.png
┃ ┃ ┃ ┃ ┣ 📜CHNCXR_0365_1.png
┃ ┃ ┃ ┃ ┣ .....
┗ 📂dataset3
┃ ┗ 📂chest_xray
┃ ┃ ┣ 📂test
┃ ┃ ┃ ┣ 📂NORMAL
┃ ┃ ┃ ┃ ┣ 📜IM-0001-0001.jpeg
┃ ┃ ┃ ┃ ┣ 📜IM-0003-0001.jpeg
┃ ┃ ┃ ┃ ┣ .....
┃ ┃ ┃ ┗ 📂PNEUMONIA
┃ ┃ ┃ ┃ ┣ 📜person100_bacteria_475.jpeg
┃ ┃ ┃ ┃ ┣ 📜person100_bacteria_477.jpeg
┃ ┃ ┃ ┃ ┣ .....
┃ ┃ ┣ 📂train
┃ ┃ ┃ ┣ 📂NORMAL
┃ ┃ ┃ ┃ ┣ 📜IM-0115-0001.jpeg
┃ ┃ ┃ ┃ ┣ 📜IM-0117-0001.jpeg
┃ ┃ ┃ ┃ ┣ .....
┃ ┃ ┃ ┗ 📂PNEUMONIA
┃ ┃ ┃ ┃ ┣ 📜person1000_bacteria_2931.jpeg
┃ ┃ ┃ ┃ ┣ 📜person1000_virus_1681.jpeg
┃ ┃ ┃ ┃ ┣ .....
┃ ┃ ┗ 📂val
┃ ┃ ┃ ┣ 📂NORMAL
┃ ┃ ┃ ┃ ┣ 📜NORMAL2-IM-1427-0001.jpeg
┃ ┃ ┃ ┃ ┣ 📜NORMAL2-IM-1430-0001.jpeg
┃ ┃ ┃ ┃ ┣ .....
┃ ┃ ┃ ┗ 📂PNEUMONIA
┃ ┃ ┃ ┃ ┣ 📜person1946_bacteria_4874.jpeg
┃ ┃ ┃ ┃ ┣ 📜person1946_bacteria_4875.jpeg
┃ ┃ ┃ ┃ ┣ .....