


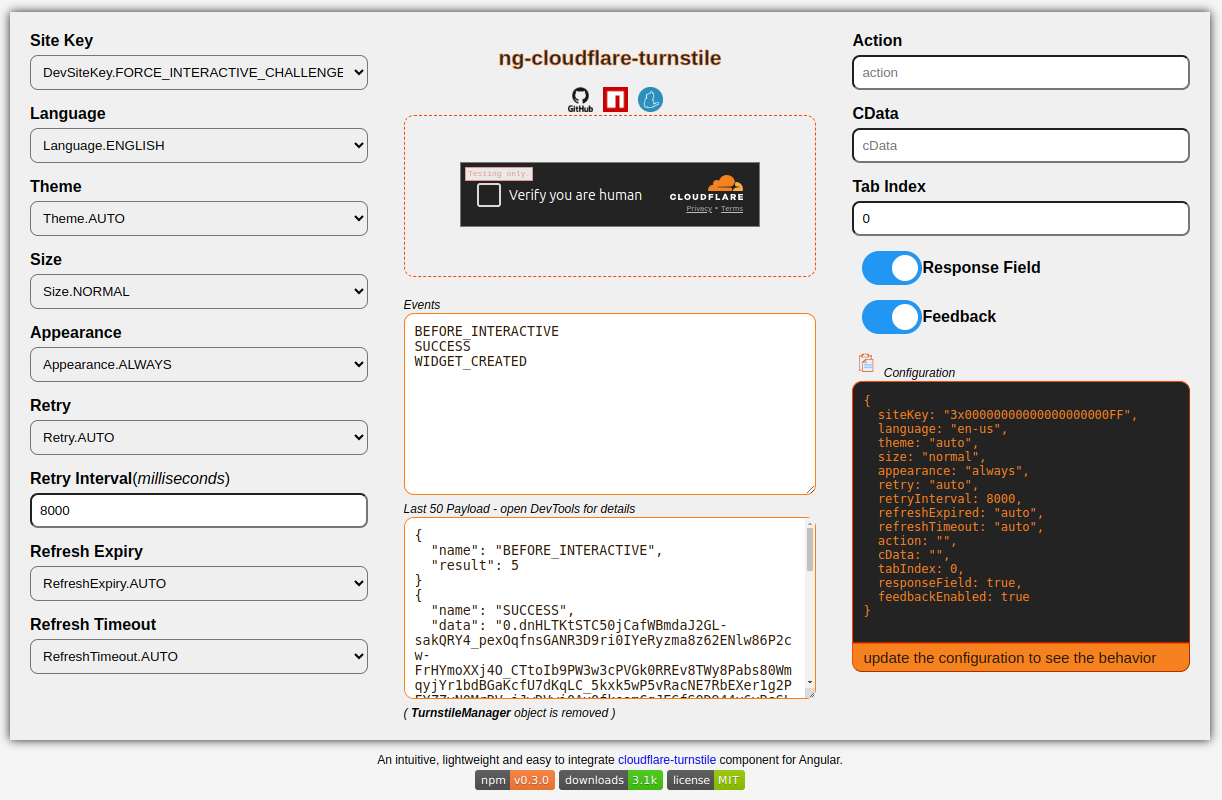
An intuitive, lightweight and easy to integrate cloudflare-turnstile component for Angular.
- This a full implementation of cloudflare-turnstile for Angular.
- All properties and callbacks + other utilities are available for an easier integration.
npm i @pangz/ng-cloudflare-turnstileIn the logic class (i.e.)example.component.ts, add the following.
import {
    NgCloudflareTurnstileComponent,
    Config,
    Result
} from 'ng-cloudflare-turnstile';

@Component({
    ...
    imports: [NgCloudflareTurnstileComponent],
    ...
})Add the widget configuration and the event listener.
( You need to get your own siteKey from the cloudflare dashboard. See below to use a development siteKey for testing. )
export class ExampleComponent {
    config: Config = {
        siteKey: XXXXXXXXXXXXXXXXXXXXXXXXXXX,
    }

    //Name can be anything. Make sure the parameter is of the correct type.
    eventHandler(d: Result): void { console.log(d); }
}In the template or view file (i.e.)example.component.html, add the turnstile component.
<ng-cloudflare-turnstile [config]="config" (event)="eventHandler($event)"></ng-cloudflare-turnstile>import {
NgCloudflareTurnstileComponent,
Config,
Result
} from 'ng-cloudflare-turnstile';
@Component({
...
imports: [NgCloudflareTurnstileComponent],
template: `<ng-cloudflare-turnstile [config]="config" (event)="eventHandler($event)"></ng-cloudflare-turnstile>`
...
})
export class ExampleComponent {
config: Config = {
siteKey: XXXXXXXXXXXXXXXXXXXXXXXXXXX,
}
eventHandler(d: Result): void { console.log(d); }
}That's all you need to have a working turnstile.
You can use the cloudflare test siteKeys if you don't have yours yet alternatively.
Note that these are test keys especially used for development.
( Make sure to get your own when you decide to put it in production. )
- DevSiteKey.ALWAYS_PASSES
- DevSiteKey.ALWAYS_BLOCKS
- DevSiteKey.ALWAYS_PASSES_INVISIBLE
- DevSiteKey.ALWAYS_BLOCKS_INVISIBLE
- DevSiteKey.FORCE_INTERACTIVE_CHALLENGEWhen challenge is successful, a success token is provided. This can be obtained from either the onSuccess callback or the eventHandler.
You must verify the token from the server side to prove it's validity and more importantly to complete the process from the cloudflare dashboard.
( see here for ways to verify )
config: Config = {
    onSuccess: (d: Result): void => {
        const token = d.data;
        // send to backend (together with your data) to verify
    },
}

eventHandler(d: Result): void {
    switch (d.result) {
        case State.SUCCESS:
            const token = d.data;
            // send to backend (together with your data) to verify
            break;
        default: console.log("Unknown event");
    }
}
Note that you need a secretKey to verify the token from your server. This usually comes in pair when you generate from cloudflare dashboard.
There are test tokens that are also available for development used. Feel free to try one.
ALWAYS_PASSES = '1x0000000000000000000000000000000AA',
ALWAYS_FAILS = '2x0000000000000000000000000000000AA',
TOKEN_ALREADY_SPENT = '3x0000000000000000000000000000000AA',You might wanna do something when a particular event is triggered.
One way to do this is to check each state then add the logic that's specific for each state of events.
eventHandler(d: Result): void {
    console.log(d);
    switch (d.result) {
        case State.WIDGET_CREATED: console.log("WIDGET_CREATED");break;
        case State.WIDGET_RESET: console.log("WIDGET_RESET"); break;
        case State.WIDGET_REMOVED: console.log("WIDGET_REMOVED"); break;
        case State.SUCCESS: console.log("SUCCESS"); break;
        case State.BEFORE_INTERACTIVE: console.log("BEFORE_INTERACTIVE"); break;
        case State.AFTER_INTERACTIVE: console.log("AFTER_INTERACTIVE"); break;
        case State.ERROR: console.log("ERROR"); break;
        case State.EXPIRED: console.log("EXPIRED"); break;
        case State.TIMEOUT: console.log("TIMEOUT"); break;
        default: console.log("Unknown event");
    }
}
Apart from the eventHandler, widget configuration enables you to add logic to events using callbacks.
config: Config = {
    onSuccess: (_: Result): void => {},
    onError: (_: Result): void => {},
    onExpired: (_: Result): void => {},
    onBeforeInteractive: (_: Result): void => {},
    onAfterInteractive: (_: Result): void => {},
    onTimeout: (_: Result): void => {},
    onCreate: (_: Result): void => {},
    onReset: (_: Result): void => {},
    onRemove: (_: Result): void => {},
}
For normal cases, you might use 2 to 3 of these callbacks at most. Configuration callbacks can be used for cases where you need to isolate your logic to have a better organization and readbility of your implementation. ( see here for details. )
| Built-in Callback | Config Callback | States |
|---|---|---|
callback |
onSuccess |
State.SUCCESS |
error-callback |
onError |
State.ERROR |
expired-callback |
onExpired |
State.EXPIRED |
before-interactive-callback |
onBeforeInteractive |
State.BEFORE_INTERACTIVE |
after-interactive-callback |
onAfterInteractive |
State.AFTER_INTERACTIVE |
timeout-callback |
onTimeout |
State.TIMEOUT |
Built-in callbacks might be enough for most cases but there are configuration that might be tricky especially when manual rendering is involved.
For example, when retry is set to never, when an error occurred, you code might be left hanging and might not able to respond in a straight-forward way.
A couple of new events are made available which can also be listened to during the widget's lifetime. Due to the nature of manual rendering, these extra callbacks (paired with the TurnstileManager) becomes handy allowing finer control over managing the widgets's life-cycle enabling you to respond accordingly when certain events ( that matter ) occurred.
| Built-in Callback | Config Callback | States | Call Timing |
|---|---|---|---|
- |
onCreate |
State.WIDGET_CREATED |
After the render method is called |
- |
onReset |
State.WIDGET_RESET |
After the reset method is called |
- |
onRemove |
State.WIDGET_REMOVED |
After the remove methid is called |
You might be wondering, "what are the possible ways to handle cases where you need to rerender or remove a widget"? What's there to use?
Introducing - the TurnstileManager.
TurnstileManager provides reRender, reset and remove methods. TurnstileManager object can be obtained from the eventHandler or from built-in and library-level-callbacks result using the manager key.
For example:
eventHandler(d: Result): void {
    d.manager.reRender();
}
or
onTimeout: (d: Result): void => {
    d.manager.remove();
}
These class and callbacks gives you more flexibility when widget is configured to be rendered manually.
Cloudflare turnstile offers various configuration options to meet your needs.
The following are configurations and library-provided classes you can use to customize the behavior of your widget.
{
    siteKey: '',
    action: '',
    cData: '',
    tabIndex: 0,
    language: Language.AUTO,
    theme: Theme.AUTO,
    size: Size.NORMAL,
    appearance: Appearance.ALWAYS,
    retry: Retry.AUTO,
    retryInterval: 8000,
    refreshExpired: RefreshExpiry.AUTO,
    refreshTimeout: RefreshTimeout.AUTO,
    responseField: true,
    feedbackEnabled: true,
    onSuccess: (_: Result): void => {},
    onError: (_: Result): void => {},
    onExpired: (_: Result): void => {},
    onBeforeInteractive: (_: Result): void => {},
    onAfterInteractive: (_: Result): void => {},
    onTimeout: (_: Result): void => {},
    onCreate: (_: Result): void => {},
    onReset: (_: Result): void => {},
    onRemove: (_: Result): void => {},
};Complete list of classes and types.
import {
    NgCloudflareTurnstileComponent,
    Config,
    Result,
    DevSiteKey,
    Language,
    Theme,
    Size,
    Appearance,
    Retry,
    RefreshExpiry,
    RefreshTimeout,
    State,
    TurnstileManager
} from 'ng-cloudflare-turnstile';
Please leave a 🌠star if you support, love, like, or simply felt this made your life easier.
You can visit the ng-cloudflare-turnstile playground to try how each configuration works.
(source)
- Client Configuration : https://developers.cloudflare.com/turnstile/get-started/client-side-rendering/
- Error Codes : https://developers.cloudflare.com/turnstile/troubleshooting/client-side-errors/error-codes/
- Cloudflare Repo : https://github.com/cloudflare
Creating and maintaining a high-quality library is a labor of love that takes countless hours of coding, debugging, and community interaction. If this library has made your development easier, saved you time, or added value to your projects, consider supporting its ongoing growth and maintenance. Your contributions directly help keep this project alive, up-to-date, and evolving.
Every donation, no matter the size, goes a long way in motivating the developer to dedicate time and energy to improving the library. With your support, We can continue fixing bugs, adding new features, and providing documentation and support for the community. By donating, you’re not just saying “thank you” for the work done so far—you’re investing in the library's future and helping it remain a reliable tool for developers worldwide.
Let’s make this library even better, together! Consider donating to show your appreciation and ensure the continued development of this project. Your generosity fuels innovation and sustains the open-source ecosystem we all benefit from. Thank you for your support! 🍻

Verus ID :
pangz@
VRSC :
RNrhRTq8ioDTrANrm52c9MfFyPKr3cmhBj
vARRR : RWCNjDd2HNRbJMdsYxN8ZDqyrS9fYNANaR
vDEX : RWCNjDd2HNRbJMdsYxN8ZDqyrS9fYNANaR
KMD : RWCNjDd2HNRbJMdsYxN8ZDqyrS9fYNANaR
BTC : 3MsmELpB8bsYvFJCYKrUpMuoBATVR5eeta
ETH : 0xa248d188725c3b78af7e7e8cf4cfb8469e46cf3b
This library is released under the MIT License.