- The Hive Wallet MetaMask Snap is a MetaMask Snap that enables secure Hive blockchain interactions directly through your MetaMask wallet.
- The primary goal is to allow you to sign Hive transactions using keys derived from your MetaMask wallet's seed phrase.
The Snap offers the following features:
- Derive Hive keys from MetaMask wallet.
- Sign Hive transactions securely.
- Encode / decode buffer using derived Hive keys.
- Provides no private key exposure.
The project places a strong emphasis on security.
To meet MetaMask requirements, it was analyzed by one of MetaMask-approved auditors: Hacken and result in report: Hive Snap audit.pdf
- Keys are derived only when needed and immediately cleared from memory after usage.
- No network requests are made by the Snap.
- Input validation is performed on all transaction data.
- No sensitive data is stored in browser storage.
We came for the honey, stayed for the decentralization
This should be a start point for the majority of non-technical Hive users. Follow this guideline to start using official release of Hive Wallet in MetaMask!
If you prefer watching the video, over the text documentation, we created a simple presentation on how to use Hive Bridge - official dApp, integrating multiple wallets (including MetaMask) to operate on the Hive blockchain:

-
Install MetaMask extension for your browser and configure it, if you have not done it already
-
Navigate to our official dApp
-
Click "Connect your wallet now"

-
Next, install our Snap

-
Navigate to the window opened by MetaMask, review and accept the Third-party software notice, which informs the user that this snap was developed a third party team, in this case Hive Community, and not by Consensys:

-
Now you can connect to the npm registry in order to retrieve our official Snap distribution:
-
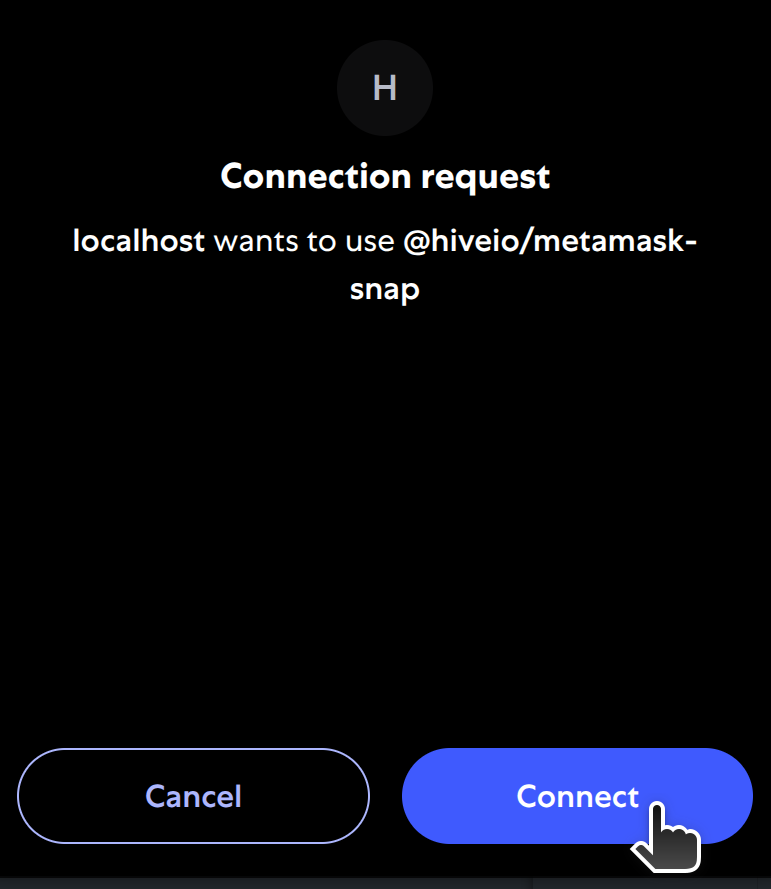
Review permissions carefully and Confirm in order to connect to our dApp:

-
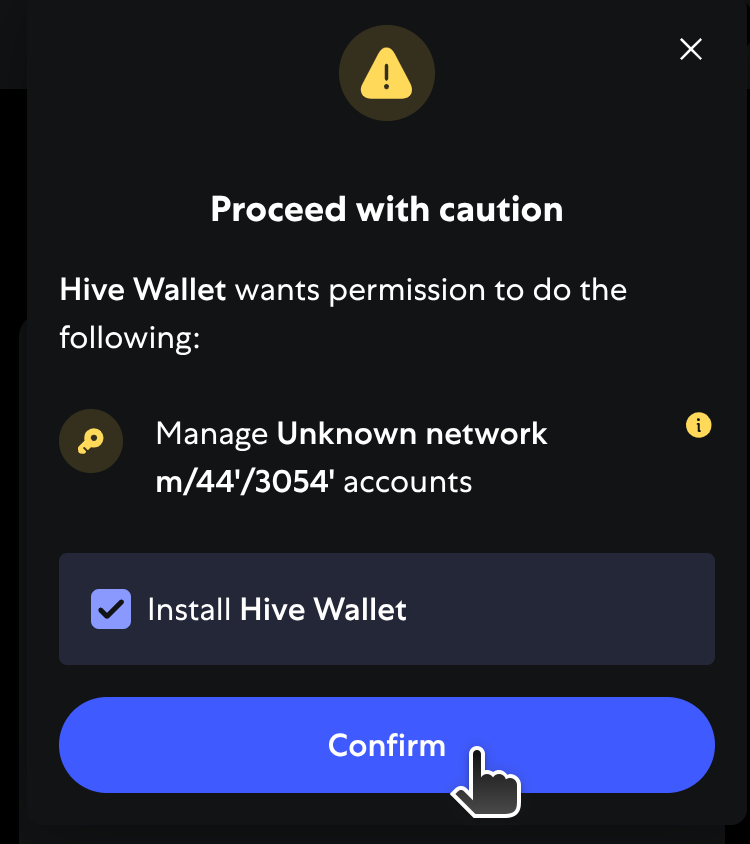
Some permissions require extra consideration, which MetaMask highlights during the installation. Review and accept the warning statement by clicking "Confirm".
-
You have completed the installation of the Hive Wallet MetaMask Snap! Please click "OK" to proceed to the final screen in the installation.

-
Now when you have succesfully connected to the MetaMask, and have Hive Wallet on board, the system will check if there is any account connected to the public keys derived from your Hive Wallet.
-
Creating a new Hive account has never been so easy! You should be now prompted with a few possible decisions to make and in this step, we will cover the first one, which is: "Request account creation". Please click on the button:

-
Now, just enter the new name for your new Hive account, copy the link and send it to your friend! (See I want to process account creation request)

-
If you already own a Hive account and want to update your account to use MetaMask, click on "Update account authority" when prompted:

-
Now, provide your account name, select the authority level(s) you want to update, and copy the signing link in order to update your account in a fast, user-friendly way. You can also copy entire transaction in JSON form, if you prefer to do it manually or in your own, safe, offline environment:

-
After that, you can login to our dApp using any other way, like Keychain or PeakVault and update your authority:

-
Now, you can re-check for Hive accounts and process with connecting Hive account with imported MetaMask derived keys
-
We are happy to hear that! If your derived keys are already used by any Hive account, just select it from the list, or enter the account name directly and click "Import":

-
Congratulations! You have succesfully connected your Hive account with MetaMask! You can now sign transaction, encode & decode messages and many more! Remember to tell your friends about Hive MetaMask integration!

-
Another day, another bee... 🐝 - Let's process your friend's request to join our wonderful Hive community! It is as simple as just entering the URL, you have received and choosing from account creation type (default - paid, or claimed) with optional VESTS delegation:

-
Congratulations! You hear that buzzing? Yeah, it’s not going away
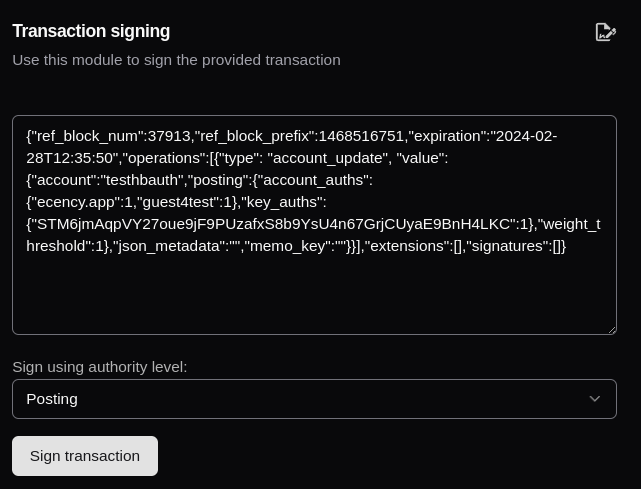
You can also use the MetaMask integration in our dApp for transaction signing. You can sign using different authority levels, which are automatically selected from the transaction provided in the API JSON form. Here is a simple tutorial on how to sign & broadcast the transaction:
-
Navigate to Transaction signing from the left menu

-
Paste the transaction in API JSON form to the editable textarea and click "Sign transaction" whenever you are ready for signing:
-
Review the transaction and approve if valid:

-
Now, there should be a signed transaction below the "Sign transaction" button. You can either copy the signed transaction or broadcast it directly to the blockchain, using: "Broadcast signed transaction":

Hive Bridge provides a user-friendly interface for encrypting and decrypting memos, ensuring your private messages on the Hive blockchain remain secure. This feature is accessible via the "Memo encryption" section in the dApp.

Memo encryption allows you to send confidential messages on the Hive blockchain. Only the intended recipient can decrypt and read the message, as it is encrypted using public-key cryptography. This is especially useful for sending sensitive information, such as private notes or payment references.
-
Navigate to the "Memo encryption" section and choose the "Encrypt" tab.

-
Enter the Message and Recipient
- Input the text you wish to encrypt.
- Specify the recipient. You can enter:
- A Hive username (the system will use their memo public key).
- Any valid Hive public key.
- Your own public key (by selecting "Use my memo key").

-
Click the "Encrypt" button. The dApp will prompt MetaMask to sign and approve the encryption operation.
-
Carefully review the content and recipient details. Approve the operation in MetaMask to proceed.

-
After approval, the encrypted memo will be displayed below the "Encrypt" button. Copy this content and share it with the intended recipient.

Note: The encrypted memo will be in the standard Hive format, starting with #. Only the recipient with the correct private key can decrypt it.
-
Switch to the "Decrypt" tab in the "Memo encryption" section.

-
Enter the encrypted content (must start with
#) into the provided field.
-
Click the "Decrypt" button. MetaMask will prompt you to approve the decryption operation using your derived Hive memo key.
-
Review the content and the key being used for decryption. Approve the operation in MetaMask.

-
After approval, the decrypted message will be shown below the "Decrypt" button.

- Node.js >= 20.18.1.
- pnpm = 10.0.0.
- MetaMask Flask (Important: You cannot have other versions of MetaMask installed).
Clone the repository and its submodules: git clone --recurse-submodules https://gitlab.syncad.com/openhive-network/metamask-snap.
The project structure includes:
├── src/                   # Source code
│   ├── assets/            # Snap assets, e.g. icons
│   ├── hive/              # Hive libraries configuration functions
│   ├── index.ts           # Main Snap entry point
│   ├── rpc.ts             # RPC method types
│   ├── snap/              # RPC method handlers code
│ └── priviledged-apis/ # Only part in Snap's code where we use Bip44 entropy functions- Install dependencies:
pnpm install --ignore-scripts --frozen-lockfile.
- Build the Snap:
pnpm build. - Lint the project:
pnpm lint. - Run tests:
pnpm test.
- Install MetaMask Flask.
- Run
pnpm start. - Connect to the MetaMask, by hosting your own version of the dApp and using
local:http://localhost:8080as the Snap's source. - Install the Snap using the dApp.
- Approve the requested permissions.
- Use the Snap to sign Hive transactions, encrypt/decrypt buffers, and retrieve your underlying public keys.
Contributions to the project are welcome. Please follow these steps:
- Create a feature branch.
- Commit your changes.
- Push to your branch.
- Open a Pull Request.
- Follow TypeScript strict mode guidelines.
- If new feature has been added, you also need to add specific regression tests to the proper suite, or create a new one if new method is added.
- Ensure all tests pass.
- Do not use deprecated functions, browser APIs, or objects not available in the MetaMask secure sandboxed environment.
- Use strong typing. Do not use
anytype and avoid usingunknown. - Update documentation as needed. This includes in-code documentation, this file and any other documentation means if applicable.
- Ensure snapper passes:
pnpm prebuild. - Ensure linter passes:
pnpm lint. - Ensure no changes were made to the dependencies if not needed -
pnpm-lock.yamlshould not change.
The project is covered under the MIT License.