Decentralized applications (dApps) use a blockchain or on-chain smart contracts to store and reference data, rather than relying on traditional centralized databases. A common, simple dApp structure generally consists of a React.js or Vue.js front-end using Web3.js or Ethers.js to interact with smart contracts deployed to an EVM-compatible blockchain.
In this tutorial, you will learn how to create a dApp for minting NFTs on the CORE network.
Mint NFT: Learn how to mint new NFTs. This includes creating unique tokens, assigning metadata, and interacting with smart contracts to register NFTs on the CORE blockchain.Get NFTs: Find out how to get and view minted NFTs. Users will be able to view the details of their NFTs, including metadata and unique properties of each token, directly from the dApp.
- Git v2.44.0
- Node.js v20.11.1
- npm v10.2.4
- Hardhat v10.2.4
- MetaMask Web Wallet Extension
-
Download this repository
-
Install dependencies in the route /contract.
npm install-
Install and configure MetaMask Chrome Extension to use with Core Testnet. Refer here for a detailed guide.
-
Create a secret.json file in the /contract folder and store the private key of your MetaMask wallet in it. Refer here for details on how to get MetaMask account's private key. Example:
{"PrivateKey":"ef1150b212a53b053a3dee265cb26cd010065b9340b4ac6cf5d895a7cf39c923"}:::caution
Do not forget to add this file to the .gitignore file in the root folder of your project so that you don't accidentally check your private keys/secret phrases into a public repository. Make sure you keep this file in an absolutely safe place!
:::
- Copy the following into your
hardhat.config.jsfile in /contract
/**
 * @type import('hardhat/config').HardhatUserConfig
 */


require('@nomiclabs/hardhat-ethers');
require("@nomiclabs/hardhat-waffle");


const { PrivateKey } = require('./secret.json');


module.exports = {
   defaultNetwork: 'testnet',


   networks: {
      hardhat: {
      },
      testnet: {
         url: 'https://rpc.test.btcs.network',
         accounts: [PrivateKey],
         chainId: 1115,
      }
   },
   solidity: {
      compilers: [
        {
           version: '0.8.24',
           settings: {
            evmVersion: 'paris',
            optimizer: {
                 enabled: true,
                 runs: 200,
              },
           },
        },
      ],
   },
   paths: {
      sources: './contracts',
      cache: './cache',
      artifacts: './artifacts',
   },
   mocha: {
      timeout: 20000,
   },
};- Inside the /contract/contracts folder is the NFTCollection.sol file which will contain the smart contract code to be used for this tutorial.
// SPDX-License-Identifier: MIT
pragma solidity ^0.8.0;

import "@openzeppelin/contracts/utils/Base64.sol";
import "@openzeppelin/contracts/token/ERC721/extensions/ERC721URIStorage.sol";
import "@openzeppelin/contracts/access/Ownable.sol";
import "@openzeppelin/contracts/utils/Counters.sol";

contract NFTCollection is ERC721URIStorage, Ownable {
    using Counters for Counters.Counter;
    Counters.Counter private _tokenIds;

    struct TokenURI {
        string tokenURI;
        string image;
    }

    struct NFTItem {
        string name;
        string description;
        string imageURI;
    }

    mapping(uint256 => NFTItem) private _tokenDetails;

    constructor() ERC721("NFTCollection", "NFTC") Ownable() {}

    function mintNFT(
        string memory name,
        string memory description,
        string memory imageURI
    ) public onlyOwner returns (uint256) {
        require(bytes(name).length > 0, "Name is required");
        require(bytes(description).length > 0, "Description is required");
        require(bytes(imageURI).length > 0, "Image URI is required");

        uint256 newItemId = _tokenIds.current();
        _mint(msg.sender, newItemId);

        TokenURI memory tokenURI = generateTokenURI(
            name,
            description,
            imageURI
        );

        _tokenDetails[newItemId] = NFTItem({
            name: name,
            description: description,
            imageURI: imageURI
        });

        _setTokenURI(newItemId, tokenURI.tokenURI);

        _tokenIds.increment();
        return newItemId;
    }

    function getTokenDetails(uint256 tokenId)
        public
        view
        returns (NFTItem memory)
    {
        require(_hasToken(tokenId), "Token does not exist");
        return _tokenDetails[tokenId];
    }

    function getNFTsByPage(uint256 page, uint256 pageSize)
        public
        view
        returns (NFTItem[] memory)
    {
        require(page > 0, "Page number should be greater than 0");
        uint256 startIndex = (page - 1) * pageSize;
        uint256 endIndex = startIndex + pageSize;
        uint256 totalItems = _tokenIds.current();

        if (endIndex > totalItems) {
            endIndex = totalItems;
        }

        require(startIndex < totalItems, "Page number out of range");

        NFTItem[] memory items = new NFTItem[](endIndex - startIndex);
        for (uint256 i = startIndex; i < endIndex; i++) {
            items[i - startIndex] = _tokenDetails[i];
        }

        return items;
    }

    function _hasToken(uint256 tokenId) internal view returns (bool) {
        try this.ownerOf(tokenId) returns (address) {
            return true;
        } catch {
            return false;
        }
    }

    function generateTokenURI(
        string memory name,
        string memory description,
        string memory image
    ) internal pure returns (TokenURI memory) {
        string memory json = string(
            abi.encodePacked(
                '{"name": "',
                name,
                '", "description": "',
                description,
                '", "image": "',
                image,
                '"}'
            )
        );

        string memory base64Json = Base64.encode(bytes(json));

        string memory tokenURI = string(
            abi.encodePacked("data:application/json;base64,", base64Json)
        );

        TokenURI memory tokenURIStruct = TokenURI(tokenURI, image);

        return tokenURIStruct;
    }
}The NFTCollection smart contract is designed to manage a collection of non-fungible tokens (NFTs) on the CORE network. It utilizes OpenZeppelin libraries to facilitate standard ERC721 functionalities and token URI management.
-
Imports:
Base64: For encoding the JSON data of the token URI in base64.ERC721URIStorage: An ERC721 extension that allows storing a URI for each token.Ownable: Provides access control for functions that only the owner can execute.Counters: Used to generate unique IDs for tokens.
-
Data Structures:
TokenURI: Stores the base64-encoded URI and the associated image of the token.NFTItem: Contains details about each NFT, including name, description, and image URI.
-
State Variables:
_tokenIds: Counter to manage token numbering._tokenDetails: Mapping that associates a token ID with its corresponding details.
-
Main Functions:
mintNFT(string memory name, string memory description, string memory imageURI): Allows the contract owner to mint a new NFT with a name, description, and image URI. Returns the ID of the newly minted token.getTokenDetails(uint256 tokenId): Allows querying the details of a specific token given its ID.getNFTsByPage(uint256 page, uint256 pageSize): Returns a paginated list of NFTs. The page and pageSize parameters allow specifying which page of results to retrieve and the number of items per page, respectively.
- To compile the
NFTCollectionsmart contract defined in theNFTCollection.sol, from the /contract directory run the following command. (Every time a change is made to the contract code we must recompile it).
npx hardhat compile-
Before deploying your smart contract on the Core Chain, it is best adviced to first run a series of tests making sure that the smart contract is working as desired. Refer to the detailed guide here for more details.
-
Create a
scriptsfolder in the /contract directory of your project. Inside this folder, create a filedeploy.js; paste the following script into it.
async function main() {
  const [deployer] = await ethers.getSigners();

  console.log("Deploy contract with the account:", deployer.address);

  const NFTCollection = await ethers.getContractFactory("NFTCollection");

  const nftCollection = await NFTCollection.deploy();

  console.log("Contract Address:", nftCollection.address);
}

main()
  .then(() => process.exit(0))
  .catch((error) => {
    console.error(error);
    process.exit(1);
});-
Make sure your MetaMask wallet has tCORE test tokens for the Core Testnet. Refer here for details on how to get tCORE tokens from Core Faucet.
-
Run the following command from the root directory of your project, to deploy your smart contract on the Core Chain.
npx hardhat run scripts/deploy.js- In the root folder, install all the dependencies.
npm install-
In the path src/contractABI we must copy the abi of our smart contract in the case of making modifications, this information will be obtained from contract/artifacts/contracts/NFTCollection.json.
-
Once the smart contract is deployed, it is necessary to copy the address and replace it in each of the components where we make calls to the contract, in this case in src/components/Mint.tsx and src/components/Get.tsx
-
To test if things are working fine, run the application by using the following command. This will serve applciation with hot reload feature at http://localhost:5173
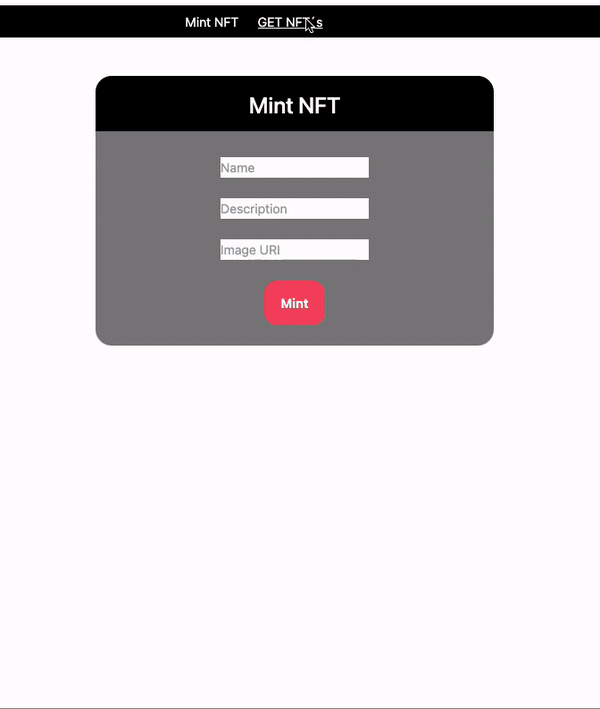
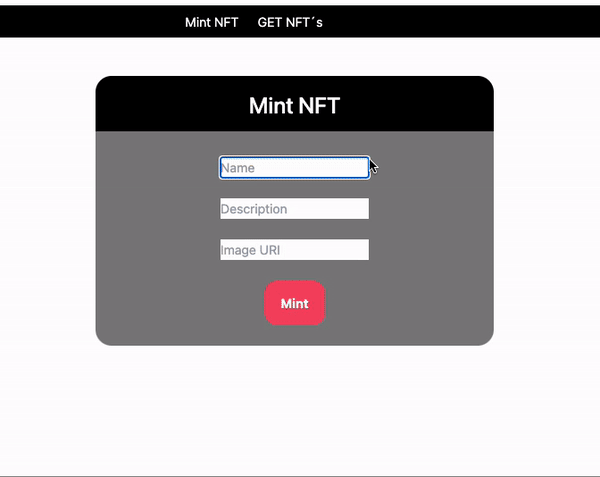
npm run dev- To mint a new NFT, we will only have to enter 3 fields, the name, the description and the url of the image.
- Once this is done, click on the “Mint” button and accept the transaction in metamask.
- To get the NFT's minted only we will have to go to the option of “Get NFT's”.