This project seeks to arrange and align different neovim editor plugins together to provide a fast, seamless and feature-rich IDE(Integrated Development Environment), for Design Verification.
Neovim is a hyperextensible Vim-based text editor that seeks to aggressively refactor Vim.
What makes it stand out is the extensive support it provides for third party plugins. And it does so with the help of Lua scripts. This project consists of a custom configuration of NeoVim based on LazyVim and contains LSP (Language Server Protocol) configuration files in compliance with the best coding practices for Design Verification. It contains all the features provided by LazyVim and more.

Since this project makes use of LazyVim, it packs all the features provided by the same.
⌨️ Keymaps
⚙️ Settings
📦 Plugins
Note: nvim-treesitter and nvim-ts-autotag have been disabled by default.
- 📜 Alpha-nvim: Alpha provides nvim with a customized main menu page.

- 📂 Pretty-fold & Fold-preview:
Pretty-fold supports foldtext customization.Without pretty-fold
With pretty-fold
Fold-preview allows you to preview closed folds, without opening them.
How-to-use: Clickhon a fold to preview. - </> Nvterm: Nvterm provides easy access to the terminal within nvim. This can act like a console for compiling and reviewing code side-by-side. It also works great with the leap plugin, making it considerably easier and faster to find keywords for a given console output.
Note: The working directory of the terminal will match the working directory at which nvim was called. For example, if Nvim was called atDownloadsthe working directory of the terminal inside Nvim will also beDownloads.
How-to-use:
Esctakes you to normal mode.itakes you to terminal mode.
Alt+hfor a horizontal terminal.
Alt+vfor a vertical terminal.
Alt+ffor a floating terminal. - 🛢️Oil: Oil is a file-explorer that lets you edit your filesystem like a normal Neovim-buffer.
How-to-use:
-to initialize Oil and/or to go to parent working directory of the file.
Ctrl+sfor a vertical split.
Ctrl+hfor a horizontal split.
Ctrl+pto preview a file.
Ctrl+lto refresh Oil.
gxto open the chosen file in an external app.
g.to show hidden files.
- 🎨 Themes: An extensive list of common themes are made available.
How-to-use:SpaceuCto preview themes.
Theme can be changed permanently inthemes.luawhich can be accessed fromconfigfrom the main menu.
![]()
echo $0/bin/csh : csh
tcsh : tcsh
/bin/bash : bash
Open terminal and paste the following commands:
#FOR CSH/TCSH
cd
curl -LO https://github.com/neovim/neovim/releases/download/v0.9.5/nvim.appimage
chmod u+x nvim.appimage
mkdir bin
mv nvim.appimage bin/

#FOR BASH
cd   #go to home directory
curl -LO https://github.com/neovim/neovim/releases/download/v0.9.5/nvim.appimage   #download nvim
chmod u+x nvim.appimage   #make nvim executable
mkdir bin   #make a directory for binaries
mv nvim.appimage bin/   #move nvim to the bin directory
sudo apt install fuse   #to run
Open your shell configuration file:
#FOR CSH
vim ~/.cshrc

#FOR BASH
vim ~/.bashrc

#FOR TCSH
vim ~/.tcshrc
Add these lines to the bottom of the file:
#FOR CSH/TCSH
setenv PATH $PATH\:$HOME/bin
alias nvim 'nvim.appimage'

#FOR BASH
export PATH=$PATH:$HOME/bin   #adds bin directory to PATH variable
alias nvim="nvim.appimage"
Exit vim and source the changes:
#FOR CSH/TCSH
source ~/.cshrc

#FOR BASH
source ~/.bashrc
svls, ripgrep require cargo. Cargo is the rust package manager.
#check if cargo has been installed
which cargo

#DO NOT EXECUTE THE NEXT COMMAND IF CARGO HAS BEEN INSTALLED
curl https://sh.rustup.rs -sSf | shecho $0/bin/csh : csh
tcsh : tcsh
/bin/bash : bash
Open your shell configuration file:
vim ~/.cshrc
vim ~/.bashrc   #for bash
vim ~/.tcshrc
Add this line at the bottom of the file:
#FOR CSH/TCSH
setenv PATH $PATH\:$HOME/.cargo/bin

#FOR BASH
export PATH=$PATH:$HOME/.cargo/bin   #add cargo binaries directory to path
Exit vim and source the changes:
#FOR CSH/TCSH
source ~/.cshrc

#FOR BASH
source ~/.bashrcNerd fonts are required for icons

Download the JetBrains font: https://github.com/ryanoasis/nerd-fonts/releases/download/v3.1.1/JetBrainsMono.zip
To install the Nerd font:
WSL users, follow this guide: https://dev.to/ansonh/customize-beautify-your-windows-terminal-2022-edition-541l
Fedora & Ubuntu users, follow this guide: https://itsfoss.com/change-terminal-font-ubuntu/
More fonts can be installed from https://www.nerdfonts.com/font-downloads
Ripgrep is used to search for a keyword in every file in a given working directory.
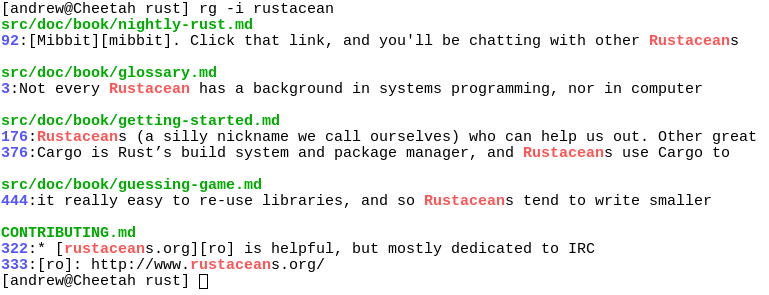
Install ripgrep via cargo:
cargo install ripgrepLazygit is a Terminal User Interface for git commands.

Install Lazygit:
cd
curl -Lo lazygit.tar.gz https://github.com/jesseduffield/lazygit/releases/download/v0.40.2/lazygit_0.40.2_Linux_x86_64.tar.gz
tar xf lazygit.tar.gz lazygit
install lazygit ~/bin/- If nvim is already installed, make a backup of your nvim files:
mv ~/.config/nvim ~/.config/nvim.bak
mv ~/.local/share/nvim ~/.local/share/nvim.bak
- Download and setup nvim config:
cd
git clone https://github.com/mbits-mirafra/neovim.git
mkdir -p .config/nvim
cp -r neovim/nvim/ ~/.config/
- Launch nvim, enter command line mode(type
:) and typeMasonInstall svls veribleto install the SystemVerilog LSPs(Language Server Protocols).
⚠️ PLEASE WAIT FOR SVLS TO FINISH INSTALLING
Note: The LSPs only get activated inside git repositories. If you do not wish to create a repository, you can add a dummy .git folder to your working directory. - The required LSP configurations for svls
.svlint.tomland verible.rules.verible_lintare available in this repository. Copy and paste them to your working directory to enable them. For example:Withoutcd git clone https://github.com/mbits-mirafra/axi4_avip.git cp neovim/.rules.verible_lint neovim/.svlint.toml axi4_avip/.svlint.tomland.rules.verible_lintthe LSPs will enable all lint rules: With
With .svlint.tomland.rules.verible_lint: