If you have questions or concerns, please DO NOT contact me. Academia pays in knowledge, but my career should pay in cash, and I am on the way out.
CMIP6-to-WRFInterim uses pure python implementation to convert CMIP6 sub-daily output into WRF intermediate files, which are used to drive the WRF model for regional dynamical downscaling usage. Current supported models are listed below. If you hope to use other models, proper modifications are needed.
| Model Name | historical | SSP126 | SSP245 | SSP585 |
|---|---|---|---|---|
| Bias-corrected Multi-Model 1 | N/A | ✔ | ✔ | |
| MPI-ESM-1-2-HR | ✔ | ✔ | ✔ | ✔ |
| EC-Earth3 | ✔2 |
Please install python3 using Anaconda3 distribution. Anaconda3 with python3.8 and 3.9 has been deeply tested, lower version of python3 may also work (without testing). If numpy, pandas, scipy, xarray, netcdf4 are properly installed, you may skip the installation step.
While, we recommend to create a new environment in Anaconda and install the requirements.txt:
conda create -n test_c2w python=3.9
conda activate test_c2w
pip install -r requirements.txtpython3 run_c2w.pyPlease use Unix-like (Linux) system to run the above command, and it is okay to see some FutureWarnings. If successful, you should see CMIP6:2100-01-02_00 and CMIP6:2100-01-02_06 in the ./output folder.
(See Troubleshooting if you are a Windows Subsystem user.)
Copy or link the two intermidiate files to your WPS folder, prepare your geo_em files and setup your namelist.wps properly, now you are ready to run metgrid.exe and the following WRF procedures.
There is a simple example of namelist.wps and namelist.input covering the East Asian region in the ./sample/MPI-ESM-1-2-HR folder for testing.
You can also modify wps_wrf_pipeline.sh to automate the procedure from metgrid.exe to wrf.exe if you are operating on a computing node.
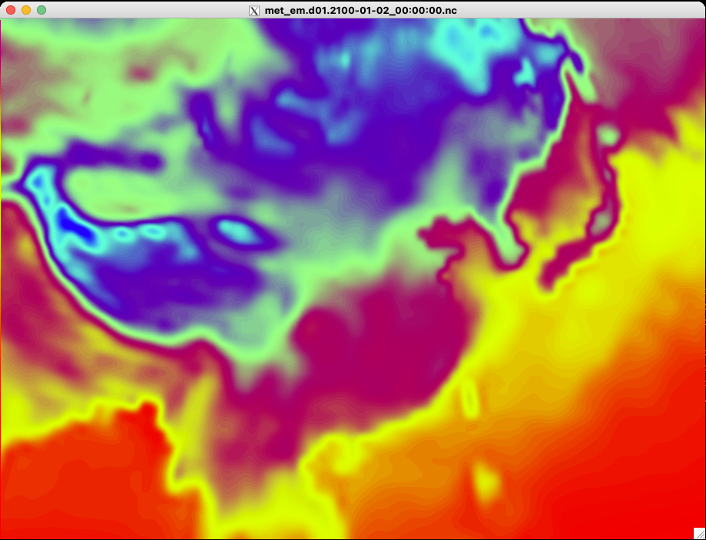
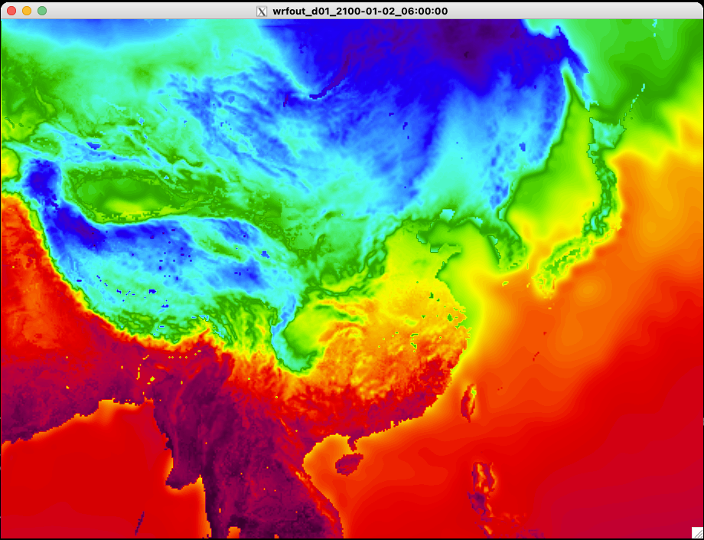
If you run the sample case successfully, you are expected to see snapshots of the skin temperature in the initial condition and after 6-hour WRFv4.3 run as shown as above.
python3 run_c2w.py -m BCMMThis will use the Bias-corrected CMIP6 Multi-model dataset.
python3 run_c2w.py -m EC-Earth3Now, you will find output files in the ./output folder with the prefix EC-EARTH3-SURF3H:. Next, we need to generate additional variables with different frequencies and grids. Please follow the table below to modify the config.ini file. Each time after making modifications according one row, execute run_c2w.py.
| vtable_name | grid_flag | cmip_strt_ts | cmip_end_ts | cmip_frq | output_prefix |
|---|---|---|---|---|---|
| EC-Earth3_SURF3H | gr | 197901010000 | 197912312100 | 3 | EC-EARTH3-SURF3H |
| EC-Earth3_SURF6H | gr | 197901010300 | 197912312100 | 6 | EC-EARTH3-SURF6H |
| EC-Earth3_LEV | gr | 197901010000 | 197912311800 | 6 | EC-EARTH3 |
| EC-Earth3_PLEV | gr | 197901010000 | 197912311800 | 6 | EC-EARTH3-PLEV |
| EC-Earth3_SST | gn | 197901010300 | 198001010000 | 3 | EC-EARTH3-SST |
There is a simple example of namelist.wps and namelist.input covering the central America in the ./sample/EC-Earth3 folder for testing.
If you run the sample case successfully, you are expected to see snapshots of the skin temperature in the initial condition and after 6-hour WRFv4.3 run as shown as below. Thanks Dr. Tito Maldonado from University of Costa Rica for helping with the EC-Earth3 support.


When you properly download the MPI-ESM1-2-HR data, First edit the ./conf/config.MPI-ESM1-2-HR.ini file properly.
[INPUT]
input_root=./sample/MPI-ESM1-2-HR/
model_name=MPI-ESM1-2-HR
scenario = ssp585
esm_flag=r1i1p1f1
grid_flag=gn
#YYYYMMDDHHMM
cmip_strt_ts = 210001020000
cmip_end_ts = 210001020600

[OUTPUT]
#YYYYMMDDHHMM, please seperate your ETL processes if request very long-term simulation
etl_strt_ts = 210001020000
etl_end_ts = 210001020600
output_root = ./output/-
[INPUT]['input_root']is the root directory of the CMIP6 data, here it points to the./sample/folder. -
[INPUT]['model_name']is the name of the model. Now only theMPI-ESM-1-2-HRmodel is supported. If you plan to use other models, you need to setup your own variable mapping table (see below). -
[INPUT]['scenario']['esm_flag']['grid_flag']are used to form the netCDF file names. -
[INPUT]['cmip_strt_ts']and[INPUT]['cmip_end_ts']are the start and end time of the CMIP6 data. -
[OUTPUT]['etl_strt_ts']and[OUTPUT]['etl_end_ts']are the start and end time of your desired ETL period.
After you have edited the config.ini file, you can run the script again for your desired period. The intemediate files will be generated in the [OUTPUT]['output_root'] folder.
Note that for MPI-ESM1-2-HR, the soil properties between 10-200cm is not provided by the model and we overwrote it by 0-10cm soil properties, a special type mark of 2d-soilr is provided in the varaible mapping table. You may need long-term (~1-month) spin-up run if your research requests accurate soil properties.
For historical run, MPI-ESM1-2-HR do not provide skin temp output in atmospheric dataset, we use tas here to represent the skin temp, which is acceptable over land as the land properties are prognostic from the land surface model, but it may have bias for the prescribed SST.
We suggest the user download tos data from the ocean data set and convet it to atmosphreic data set format, and modify the Vtable to ingest the true SST.
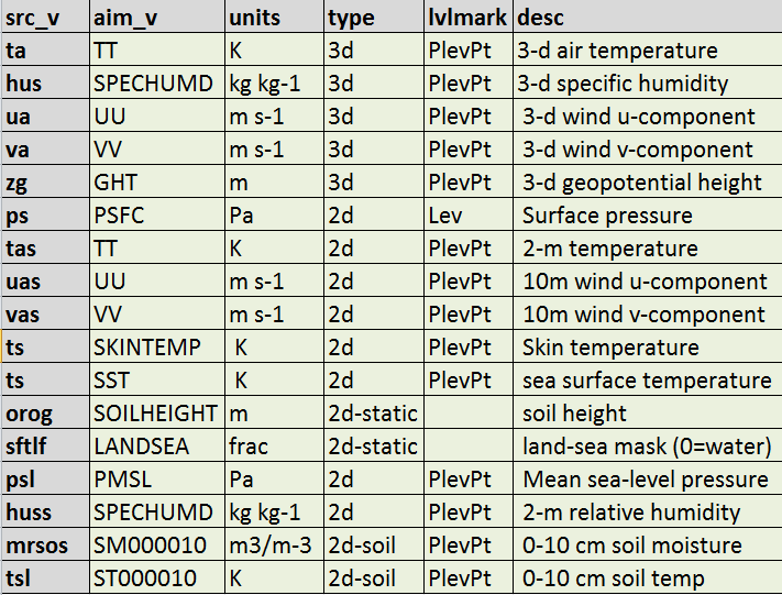
./db/${MODEL_NAME}.csv records the model-specified variable mapping table. If you plan to use other models or involve SST in certain cases (e.g. historical run of MPI-ESM1-2-HR), you need to setup your own variable mapping table.
src_v,aim_v,units,type,lvlmark,desc
ta,TT,K,3d,PlevPt,3-d air temperature
hus,SPECHUMD,kg kg-1,3d,PlevPt,3-d specific humidity
ua,UU,m s-1,3d,PlevPt, 3-d wind u-component
va,VV,m s-1,3d,PlevPt, 3-d wind v-component
zg,GHT,m,3d,PlevPt, 3-d geopotential height
ps,PSFC,Pa,2d,Lev, Surface pressure
tas,TT,K,2d,PlevPt, 2-m temperature
uas,UU,m s-1,2d,PlevPt, 10m wind u-component
vas,VV,m s-1,2d,PlevPt, 10m wind v-component
ts,SKINTEMP,K,2d,PlevPt, Skin temperature
psl,PMSL,Pa,2d,PlevPt, Mean sea-level pressure
huss,SPECHUMD, kg kg-1,2d,PlevPt, 2-m relative humidity
mrsos,SM000010, kg/m-3,2d-soil,PlevPt, 0-10 cm soil moisture
tsl,ST000010,K,2d-soil,PlevPt, 0-10 cm soil temp
mrsos,SM010200, kg/m-3,2d-soilr,PlevPt, 10-200 cm soil moisture
tsl,ST010200,K,2d-soilr,PlevPt, 10-200 cm soil temp src_vis the name of the variable in the CMIP6 data, which is also used to form the netCDF file name.aim_vis the name of the variable archived in WRF intermidiate file, which is used bymetgrid.exe.unitsis the unit of the variable.typedenotes the type of the variable.3dmeans 3-d variable,2dmeans 2-d variable,2d-soilmeans 2-d variable in the soil layer. Note that forMPI-ESM-1-2-HR, the soil properties between 10-200cm is not provided by the model and we overwrote it by 0-10cm soil, a special type mark of2d-soilris provided here.lvlmarkis the level mark of the variable.PlevPtmeans the variable is a 3-d variable with pressure level.descis the description of the variable.
The core of the converter is cmip_handler.py. It is a Python module that handles the CMIP6 data and converts it to WRF intermidiate file. The module first load CMIP6 data according to the config.ini file, then it interpolates to regular latXlon mesh. Finally it convert the data to WRF intermidiate file. The module includes the following functions and classes:
Functions:
    gen_wrf_mid_template():
        Generate a WRF-Mid template dict for the WRF-Intermediate data.

    write_record(out_file, slab_dic):
        Write a record to a WRF intermediate file
    --------------------
    Classes:
    CMIPHandler():
        Construct CMIP Handler

        Methods
        -------
        __init__:   initialize CMIP Handler with config and loading data
        interp_data: interpolate data to common mesh
        write_wrfinterm: write wrfinterm file
(Dec 19, 2022): Lack of suitable source variables from CMIP6 datasets to drive the dynamical downscaling are common. For example, the available 6-hour ts variable in SSP is missing in historical run of MPI-ESM1-2-HR output. We cannot directly map the SST by ts.
One trade-off is using the tas to represent both the land surface and sea surface temperature, just as you could find in the MPI-ESM1-2-HR_HIST.csv vtable. While this is not a good strategy.
For accurate representation of sea surface temperature, you may need to use 3-hour tos variable to generate the SST in historical run (see the Vtable with suffix SST). (Thanks Dr. Paul Nalon from ICHEC and Dr. Sium Gebremariam from PSU helping with this.)
(Nov 27, 2022): According to feedback from several users, if you are using Windows Subsystem for Linux (WSL, typically Ubuntu from Microsoft Store), please note Windows does NOT support colon ":" in the file name. You may rename the output file name or try a pure Linux platform.
You can refer to ./sample/$MODEL_NAME/download.sh for downloading specific dataset.
According to WRF Users Guide (v4.2), P3-36:
Required Meteorological Fields for Running WRF
In order to successfully initialize a WRF simulation, the real.exe pre-processor requires a minimum set of meteorological and land-surface fields to be present in the output from the metgrid.exe program. Accordingly, these required fields must be available in the intermediate files processed by metgrid.exe.
CMIP6 data can be downloaded from the LLNL interface, after cross-check the variable list from MPI-ESM-1-2-HR and the WRF required variables, we have the following table:
You may setup your own variable mapping table in ./db/${MODEL_NAME}.csv if you want to use other models.
Any question, please contact Zhenning LI (zhenningli91@gmail.com). Since I am receiving many requests recently, I may not be able to answer your questions via email promptly, please using GitHub issues instead, and have a short introduction of yourself (e.g. affiliation, research field, etc.) :-).
Footnotes
-
https://www.scidb.cn/en/detail?dataSetId=791587189614968832 ↩
-
Only done limited tests. ↩