Access to AI for free for anyone who is using Visual Studio 2022\2026.
![]()
FreeAIr is a Visual Studio extension which allows you to interact with any LLM which have OpenAI-compatible API. Even with local LLM! No artificial || political barrier injected in FreeAIr code.
Q: Wait, another one?!
A: Yes, yet another LLM VSIX :)
Q: Why? There is a fantastic Copilot!
A: Because Copilot is a subject of politics. Today you are enjoying Copilot, tomorrow your country has been banned from it. FreeAIr is not a political subject and provides no artificial barriers.
Q1: I have NO access to any LLM in Internet via public API.
Q2: I have NO rights to use any remote LLM because of license of the code I'm writing.
A: No problem! You can use local LLM, for example via KoboldCpp. Local LLM sends nothing to remote servers. See details below.
Main functions:
- Searching with natural language (with RAG support)
- Explain the code
- selected piece of the code
- whole file
- Comment the code
- selected piece of the code
- whole file
- Continue writing code according to the comments
- Composing commit message
- Whole line completion
- Generate unit tests
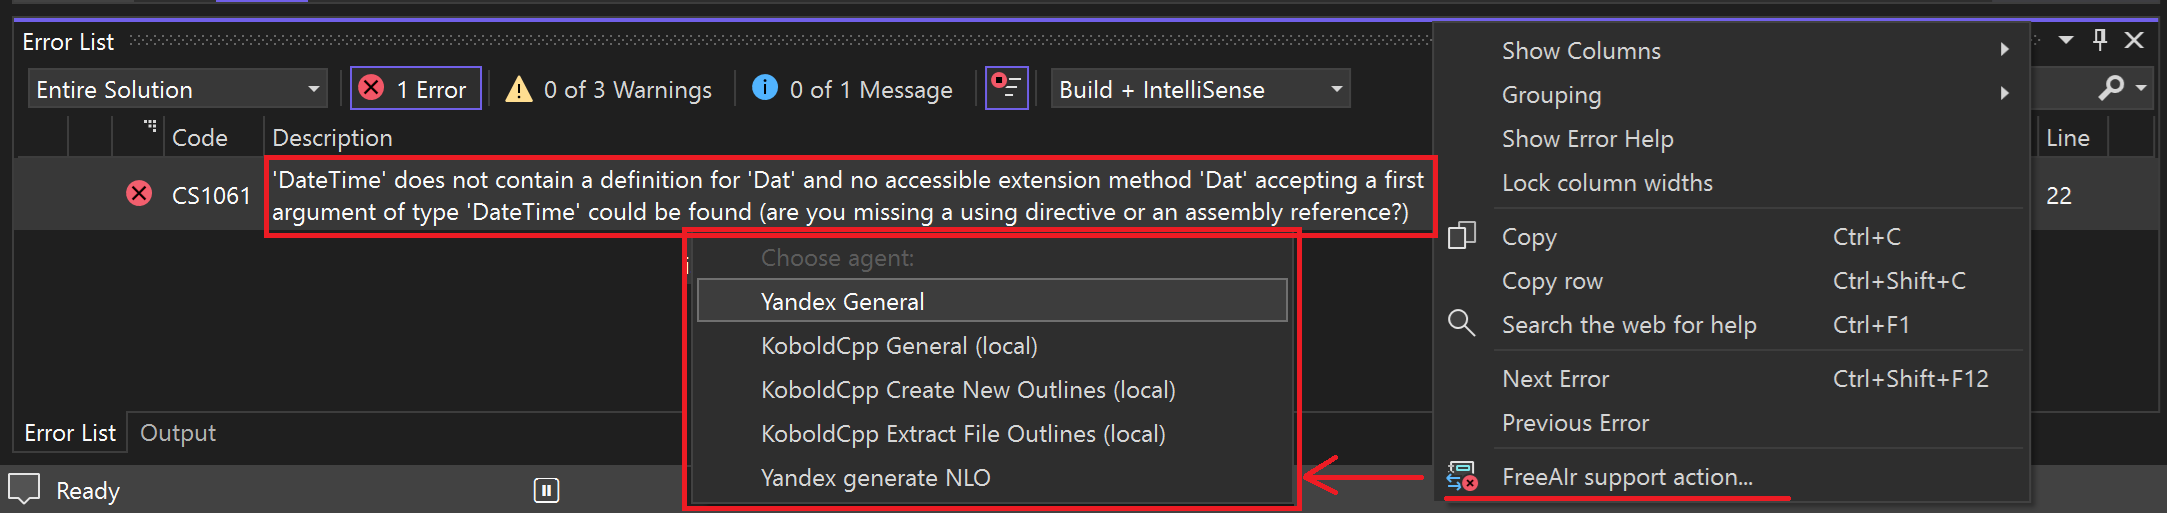
- Fix build errors
- Support for MCP servers and their tools.
- A Visual Studio MCP server is built into FreeAIr.
- Support for MSDN MCP server.


- Install .NET 9 runtime.
- Install the extension through the Visual Studio Marketplace.
- If you want to use local inference, run your model and get its
endpoint,tokenand model name. - Run
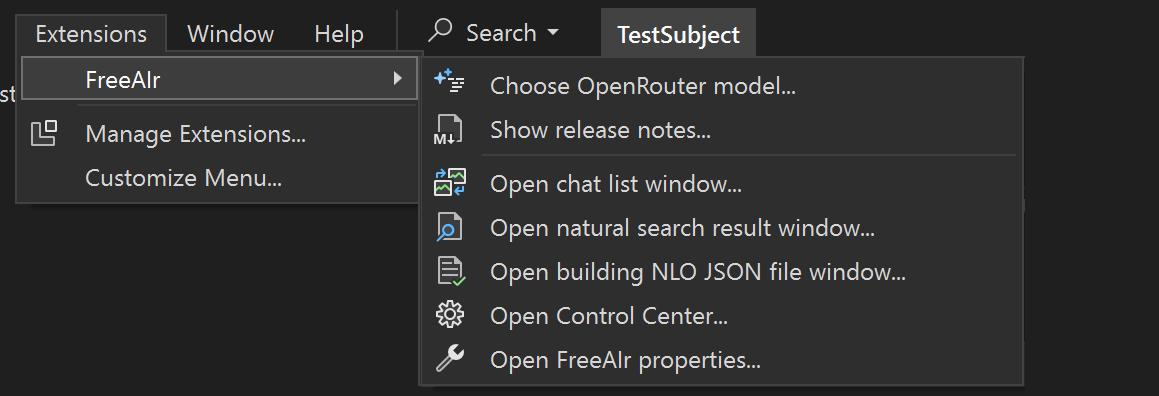
Visual Studioand open your solution. - Click
Extensions->FreeAIr->Open control center. - In the window that opens, click
Edit agents. - Select any agent (for example,
Yandex General) and configureendpoint,token,chosen model. You can also fix the system prompt, but first use theReplace with general system promptbutton. - Click
Apply changesand the window will close. - You will return to the control center window, and the changes you made will be visible in the json text. Save the modified document to a file using
Store to options file. - Click
Extensions->FreeAIr->Open chat list window. - In the window that opens, select
Start chat, and select the model you configured. The model selection window may not appear if you have one model or only one model has a token set. - Start chatting with LLM.
- Agent is a specific combination of
endpoint,token, model name and its system prompt. The same LLM can act in different roles, the role is defined by its system prompt (for example,You are an experienced programmer...,You are a database programmer...). In this case, you will have two agents that have the sameendpoint,tokenand model name, but different system prompts. - Chat is a dialogue with LLM. You can have several dialogues and delete obsolete ones.
- Chat context is additional information that is available to LLM, various files, selections, etc. are added there. This is more convenient than providing texts in the prompt itself.
- Natural Language Search is a FreeAIr feature that allows you to search your code base in natural human language.
- Natural Language Outlines are comments inside your solution documents. They are ultimately used by Natural Language Search to speed up searches.
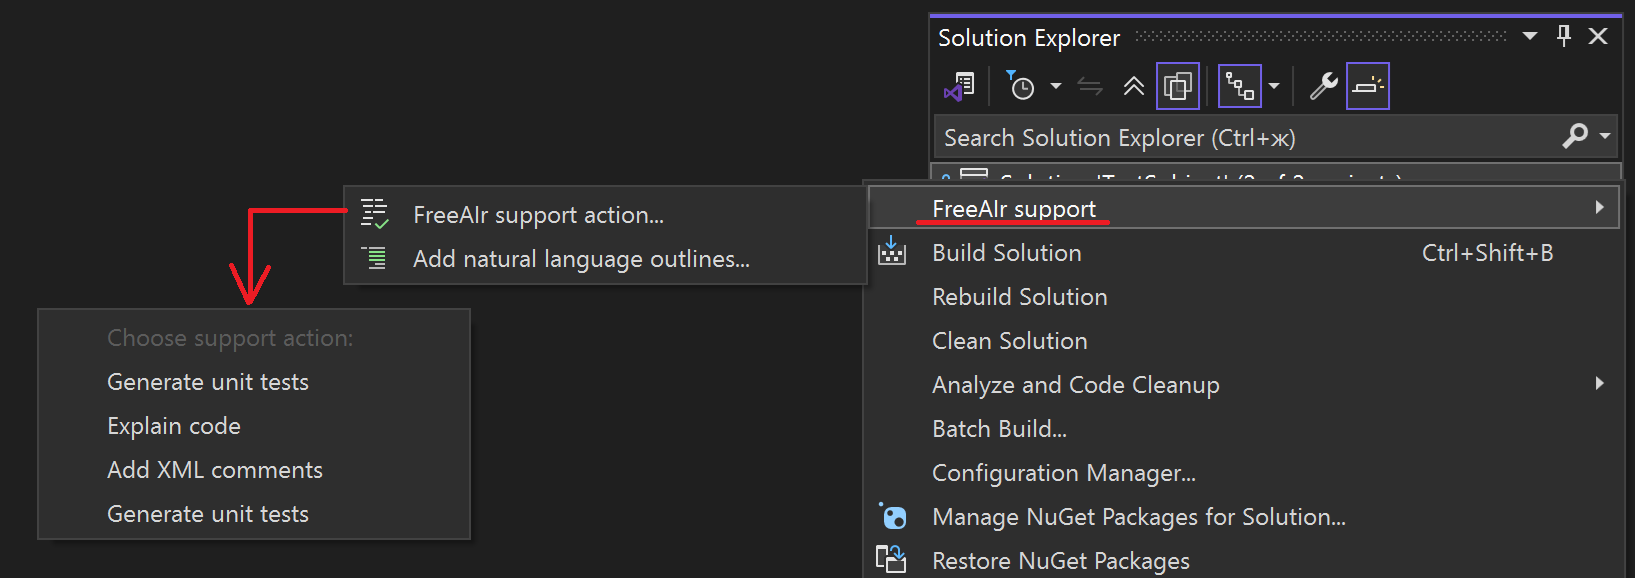
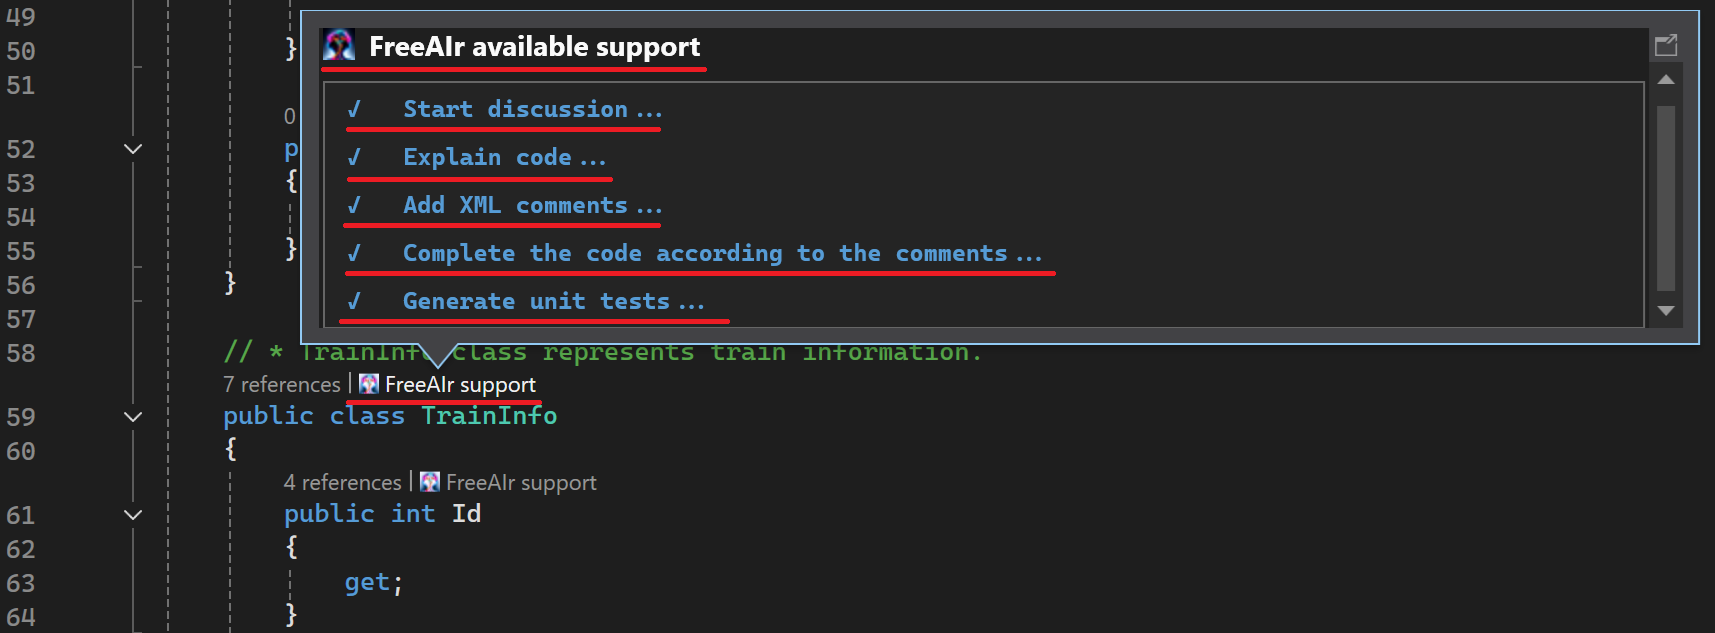
- Support Action is an action that FreeAIr can take in response to user actions in Visual Studio.
- MCP Servers are Model Context Protocol servers that provide additional capabilities to LLM.
- Tools are capabilities that selected MCP Servers offer.
FreeAIr settings are divided into two categories:
- Json settings that apply to the solution
- Settings for a specific Visual Studio user
This is a group of user-specific settings. Each member of your team can customize these settings for themselves, they are saved only locally in the Visual Studio instance.
For example, these are font size settings for the LLM dialog. They can be opened via Extensions -> FreeAIr -> Open FreeAIr properties.
This is a group of settings that makes sense to keep common for all members of your team. These settings can be saved in a json file, which is recommended to be committed to the git repository. Also, these settings can be saved inside Visual Studio, if, for some reason, it is undesirable to create a file.
These settings contain:
- agent settings
- MCP servers and their tools settings
- support action settings
- other settings, the meaning of which is described directly in the Json file.
An agent is a specific combination of endpoint, token, model name and its system prompt. The same LLM can act in different roles, the role is determined by its system prompt (e.g. You are an experienced programmer..., You are a database programmer...). In this case, you will have two agents with the same endpoint, token and model name, but different system prompts.
You can edit existing agents or add your own. If an agent does not have a token, the agent is considered inactive.
Chat is the core element of FreeAIr, where communication with LLM and code generation takes place.
The chat consists of three elements:
- the dialog area, which contains the user's prompts and LLM responses
- the area for the input prompt
- the chat context area
This area displays:
- Sent prompts
- Received responses from LLM
- Service information (e.g. MCP Server Tools calls)
The size of these elements is adjusted in Tools -> Options -> FreeAIr.
For some dialog elements (code chunks, images, etc.) special buttons are added to the text that allow you to conveniently operate these elements:
- Copy to clipboard
- Choose context item to replace its content
- Replace the selected block of the code in the VS document
- Create new file with this
The size of these buttons is also adjusted in Tools -> Options -> FreeAIr.
This is the area for entering a new prompt. To send the entered prompt, press Ctrl+Enter, after which the LLM will wait for a response. You can interrupt the response by pressing the Stop button.
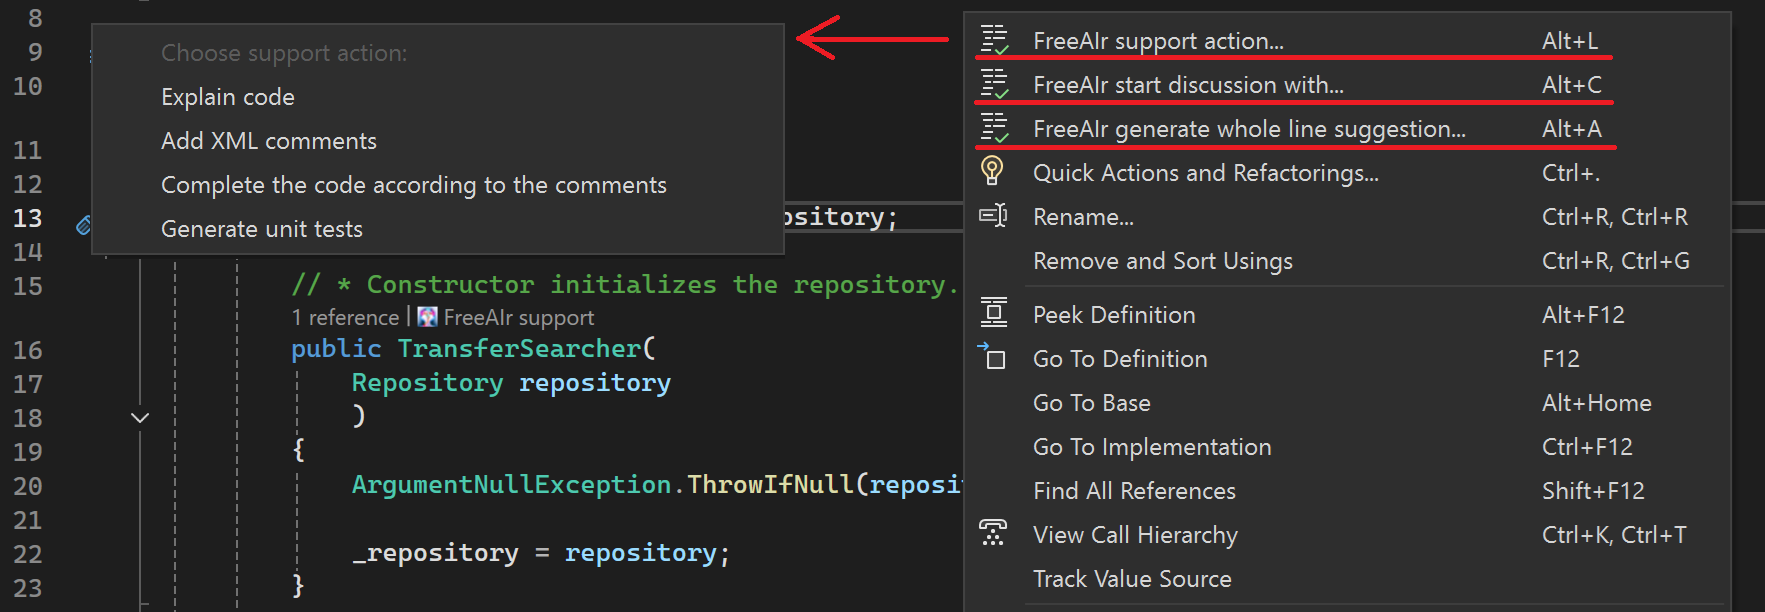
You can also enter the following in this area:
- actions for FreeAIr: to do this, enter
/and select an action from the list; the list of available support actions is specified in the JSON settings. - solution documents: to do this, enter
#and select the required document.
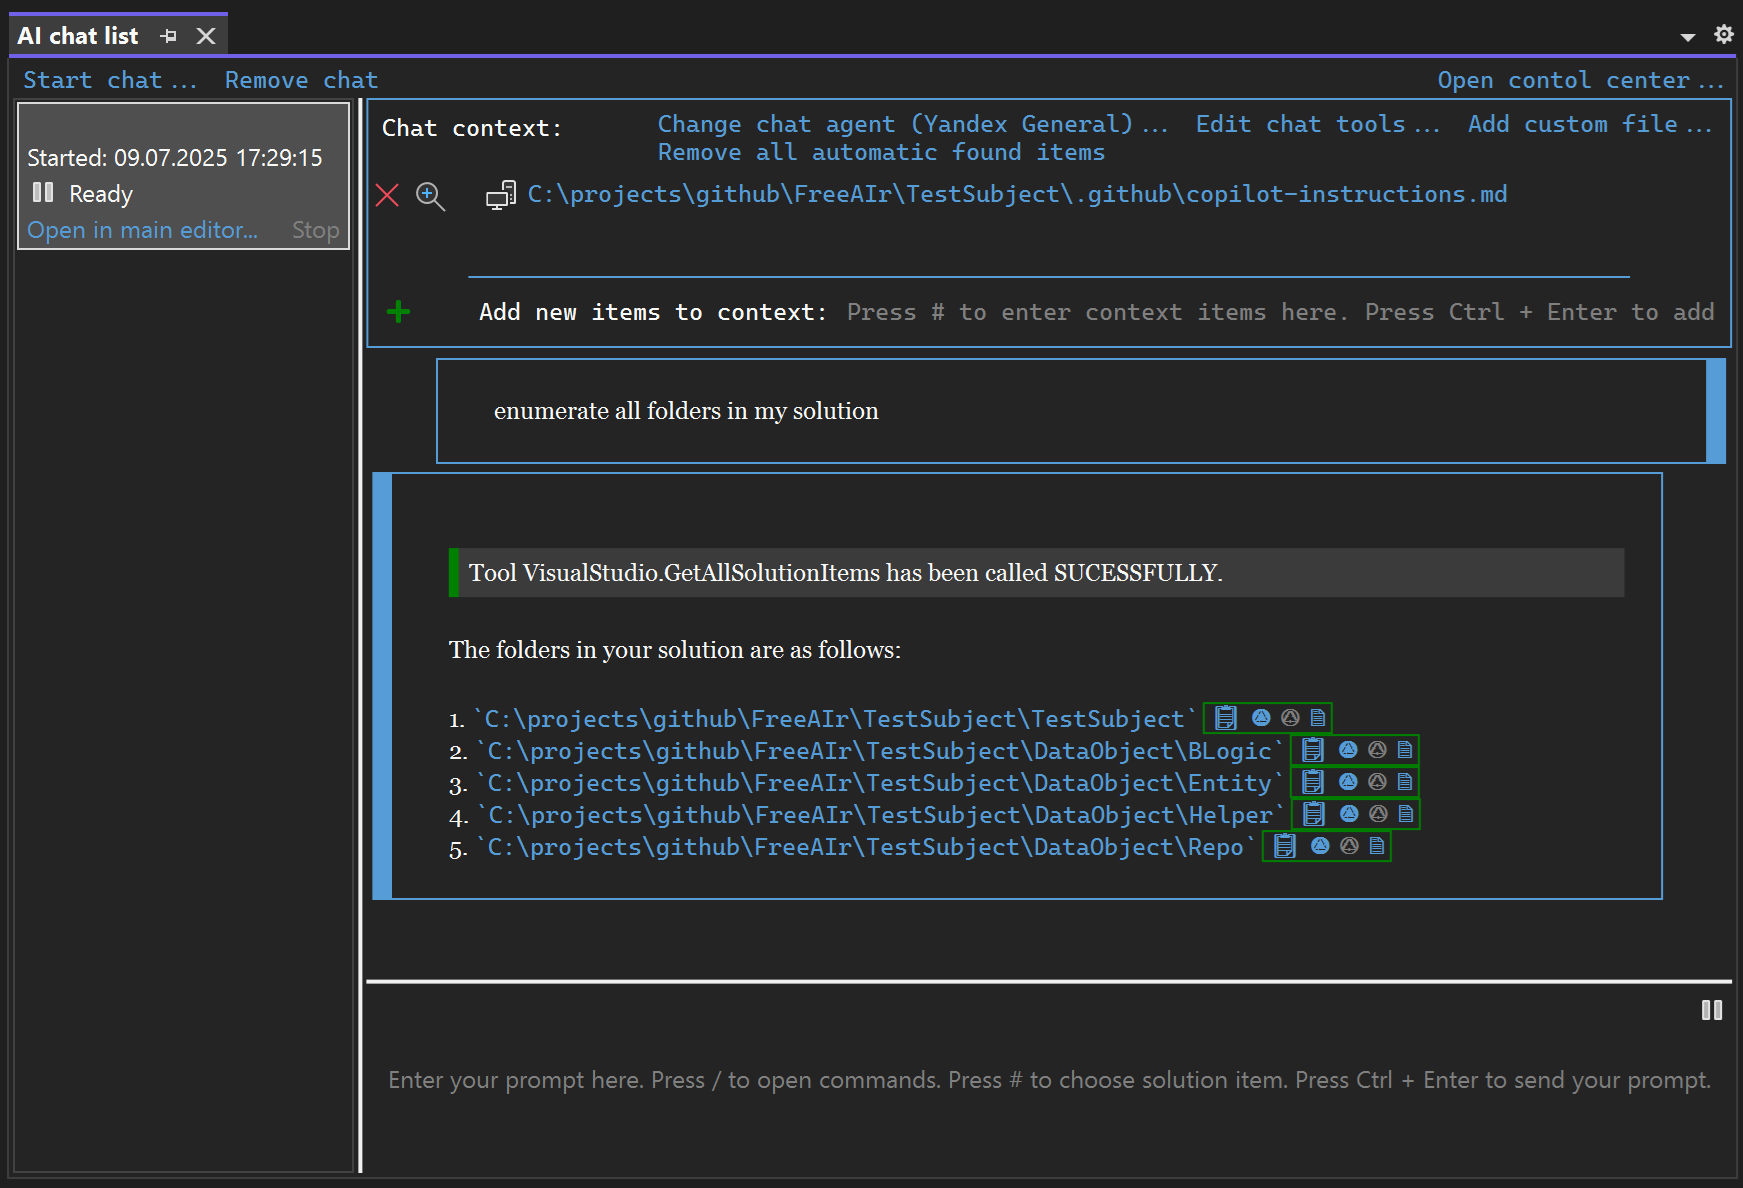
The chat context is additional information for LLM, for example, documents from your solution are often added to the context. You can add to the context:
- your solution document, to do this, type
#, select a document from the list and press Ctrl+Enter. - an external document, to do this, click the
Add custom filebutton.
If your project is configured to use Microsoft Copilot, the copilot-instructions.md file will be automatically added to the chat context when creating a chat.
If your project is written in C#, you can add all files dependent on the already added file to the chat context so that LLM gets more context. There is a corresponding button next to the document name for this.
The actions that FreeAIr can offer the user are not encoded in the FreeAIr code. The list of actions is part of the Json settings file in the Supports/Actions section.
Each action consists of:
- name.
- scope collection: for which user actions this support action should be applied (for example, when working with the document code; inside codelens; when working with files in Solution Explorer; when forming a commit message, etc.).
- prompt with anchors.
- name of the agent who should perform this action. If the agent name is not specified, FreeAIr will offer the user to select an agent manually.
- image moniker - used as an icon to display in the prompt input control in the FreeAIr chat.
Anchors are placeholders in which the corresponding contextual information is added. They can be:
- name of the document(s) in the chat context.
- text of the compilation error.
- the line where the compilation error occurred.
- the column where the compilation error occurred.
- the preferred unit test framework.
- a git diff with your changes.
- a natural language search query.
You can edit existing and add your own support actions.
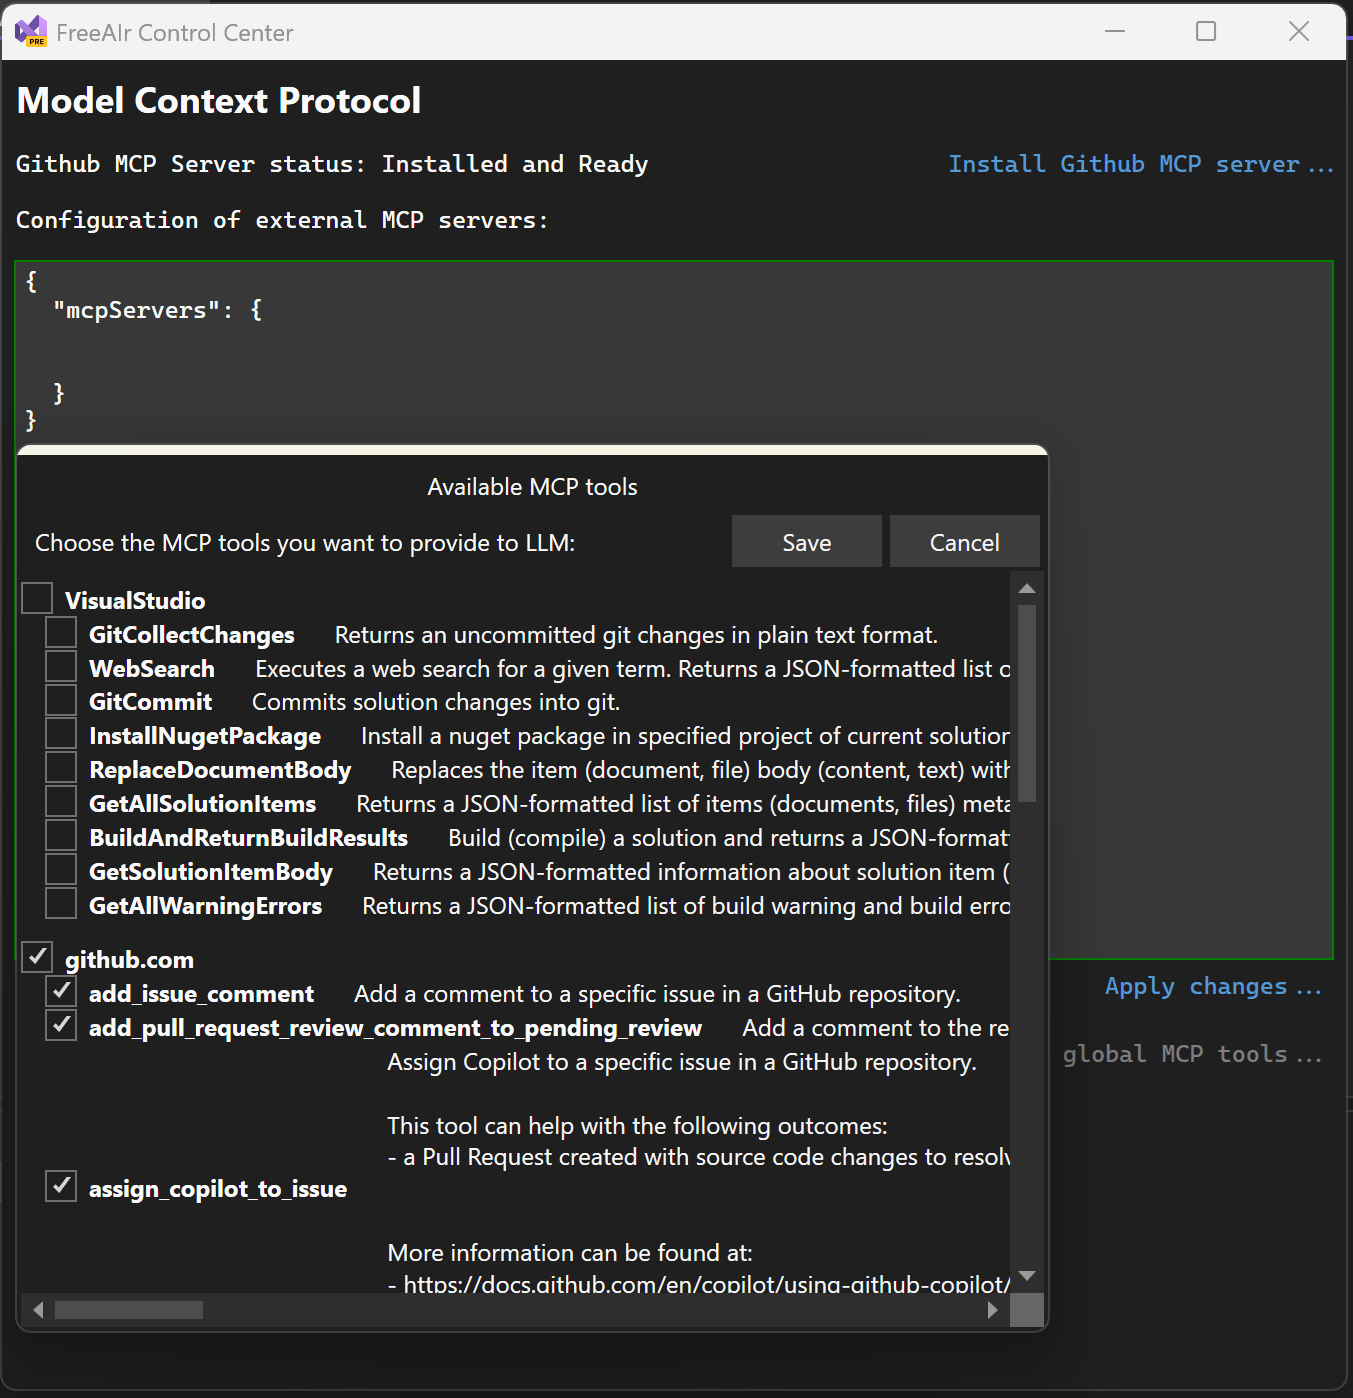
MCP Servers are Model Context Protocol servers that provide additional capabilities for LLM (e.g. database access, or git access). FreeAIr fully supports MCP Servers.
There are three categories of MCP servers:
- Visual Studio Embedded MCP server - a FreeAIr built-in MCP server that provides LLM with the ability to perform actions inside Visual Studio (e.g. compile a project, change the text of a document, etc.).
- GitHub.com MCP server - this is a standard github.com MCP server; you can install it from the FreeAIr Control Panel.
- Other MCP servers - they can be "installed" by editing the corresponding section of FreeAIr Json settings. The format is the standard Claude format.
Each MCP server provides its own set of tools. You can edit the set of MCP servers and their tools and commit this file to the repository. When creating a chat, the selected tools are copied to the chat and you can enable/disable tools inside the chat, this does not affect the status of global tools.
Examples of prompts that LLM can execute if it is provided with the appropriate tools:
commit my changes with message "newcommit"install a 3.3.6 version of "Ninject" nuget package in TestSubject project
This MCP server provides LLM with the ability to work inside Visual Studio, such as:
- make a git commit.
- build solution and collect errors.
- install nuget package.
- get solution tree structure.
- get document body.
- replace document body.
- and others.
This MCP server is available immediately and does not require any configuration steps.
Github.com MCP server is a server that provides LLM with the ability to work with a repository on github.com. For example, through this server you can ask LLM to get a list of issues and ask LLM to fix one of them.
To install this server, click the corresponding button in the FreeAIr Command Center. The latest version of github.com MCP server will be downloaded and installed.
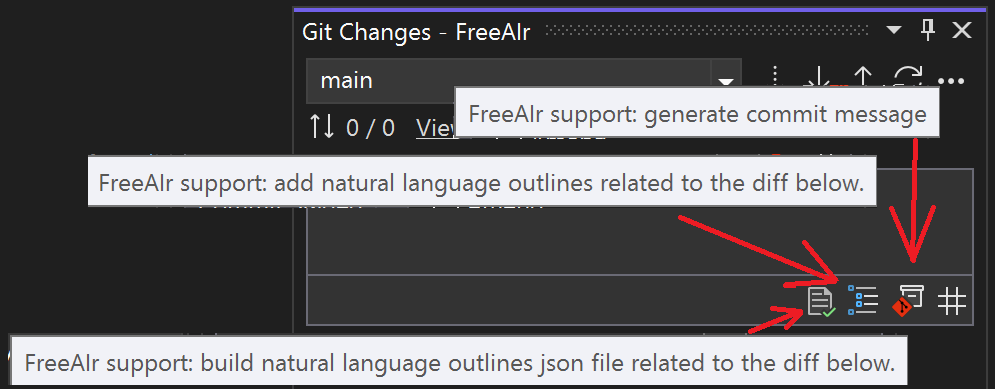
FreeAIr allows a Visual Studio user to use LLM to generate a commit message. To do this, switch to the Git Changes tab and click the corresponding button. A new chat with LLM will start, and when a response is received, the commit message will be copied to the Enter a message field.
An example of a prompt: suggest me the best commit message for my uncommitted changes.
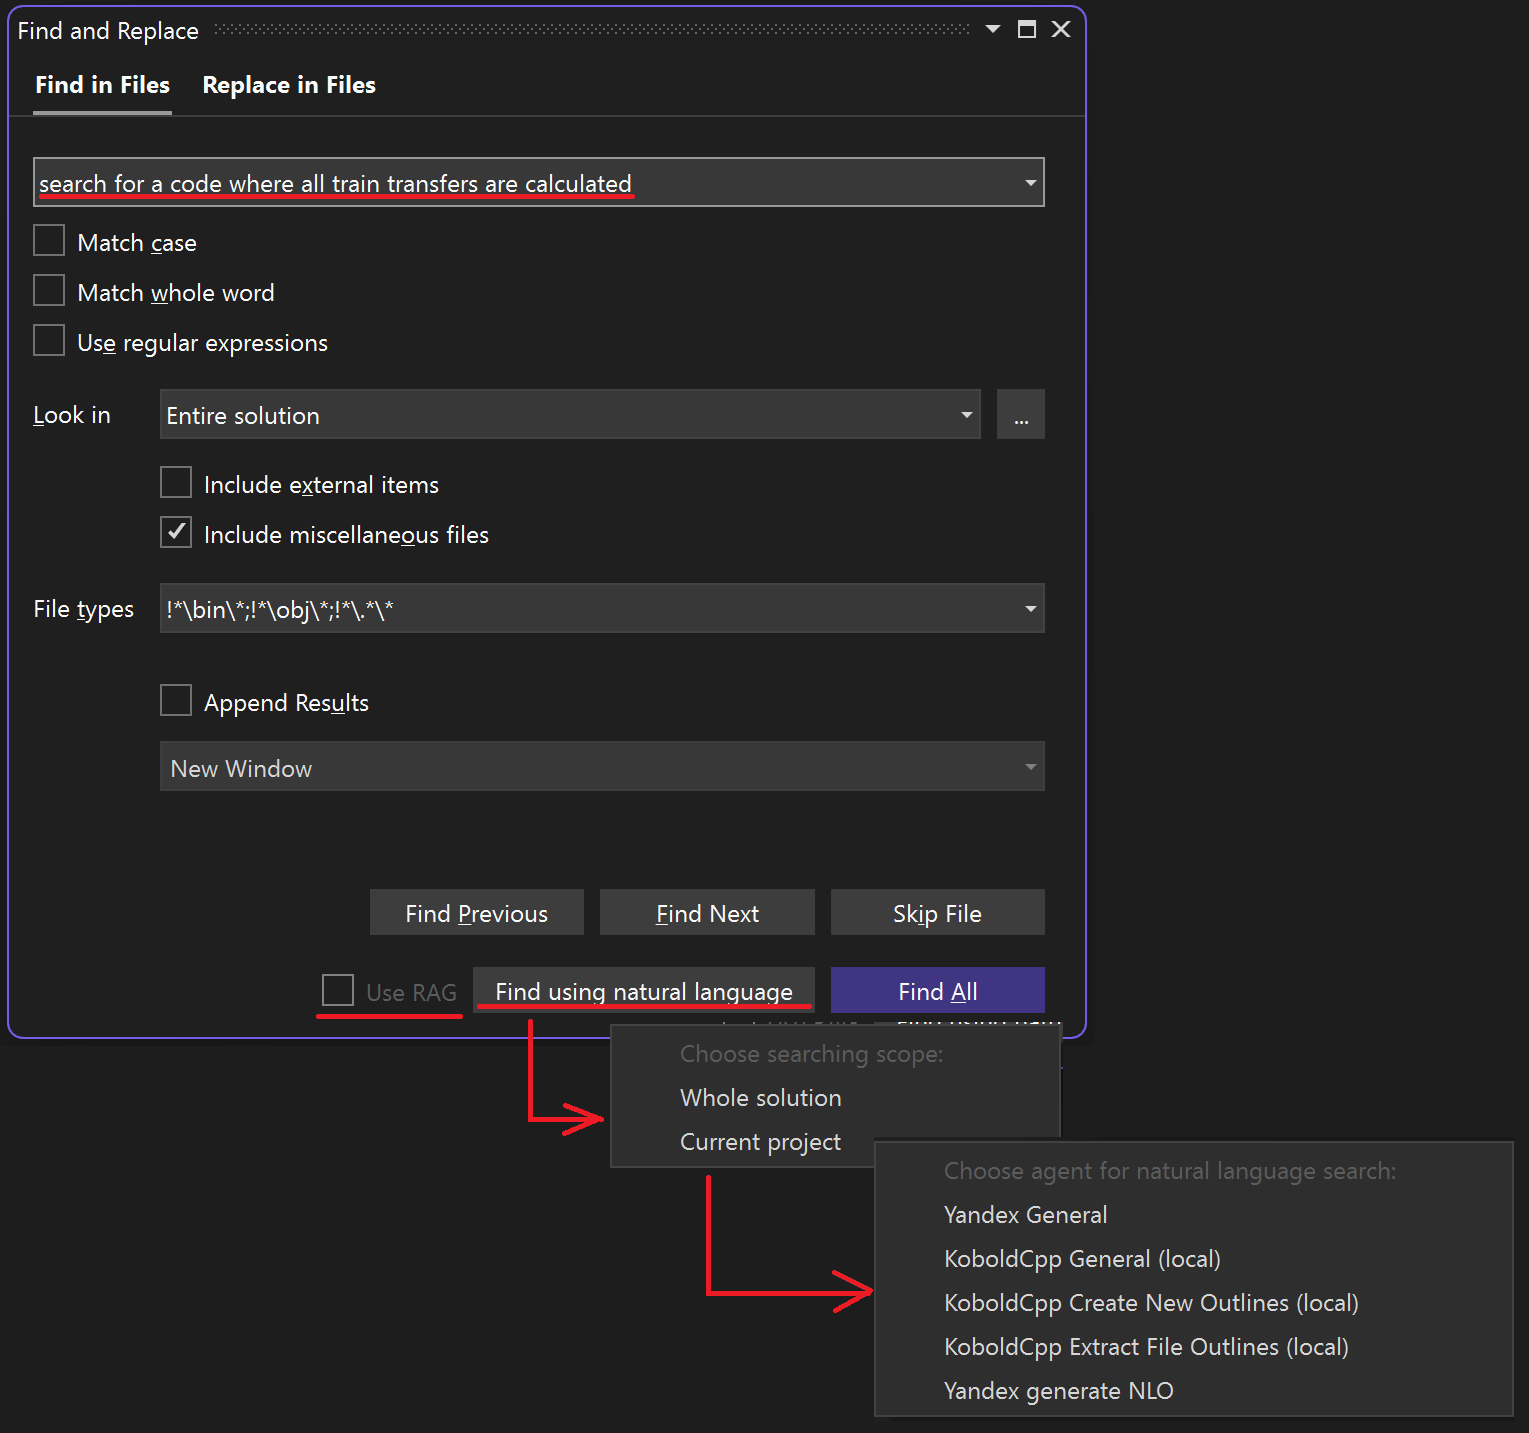
Using natural language to search for a solution or project helps you search code using fuzzy queries that focus on the meaning of the code rather than its text.
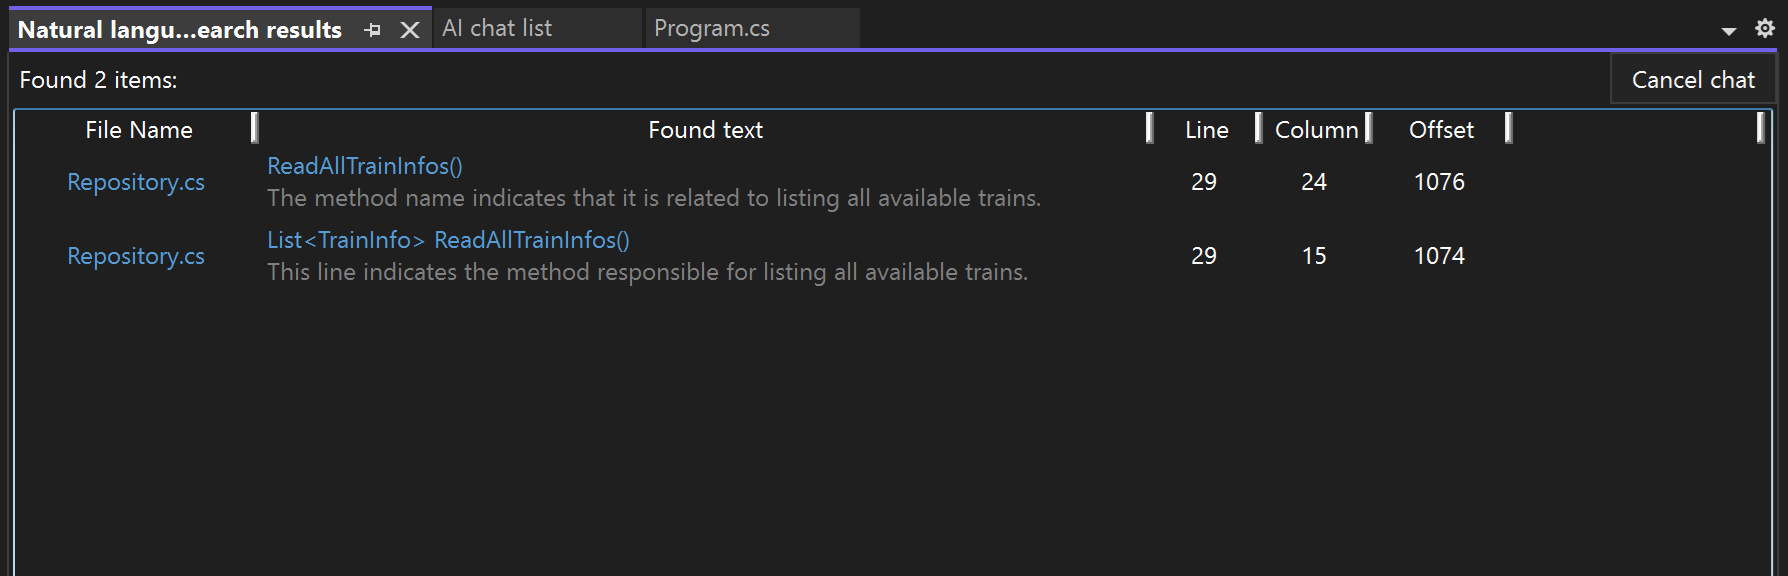
Each text file from the solution (project) is passed to LLM along with a search query, and LLM determines whether there is anything suitable in that file. After all files are processed, the results are collected in the search results window:
Since all project files are processed, searching can take a considerable amount of time. To speed it up, FreeAIr supports RAG using natural language outlines.
Natural Language Outlines are a special kind of comments embedded directly into the source code. These comments are generated by LLM, and are used to create embeddings that are used in RAG. In FreeAIr, NLOs are implemented according to paper.
The first step is to generate NLOs and add them to the source code files. When starting this work, you should generate NLOs for the entire solution via this menu:
Next, you can incrementally add NLOs to only those files that have been modified using this menu:
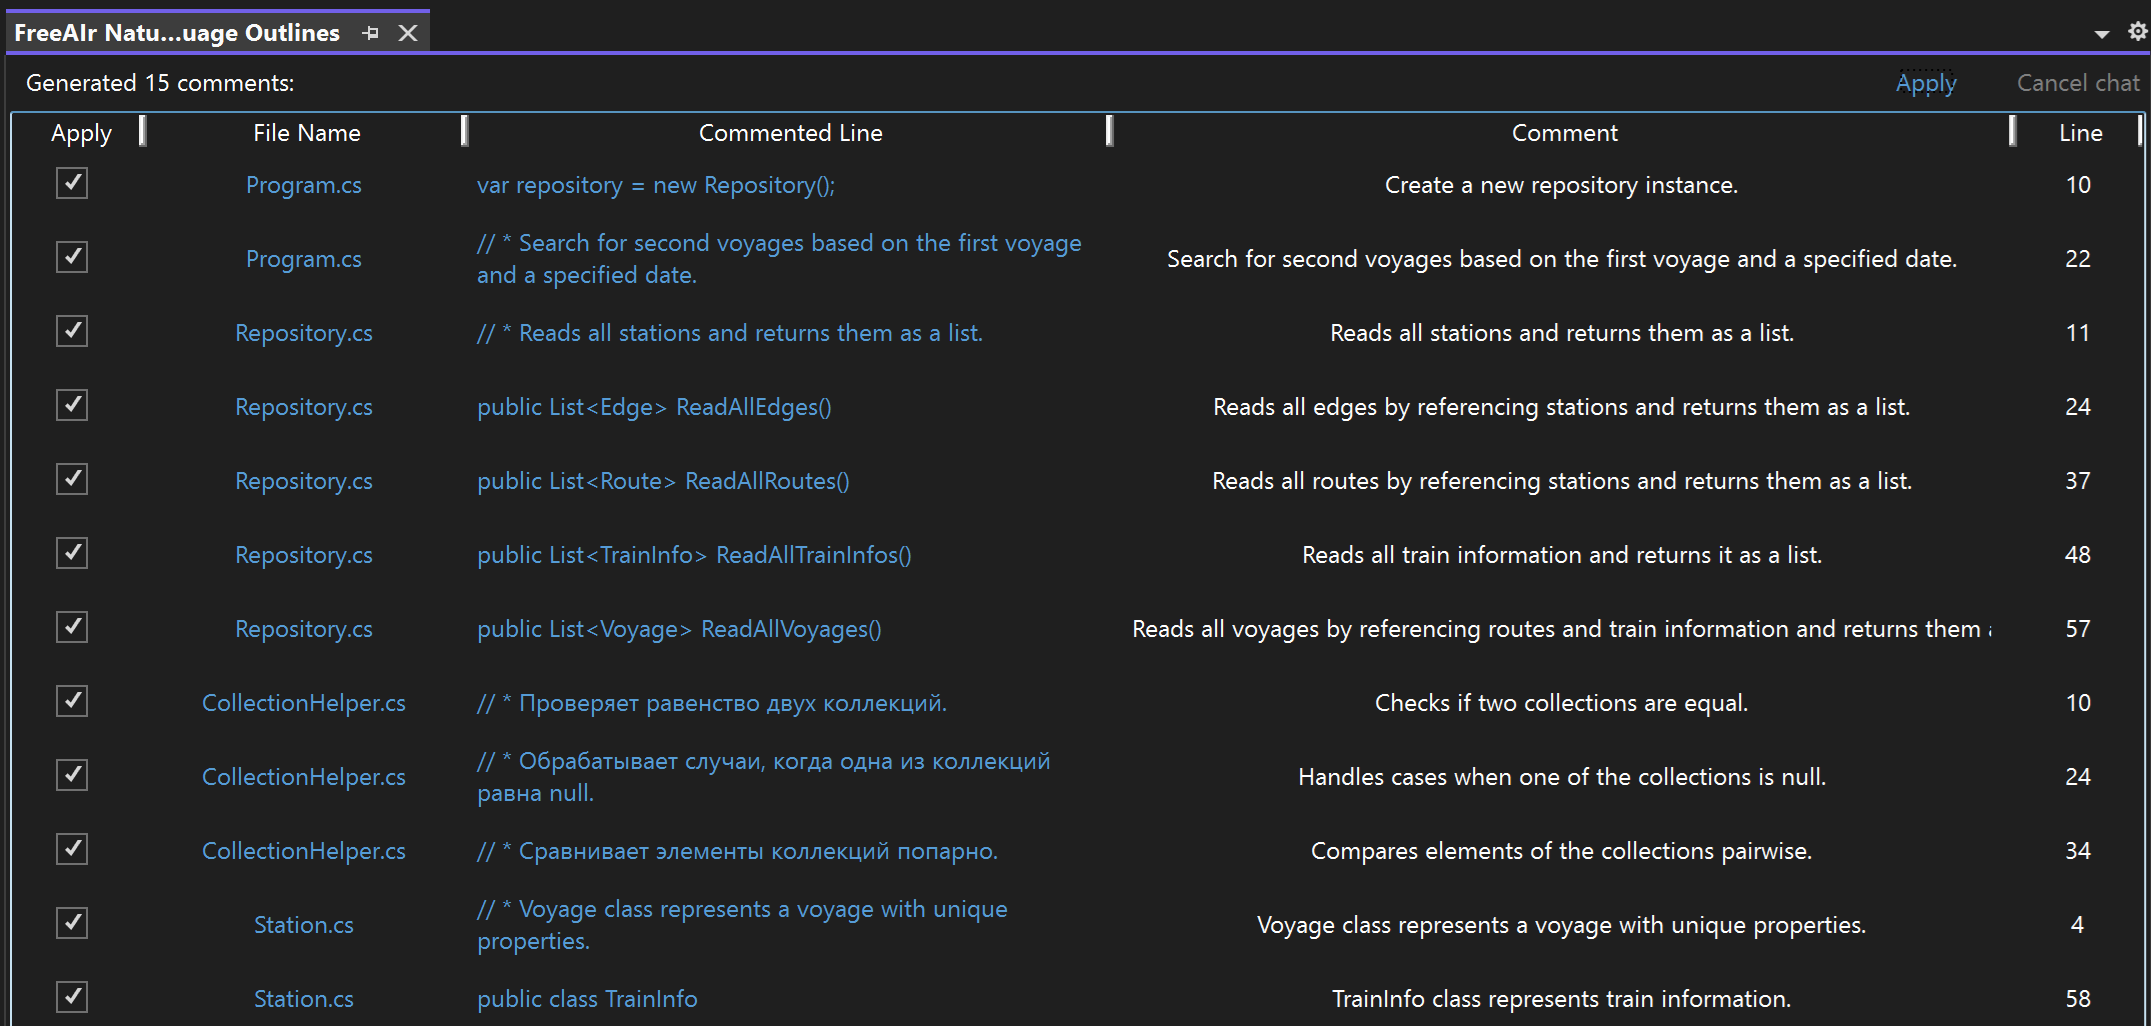
The NLO viewing and saving window itself is designed trivially:
By unchecking the box, you can enable or disable adding a specific outline. By clicking Apply you will save the outlines with the checkboxes set.
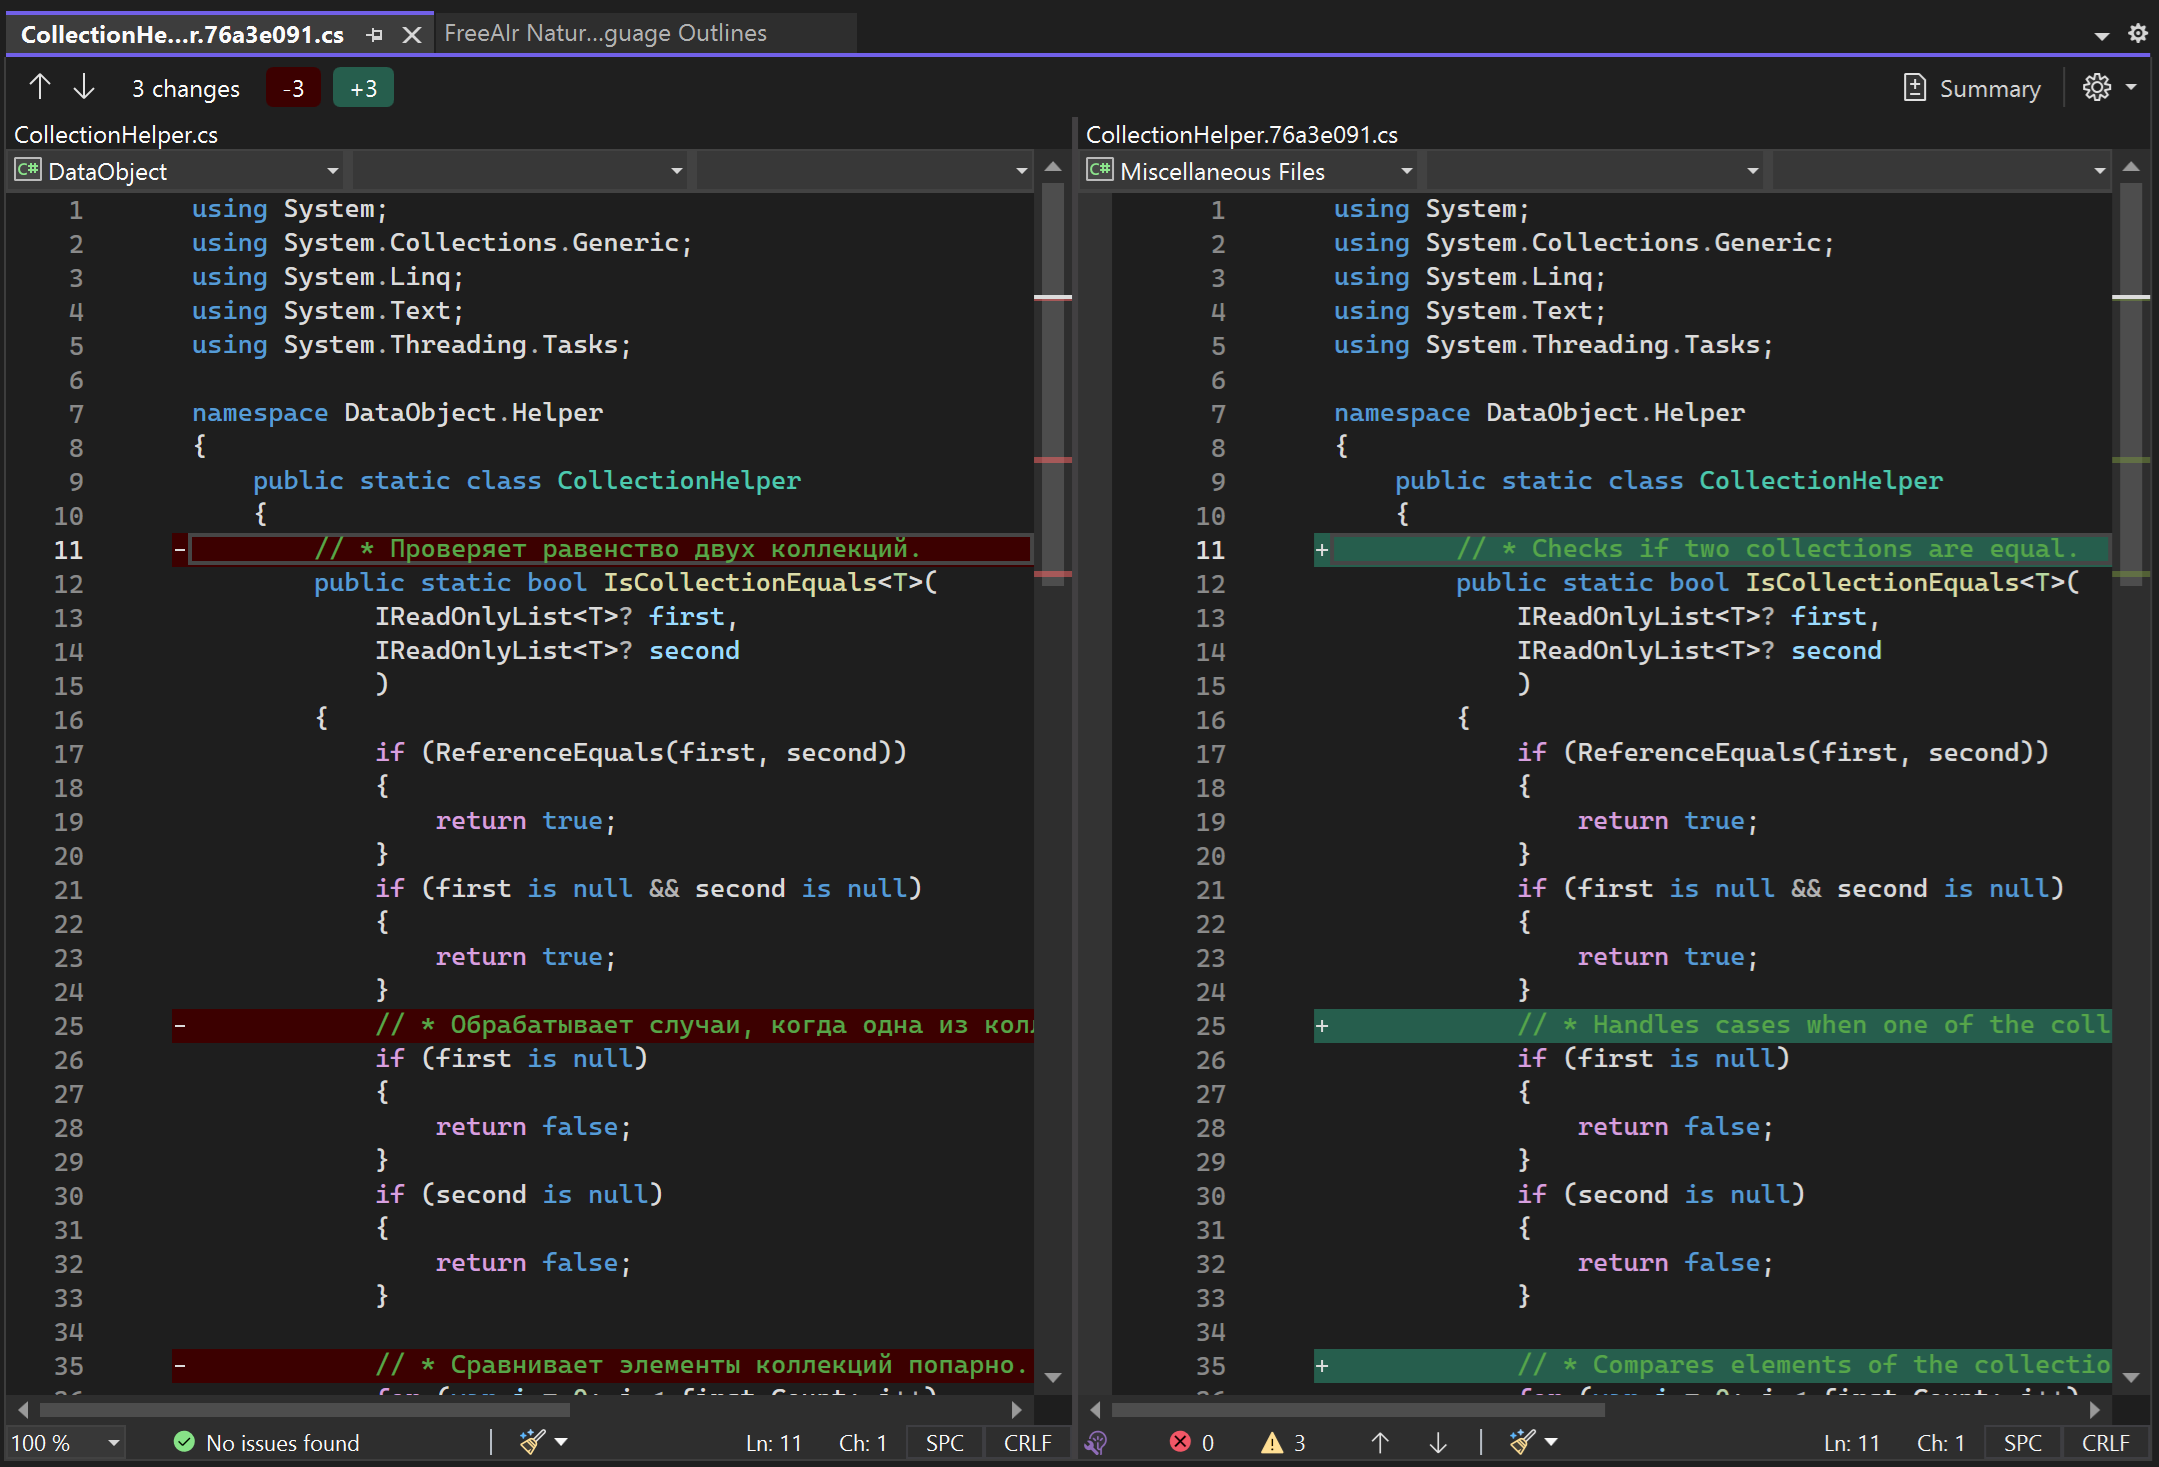
By left-clicking on the file name or the outline itself, you can view the proposed changes:
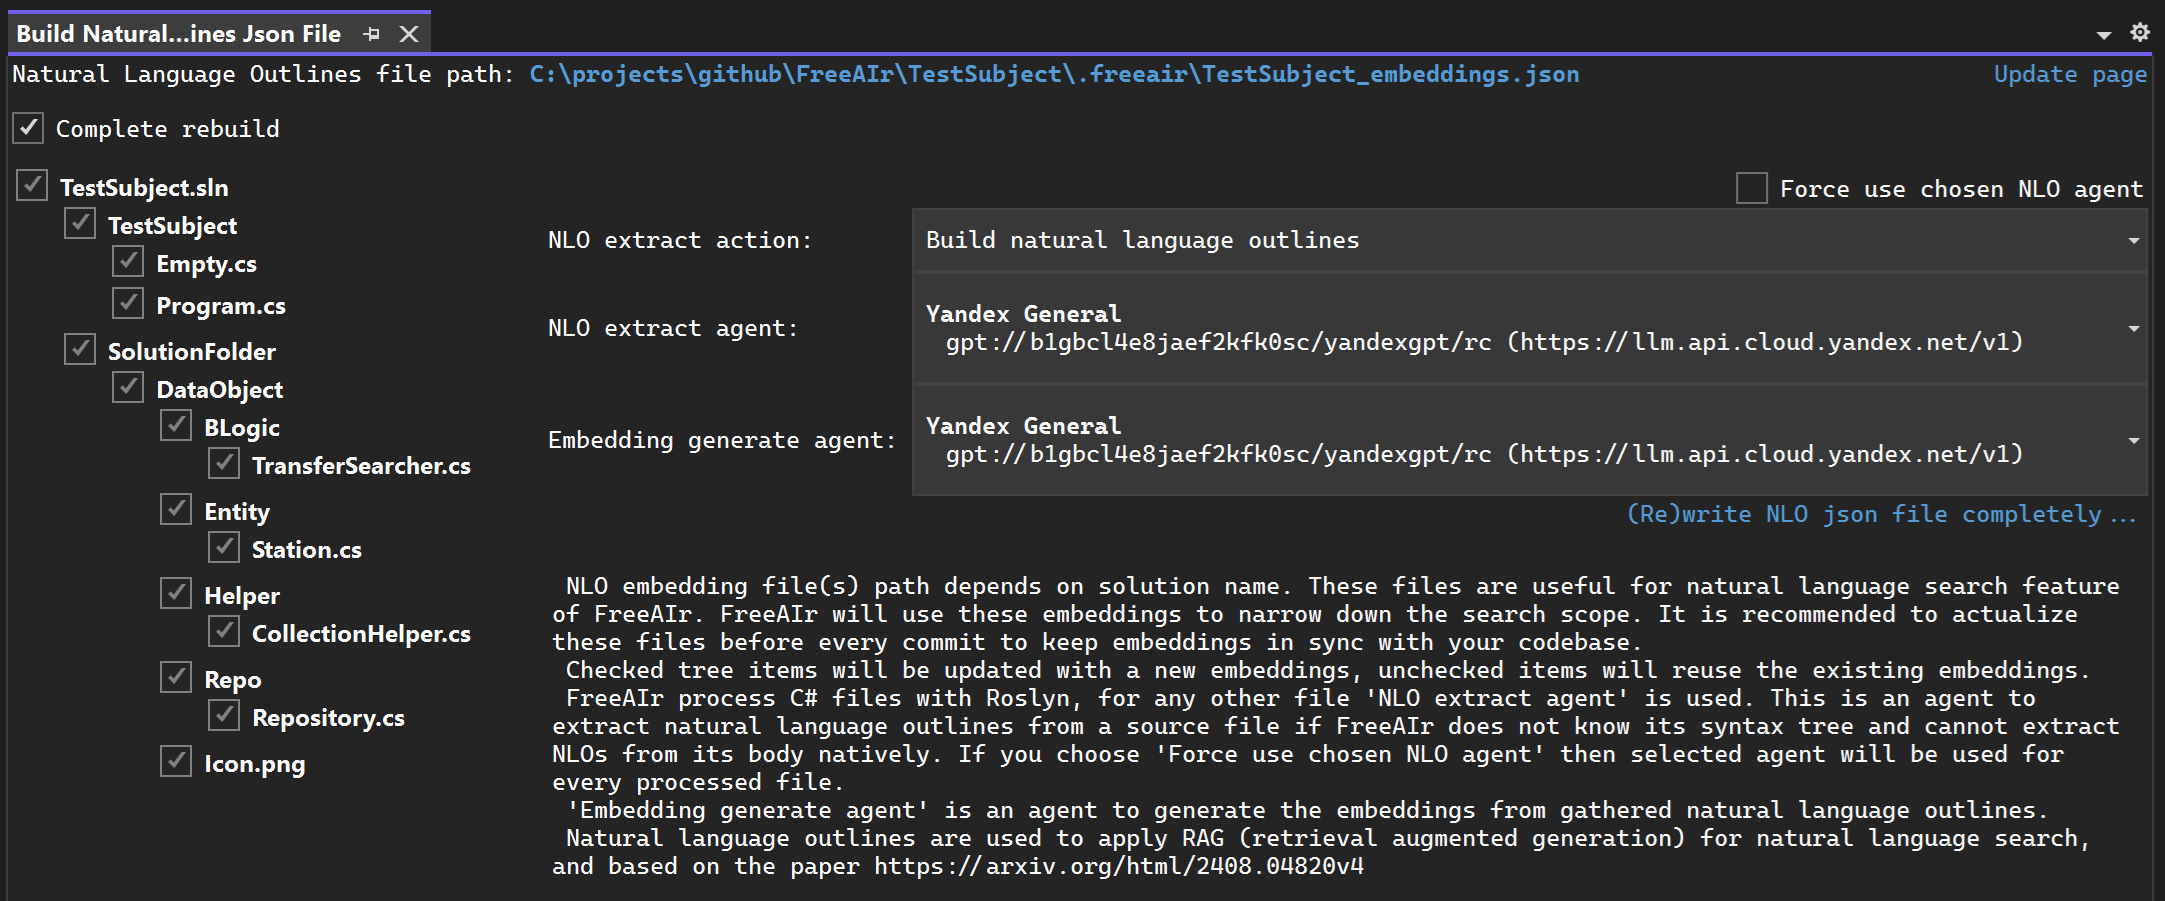
After adding (updating) NLO in the source code files, it is necessary to create (update) JSON files of a special type: NLO-embedding Json files. This can be done for the entire solution via the menu:
or only for modified files via the menu:
In any case, a window will open:
Set up everything you need and create (update) json files. These files contain:
- information about all NLOs (as well as regular comments in the code)
- embeddings of all NLOs
If the files are created, then in the menu
the Use RAG checkbox will become available. When selected, FreeAIr first selects suitable embeddings, reconstructs documents containing NLOs associated with the selected embeddings, and passes these documents to the search engine (instead of all solution or project documents).
It is recommended to save these Json files to a git repository so that the natural language search function works for all team members.
WARNING: In the 3.0 version of FreeAIr the checkbox Use RAG DOES NOT IMPLEMENTED YET.
This is possible. If you are banned only from Copilot:
- Install this VSIX into your Visual Studio. You will need to have Visual Studio 2022 v.17.14 at least.
- Register on openrouter.ai. This is easily can be done via github.com account. Also, you can obtain access to any LLM with OpenAI compatible API. FreeAIr itself does not include any LLM.
- Choose any
freemodel at openrouter.ai and create an access token. - Put your token into options page (see screenshot above).
- That's all, enjoy! But remember: for a free LLM openrouter.ai has daily limits (50 prompts per day, if I remember correctly).
FreeAIr itself has no restrictions, you are able to switch another OpenAI compatible API.
If you are banned from any remote LLM then run LLM locally, which is very easy, for example with KoboldCpp: run KoboldCpp, choose the model, wait for KoboldCpp starts (it opens browser), and then use correct OpenAI compatible endpoint like http://localhost:5001/v1.
- openrouter.ai for free access.
- CCodeAI for inspiration.
- L.AI for inspiration.
- KoboldCpp for testing without daily limits.
- Yandex for supporting grant to access Yandex LLMs.
- to you, visitor. Thanks for reading this. If you are enjoying it please consider give it a ★ in the github repo and ★★★★★ rating on the Visual Studio Marketplace.