Author: Marin Maletić
Date: February 2025
Last Updated: July 2025
This code accompanies the work in the ECMR 2025 paper "Spatial-Semantic Reasoning using Large Language Models for Efficient UAV Search Operations". If you find the work here useful in you own research, please cite the paper:
The original idea was developed as a part of the Master's degree work titled "Control of an Unmanned Aerial Vehicle for Object Detection in 3D Space Based on Spatial Semantics" at Faculty of electrical engineering and computing, University of Zagreb.
The task was to create, present and implement a method of using Large Language Models (LLM) to reduce the time necessary to find the target object in a 3D space. YOLO11 Object Detection and OctoMap are used to map detected objects and its 3D coordinates while LLM uses that information to create an understanding of the UAV and the space around it. The LLM then guides the search to a more logical direction than a random search.

This repository contains all developed algorithms, code and the documentation.
Keywords:
Unmanned aerial vehicle; YOLO; Autonomous search; Space semantics;
LLM; Crazyflie; 3D navigation, Computer vision; LiDAR
Used Technologies:
Crazyflie 2.1; OptiTrack; Livox MID-360 LiDAR; Cartographer SLAM; CloudCompare; OctoMap; A* search algorithm; Polinomial splines; YOLOv8; LLM; Python; OpenCV; Docker
This code was tested in Docker containers provided by LARICS
- Ubuntu 22.04
- ROS 2 (Humble & Iron)
- Python 3.10
- CrazySwarm and CrazySim package
- Octomap of the space in .bt file format
Clone the repository:
git clone https://github.com/larics/UAV-LLM-semantic-reasoning.git
cd UAV-LLM-semantic-reasoning
Other dependencies can be installed with:
pip install -r requirements.txtInstall OctoMap for Python:
apt-get install libqt5opengl5-dev libqt5svg5-dev cmake
sudo apt-get install libdynamicedt3d-dev
pip install trimesh==3.8.11
pip install cython==0.29.25
pip install setuptools==58.0.0
pip install --upgrade "numpy>=1.17.3,<1.25.0"
CXXFLAGS="-std=c++11" pip install octomap-python==1.8.0.post11
export LD_LIBRARY_PATH=/usr/local/lib:$LD_LIBRARY_PATHThe repository is to be clonned as it is outside of the CrazySim (simulation) or CrazySwarm (real world) packages. ROS2 workspace and ROS2 should be sourced before running the code. Models and the sdf file used in the simulation can be downloaded here.
A bash script that runs Tmuxinator with needed terminals is provided:
cd run_simulation
./start_tmux.shcd run_realworld
./start_tmux.sh- Add yolo_ros_msgs folder to ros2_ws/src folder and compile the ROS2 workspace again
- Your ChatGPT API key needs to be added in /config/chatgpt_credentials.yaml file
- Change topic names according to Crazyflie name
- Copy Rviz configuration config/config.rviz to ros2_ws/src/crazyswarm2/crazyflie/config
- Comment out rclpy.init() in crazyswarm_py.py script in crazyswarm2/crazyflie_py/crazyflie_py folder
- Add the camera sensor to the crazyflie model in the simulation
Adding a camera to the crazyflie model:
- Add the camera plugin to /root/CrazySim/crazyflie-firmware/tools/crazyflie-simulation/simulator_files/gazebo/models/crazyflie/model.sdf.jinja, under the IMU sensor at line 52:
    <sensor name="camera_sensor" type="camera">
        <camera>
            <horizontal_fov>1.5184</horizontal_fov>
            <image>
                <width>324</width>
                <height>324</height>
            </image>
            <clip>
                <near>0.1</near>
                <far>100</far>
            </clip>
        </camera>
        <always_on>1</always_on>
        <update_rate>30</update_rate>
        <visualize>true</visualize>
        <topic>/cf_{{ cf_id }}/camera</topic>
</sensor>- Copy gz_bridge.yaml from the config folder to ros2_ws/src/crazyswarm2/crazyflie/config
- Add the bridge node to parse_yaml function in ros2_ws/src/crazyswarm2/crazyflie/launch/launch.py:
gz_bridge_yaml = os.path.join(
        get_package_share_directory('crazyflie'),
        'config',
        'gz_bridge.yaml')

# Append the bridge node to the return value
        Node(
            package='ros_gz_bridge',
            executable='parameter_bridge',
            output='screen',
            parameters = [{'config_file': gz_bridge_yaml}]
)Video results of the simulation and realworld testing of different scenarios can be found in the documentation folder. Below is one example of the algorithm working where the task is to find a computer mouse:
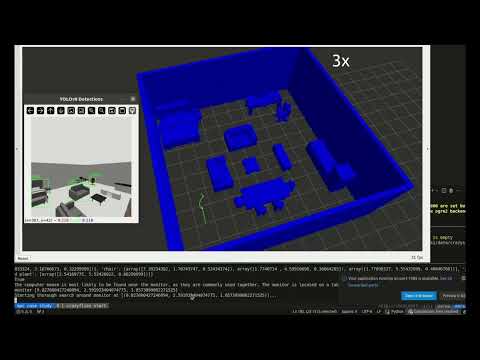
In the terminal in the lower part of the screen, informations about the search are displayed.
The initial scan sees a computer monitor but no mouse, so LLM concludes that the computer mouse could be close to the monitor. Then it conducts a search around it which results with the computer mouse being found.
- Research the possibilities of VLMs
- More diverse testing and benchmark results