This software is a port of SmsPlus, a Sega Master System and Game Gear emulator for RP2040/RP2350 based microcontroller boards like the RaspberryPi Pico and Pico 2. Sound and video are ouput over HDMI. The code for HDMI output is based on Shuichi Takano's Pico-InfoNes project which in turn is based on PicoDVI.
Put your Master System (.sms) and Game Gear (.gg) rom files on a FAT32 formatted SD card. You can organize the roms in directories. A menu is displayed on which you can select the rom to play.
Supports two controllers for two player Master System games. See "about two player games" below for specifics and limitations
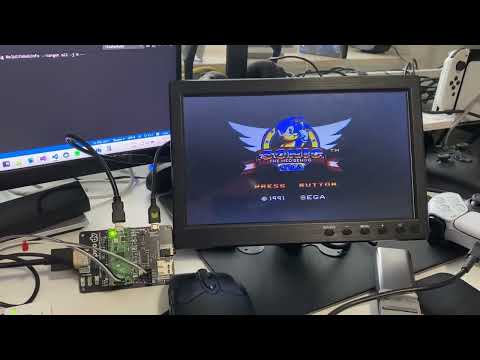
Click on image below to see a demo video.
There are still some issues to be fixed. The emulator runs decently well, especially on the Pico 2/RP2350. On the Pico/RP2040, Some games may not run at full speed or at all. (afterburner).
Warning
On Pico/RP2040, some games show red flashing between screens. This can be occasionally or severe depending on the game. If you are sensitive for this, or experience health issues while playing those games, please stop playing immediately. Runs much better on Pico 2/RP2350.
For Sega Master System (SMS) games that support it, progress can be saved to SD card.
- Saving: To ensure game data is written to the SD card, you must return to the main menu by pressing Select + Start.
- Save Location: Save files are stored in the
/SAVESdirectory with a.SAVextension. - Auto-Loading: When you start a game, its corresponding
.SAVfile will be loaded automatically (if available).
Note
Make sure to return to the menu before powering off, or the save data may be lost.
The binary specific for your config can be downloaded from the releases page.
You need a FAT32 formatted SD card to put your .sms and .gg roms on.
Note
For detailed instructions how to setup specific configurations, see the Pico-InfonesPlus sister project.
- Raspberry Pi Pico and Pimoroni Pico DV Demo Base
- Custom Printed Circuit Board
- Breadboard with components.
These boards already contain an RP2040 cpu, a separate Raspberry Pi Pico is not needed.
- Adafruit Feather RP2040 with DVI Output and FeatherWing - RTC + SD.
- Waveshare RP2040-PiZero Development Board
-
Use the breadboard config for this. Should also work on the Pimoroni Pico DV Demo base, but currently untested. This board does not fit the PCB because of the SP/CE connector on back of the board. The PSRAM on the board is used in stead of flash to load the roms from SD.
An additional PCB design for Waveshare RP2040 & RP2350 Zero including case design by DynaMight1124 based around cheaper but harder to solder components for those that fancy a bigger challenge. It also allows the design to be smaller.
The following controllers are supported.
- BUFFALO BGC-FC801
- SONY DUALSHOCK 4
- SONY DualSense
- Xinput type controllers (Xbox)
- and more...
Also original NES and WII-classic controllers are supported in some configurations.
See the Pico-InfonesPlus sister project for more info.
The emulator supports two player games using two NES controllers or an USB gamecontroller and a NES controller.
Note
You cannot use two USB controllers for two player games. At the moment only one USB controller is recognized by the driver. In this case the USB controller is always player 1. Player 2 must be a NES controller.
| Player 1 | Player 2 | |
|---|---|---|
| USB controller connected | USB | NES port 1 or NES port 2 |
| No usb controller connected | NES port 1 | NES port 2 |
Gamepad buttons:
- UP/DOWN: Next/previous item in the menu.
- LEFT/RIGHT: next/previous page.
- A (Circle): Open folder/flash and start game.
- B (X): Back to parent folder.
- START: Starts game currently loaded in flash.
The colors in the menu can be changed and saved:
- Select + Up/Down changes the foreground color.
- Select + Left/Right changes the background color.
- Select + A saves the colors. Screen will flicker when saved.
- Select + B resets the colors to default. (Black on white)
Gamepad buttons:
- SELECT + START: Resets back to the SD Card menu. Game saves (when available) are saved to the SD card.
- SELECT + UP/SELECT + DOWN: switches screen modes.
- SELECT + A/B: toggle rapid-fire.
- START + A : Toggle framerate display.
- SELECT + LEFT: Switch audio output to the connected speakers on the line-out jack of the Pimoroni Pico DV Demo Base. The speaker setting will be remembered when the emulator is restarted.
When using an USB-Keyboard:
- Cursor keys: Up, Down, left, right
- Z: Back to parent folder
- X: Open Folder/flash and start a game
- S: Starts game currently loaded in flash.
- A: acts as the select button.
Gamepad buttons:
- SELECT + START, Xbox button: Resets back to the SD Card menu. Game saves are saved to the SD card.
- SELECT + UP/SELECT + DOWN: switches screen modes.
- SELECT + A/B: toggle rapid-fire.
- START + A : Toggle framerate display
- SELECT + LEFT: Switch audio output to the connected speakers on the line-out jack of the Pimoroni Pico DV Demo Base. The speaker setting will be remembered when the emulator is restarted.
When using a Genesis Mini controller, press C for SELECT.
When using an USB-Keyboard
- Cursor keys: up, down, left, right
- A: Select
- S: Start
- Z: B
- X: A
Note
The standard NES style layout is used for all controller types. So when using XInput controllers, B and A are swapped.
When using Visual Studio code, make sure to build in Release or RelWithDbinfo mode, as the emulator is too slow in the other modes.
Build shell scripts are available:
- build.sh : Builds .uf2 for the Pimoroni DV Deno Base
- build_alternate.sh: For the PCB or breadboard variant
- build_feather_dvi.sh: For the Adafruit feather
- build_ws_rp2040_pizero.sh: For the Wavehare device
Make sure they are executable by running chmod +x build*.sh in the terminal.
The _debug.sh scripts can be use to create a debug build for each system.
- Improve performance
- Save states