This guide is meant to re-create the React workshop we did but on your local development setup which makes the experience much better. The purpose of this app is to display the list of products from your WordPress WooCommerce. We fetch data via GraphQL (configured with plugins to allow such functionality) and with React to create a blazing fast product catalog with search functionality and more.
This React app was bootsrapped with Create React App.
Begin by cloning the initial_markup branch from wpreactandbeyond-productcatalog
Run the command below:
git clone --single-branch --branch initial_markup https://github.com/dorelljames/wpreactandbeyond-productcatalog.gitAfter cloning, install the package dependencies by running command npm install or better yet run (yarn if you have)
After that, start the development server by running command npm start and following the Getting Started guide below.
Below are the items you need to follow step by step to reach the end output of this app.
- WordPress Backend Guide
- GraphQL Basic Concepts - Queries and Mutations
- Working with HTML, CSS & JavaScript with React
- Converting HTML structure to React Components
- Fetching data from WordPress GraphQL endpoint
- Adding Search Functionality
- Viewing Our Product
We'll use Netlify to upload our App LIVE, making it publicly accessible. It is recommended to save your project in a repo such as GitHub or depending on your preferred Git hosting provider so that you can take advantage of Netlify's continuous delivery feature. See below for a step by step guide:
- Create a repo at GitHub.
- Push code to repo.
- Create an account at Netlify.
- Create a "New Site" by clicking the button at top right corner.
- Select repo after authorizing GitHub. (Tip: Use search if you need to)
- The deploy settings will be automatically filled out. But for reference,
Build commandshould beyarn buildornpm run build.Publish directoryshould be set to/build
- Run a build locally on your project by issuing command:
npm run build - Create an account at Netlify.
- Drag the whole
buildfolder after it's done building to the dropzone area at the bottom part. You'll recognize this with a dashed border div with text "Want to deploy a new site without connecting to Git? Drag and drop your site folder here"
Here goes the detailed explanation of the Getting Started list.
There's nothing really special going here. We just have to configure WordPress 5.2.4 by installing and activating the plugins listed below and adding dummy data. Here's an exported site from All-in-One WP Migration, you can use this and import so you can skip doing the manual work:
- Advanced Custom Fields - Allows us to create custom fields.
- Custom Post Type UI - Allows to create custom post types such as "Books", "Launches" which is not part of default WP post types.
- WooCommerce - Ecommerce, adds ability to sell anything.
- WP GraphQL v0.3.8 - Core plugin to support GraphQL.
- WP GraphiQL v1.0.1 - GraphQL IDE. Basically a playground to try executing queries and mutations.
- WP GraphQL WooCommerce v0.2.2 - Support plugin to enable queries & mutations for WP GraphQL
- WPGraphQL Custom Post Type UI v1.1 - Support plugin to enable queries & mutations for Custom Post Type (CPT) UI
- WPGraphQL for Advanced Custom Fields v0.2.1 - Support plugin to enable queries & mutations for WP GraphQL Advanced Custom Fields (ACF)
NOTE: The WP GraphQL plugins (those with version numbers) are not production ready and installing them requires that you download each releases from their GitHub repository. The decision of why we chose and proceeded with GraphQL for this workshop is because we believe there's no better time but now to learn GraphQL as you probably gonna learn REST API in your career anyway.
In a nutshell, GraphQL is a syntax that describes how to ask for data, and is generally used to load data from a server to a client. You create a Query to fetch data and use Mutation to create or update data to server. If you want to learn the basics, click here
What makes GraphQL awesome is that you are able to specify just exactly the fields you want to get, even its related from others.
Consider the following examples:
- Get all Products from WooCommerce
- Get all Products and their Categories from WooCommerce

The great thing about learning React is that its pre-requisites are just HTML, CSS and JavaScript. If you know ES6 (new syntax improvement for JavaScript), that's a huge plus.
There's nothing to do here but take a moment to take a good look at this HTML markup - a input text button for product search and products in figure tags contained in a div container:
<div>
    <div class="productSearch">
        <input type="text" placeholder="Search for a product" />
    </div>
    <div class="productList">
        <figure class="product">
            <img
                src="https://s3-us-west-2.amazonaws.com/s.cdpn.io/331810/sample71.jpg"
                alt="sample71"
            />
            <div class="price">$19.00</div>
            <figcaption>
                <h3>Wool Hat</h3>
                <p>
                    Sometimes I think the surest sign that intelligent life
                    exists elsewhere in the universe is that none of it has
                    tried to contact us.
                </p>
                <a href="/product/wool-hat">View Product</a>
            </figcaption>
        </figure>
        <figure class="product blue">
            <img
                src="https://s3-us-west-2.amazonaws.com/s.cdpn.io/331810/sample47.jpg"
                alt="sample47"
            />
            <div class="price">$19.00</div>
            <figcaption>
                <h3>Denim Shirt</h3>
                <p>
                    I don't need to compromise on my principles, because they
                    don't have the slightest bearing on what happens to me
                    anyway.
                </p>
                <a href="/product/denim-shirt">View Product</a>
            </figcaption>
        </figure>
        <figure class="product orange">
            <img
                src="https://s3-us-west-2.amazonaws.com/s.cdpn.io/331810/sample52.jpg"
                alt="sample52"
            />
            <div class="price">$19.00</div>
            <figcaption>
                <h3>Wax Jacket</h3>
                <p>
                    You know that is the real problem with nature, something's
                    always stinging you or oozing mucous all over you. Let's go
                    and watch TV.
                </p>
                <a href="/product/wax-jacket">View Product</a>
            </figcaption>
        </figure>
    </div>
</div>To transform and use the initial HTML markup above to our React app, all you have to do is copy and paste the above HTML code markup to /src/App.js in the return statement as shown below.
NOTE: We have to change class to className as well.
If you are unsure, you can always refer to initial_branch and browse the file /src/App.js from there.
import React from "react";
import "./App.css";

function App() {
    return (
        <div>
            <div className="productSearch">
                <input type="text" placeholder="Search for a product" />
            </div>
            <div className="productList">
                <figure className="product">
                    <img
                        src="https://s3-us-west-2.amazonaws.com/s.cdpn.io/331810/sample71.jpg"
                        alt="sample71"
                    />
                    <div className="price">$19.00</div>
                    <figcaption>
                        <h3>Wool Hat</h3>
                        <p>
                            Sometimes I think the surest sign that intelligent
                            life exists elsewhere in the universe is that none
                            of it has tried to contact us.
                        </p>
                        <a href="/product/wool-hat">View Product</a>
                    </figcaption>
                </figure>
                <figure className="product blue">
                    <img
                        src="https://s3-us-west-2.amazonaws.com/s.cdpn.io/331810/sample47.jpg"
                        alt="sample47"
                    />
                    <div className="price">$19.00</div>
                    <figcaption>
                        <h3>Denim Shirt </h3>
                        <p>
                            I don't need to compromise on my principles, because
                            they don't have the slightest bearing on what
                            happens to me anyway.
                        </p>
                        <a href="/product/denim-shirt">View Product</a>
                    </figcaption>
                </figure>
                <figure className="product orange">
                    <img
                        src="https://s3-us-west-2.amazonaws.com/s.cdpn.io/331810/sample52.jpg"
                        alt="sample52"
                    />
                    <div className="price">$19.00</div>
                    <figcaption>
                        <h3>Wax Jacket</h3>
                        <p>
                            You know that is the real problem with nature,
                            something's always stinging you or oozing mucous all
                            over you. Let's go and watch TV.
                        </p>
                        <a href="/product/wax-jacket">View Product</a>
                    </figcaption>
                </figure>
            </div>
        </div>
    );
}

export default App;
Now we have a nice working template and if you may have observed, it's styled and looks good in that instant. That is because all the necessary styling were already added in /src/App.css which is imported or in other words included for use in our React app. Styling is pretty similar to using a stylesheet in our typical HTML & CSS setup but there are other ways to do styling, such as inline styling, CSS-in-JS. We'll just have to leave this up to you to explore.
But have you noticed that we have repeated sections? The figure tags are repeated for the three products, right? When we see something like this, it's a good indication that we can use one of React's main features which is Components - the building blocks of a React App. As per our use case right now, it allows us to split our UI into an independent, reusable piece and keeping it isolated from the rest of our markup.
So we start by creating a React Component that looks like this below. Save this file at /src/Product.js.
// /src/Product.js
import React from "react";

function Product(props) {
    return (
        <figure
            className={
                props.color !== "black" ? `${props.color} product` : `product`
            }
        >
            <img src={props.imgSrc} alt={props.name} />
            <div className="price">{props.price}</div>
            <figcaption>
                <h3>{props.name}</h3>
                <p dangerouslySetInnerHTML={{ __html: props.description }} />
                <a href={props.link}>View Product</a>
            </figcaption>
        </figure>
    );
}

export default Product;
And let's use this Component by updating our code at /src/App.js:
// /src/App.js
import React from "react";
import "./App.css";
import Product from "./Product"; // we imported our Component for later use below

function App() {
    return (
        <div>
            <div className="productSearch">
                <input type="text" placeholder="Search for a product" />
            </div>
            <div className="productList">
                {/** We used our Product Component below and specified props - imgSrc, imageAlt, price, name, description, link **/}
                <Product
                    imgSrc="https://s3-us-west-2.amazonaws.com/s.cdpn.io/331810/sample71.jpg"
                    imageAlt="sample47"
                    price="$19.00"
                    name="Wool Hat"
                    description="Sometimes I think the surest sign that intelligent life exists elsewhere in the universe is that none of it has tried to contact us."
                    link="/product/wool-hat"
                />
                <Product
                    imgSrc="https://s3-us-west-2.amazonaws.com/s.cdpn.io/331810/sample47.jpg"
                    imageAlt="sample71"
                    price="$19.00"
                    name="Denim Shirt"
                    description="I don't need to compromise on my principles, because they don't have the slightest bearing on what happens to me anyway."
                    link="/product/denim-shirt"
                />
                <Product
                    imgSrc="https://s3-us-west-2.amazonaws.com/s.cdpn.io/331810/sample52.jpg"
                    imageAlt="sample52"
                    price="$19.00"
                    name="Wax Jacket"
                    description="You know that is the real problem with nature, something's always stinging you or oozing mucous all over you. Let's go and watch TV."
                    link="/product/wax-jacket"
                />
            </div>
        </div>
    );
}

export default App;
There's so many things going on and you probably feel lost right now. Don't worry, we'll get down to all of this below:
-
import Product from "./Product";- right at the top, before the function declaration, we imported/included our Product Component. -
className- just always take note that everytime we useclassas per in HTML, in React, it should be renamed to this.
<div className="productSearch">
    <input type="text" placeholder="Search for a product" />
</div>propsin Product Component - As you can see ourfunction Product(props)takes an argument namedprops.
import React from "react";

function Product(props) {
    ...
}
Props is one of the fundamental concepts in React that we need to understand. It's short for properties and it basically functions the same with how our standard HTML tags that we know such as img that needs a src attribute to display the image correctly.
<img src="http://example.com/image.jpg" />or the input tag that needs a type attribute to specify whether it's text for standard elements
<input type="text" name="name" />
<input type="email" name="your_email" />
<input type="password" name="password" />
or email for email addresses or password for sensitive data.
Now, in React, we could create our custom properties (props) or attributes as you probably know it and pass it down as data to make our Components flexible.
And we use our Product Component below and specified props - imgSrc, imageAlt, price, name, description, link
<Product
    imgSrc="https://s3-us-west-2.amazonaws.com/s.cdpn.io/331810/sample71.jpg"
    imageAlt="sample47"
    price="$19.00"
    name="Wool Hat"
    description="Sometimes I think the surest sign that intelligent life exists elsewhere in the universe is that none of it has tried to contact us."
    link="/product/wool-hat"
/>jsx- You probably never wondered how you can useHTMLinside a JavaScript function until now.
function App() {
    return (
        <div>
            <div className="productSearch">
                <input type="text" placeholder="Search for a product" />
            </div>
        </div>
    );
}
In plain JavaScript, the above syntax is invalid and will result to an Uncaught SyntaxError error.
Not only that JSX allows us to do such thing but also allows us to easily describe how our structure should be and looks like. It also adds capability to call JavaScript expressions inside the {} tags.
As an example, notice {props.name} in this H3 tag from our Product Component above (/src/Product.js).
<h3>{props.name}</h3>{props.name} gets transformed into whatever props that gets passed on the Component such as below:
<Product name="Blue Jeans" description="Sample description" ... />
So in this case, props.name will be equal to Blue Jeans as well as props.description will be Sample description. You can add as many props as you like but you have to be very conscious here not to overload it to make our Component easier to consume.
Our data is not dynamic. What we actually want is to fetch from an external source such as our WordPress backend. This is the de-facto standard of building apps. Data is usually fetched from a specified source such as REST API's coming from servers and we processed the returned data (usually in JSON format) by creating apps or like others such as automation and other stuff.
We need to use JavaScript npm libraries here to make our jobs easier. So install the following packages from npm by running the command below:
npm install @apollo/react-hooks apollo-boost graphql
See package details below:
- apollo-boost: Package containing everything you need to set up Apollo Client
- @apollo/react-hooks: React hooks based view layer integration
- graphql: Also parses your GraphQL queries
Afterwards, let's begin to use our packages and get to know them as well.
So let's update /src/index.js with the following code below:
// /src/index.js
import React from "react";
import ReactDOM from "react-dom";
import "./index.css";
import App from "./App";

import ApolloClient from "apollo-boost";
import { ApolloProvider } from "@apollo/react-hooks";

const client = new ApolloClient({
    uri: "https://dev.eternusglobal.com/react/graphql"
});

ReactDOM.render(
    <ApolloProvider client={client}>
        <App />
    </ApolloProvider>,
    document.getElementById("root")
);
NOTE: You need to swap the uri with the WordPress local setup here if you have one or use this LIVE self-hosted one made for this specific workshop.
We imported ApolloClient from @apollo-boost and ApolloProvider from @apollo/react-hooks. By importing ApolloClient we can simplify the process of fetching data, loading state detection and error in one go using useQuery React Hook. It makes it easy to take advantage of other features also like built-in caching which is probably you have to configure yourself using multiple libraries. We passed our initialized client as props to ApolloProvider Component that houses our App component so we can use it everywhere in our entire React App.
Now, let's also update our /src/App.js as per below. Don't worry, just copy and paste this for now and let's walk through together each item once done.
// /src/App.js
import React from "react";
import "./App.css";
import { useQuery } from "@apollo/react-hooks";
import { gql } from "apollo-boost";

import Product from "./Product";

const GET_PRODUCTS = gql`
    query getProducts {
        products {
            edges {
                node {
                    id
                    name
                    description
                    slug
                    price
                    image {
                        sourceUrl
                    }
                }
            }
        }
    }
`;

function App() {
    const { loading, error, data } = useQuery(GET_PRODUCTS);

    return (
        <div className="productCatalog">
            <h2>WP React and Beyond Catalog</h2>
            <div className="productSearch">
                <input type="text" placeholder="Search for a product" />
            </div>
            <div className="productList">
                {(loading && <p className="loading">Fetching products...</p>) ||
                    (error && <p>Error :(</p>) ||
                    data.products.edges.map(product => (
                        <Product
                            key={product.node.id}
                            imgSrc={product.node.image.sourceUrl}
                            name={product.node.name}
                            description={product.node.description}
                            link={"products/" + product.node.slug}
                            price={product.node.price}
                            extraClass="blue"
                        />
                    ))}
            </div>
        </div>
    );
}

export default App;
Once again, let's try to understand what's going on here.
import { useQuery } from "@apollo/react-hooks";- ImportinguseQueryto allow us to fetch our data easily from our WordPress GraphQL endpoint.
2.import { gql } from "apollo-boost"; - We imported gql to allow us to parse our JavaScript template into GraphQL query strings of the standard GraphQL AST.
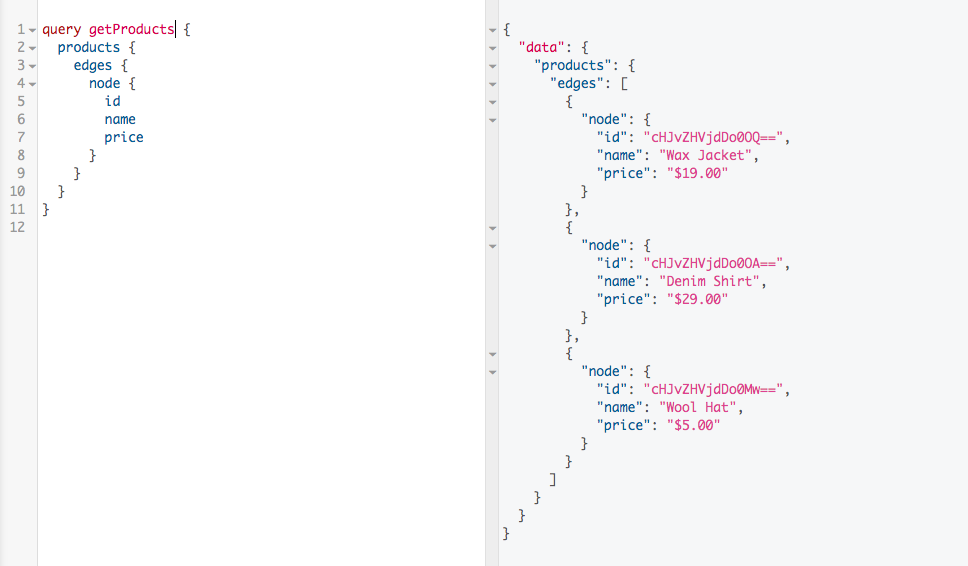
- We just specified our first GraphQL query using
gqlwe imported earlier by saving it toGET_PRODUCTSconstant variable.
const GET_PRODUCTS = gql`
    query getProducts {
        products {
            edges {
                node {
                    id
                    name
                    description
                    slug
                    price
                    image {
                        sourceUrl
                    }
                }
            }
        }
    }
`;
const { loading, error, data } = useQuery(GET_PRODUCTS);- Here we destructure the returned object from theuseQuery(GET_PRODUCTS)call. This code right here fetches the data from our WP GraphQL endpoint and as a result, this gives us 3 variables that we could work on:
loading- used to indicate that fetching data is still in progress. We want to make sure our user knows what's happening in our app. It's really important to put a loading indicator or a text indicating what's going on rather have the user stare at a void of blank white screen.error- for some whatever unknown reason, fetching data might not succeed. If set, we can use this to inform our users so they could retry by refreshing the browser or providing a functionality in your app to redo the fetching.data- as the name indicates, the result of fetching data is saved here. We'll be processing this later.
- So far, fetching is done but we also want to make use of the data and process it so be used of the
Product Componentthat we created earlier:
<div className="productList">
    {(loading && <p className="loading">Fetching products...</p>) ||
        (error && <p>Error :(</p>) ||
        data.products.edges.map(product => (
            <Product
                key={product.node.id}
                imgSrc={product.node.image.sourceUrl}
                name={product.node.name}
                description={product.node.description}
                link={"products/" + product.node.slug}
                price={product.node.price}
                extraClass="blue"
            />
        ))}
</div>
Remember that anything inside {} is JavaScript expression. So that means you can call JS functions inside it. Let's break down the code above:
(loading && <p className="loading">Fetching products...</p>)- Ifloadingvalue is booleantrue, showFetching products...in a P tag. Remember our loading indicator? This is it.error && <p>Error :(</p>)- Or whenerroris set which means the fetching results to an error, show this P tag withError :(message.mapfromdata.products.edges- Our list of products based from theGET_PRODUCTSquery is saved atdata.products.edges. This means to iterate over each item to use our ProductComponentand passing the rightpropsto show relevant info per product.
So for each product, we could specify each props that is needed that could be found in product.node.
data.products.edges.map(product => (
    <Product
        key={product.node.id}
        imgSrc={product.node.image.sourceUrl}
        name={product.node.name}
        description={product.node.description}
        link={"products/" + product.node.slug}
        price={product.node.price}
        extraClass="blue"
    />
));
For reference, check this out
So far we are able to get data from WordPress and list them all but when we look for a specific product, it's always faster to search, right?
At this point, you've learned how to create Component, what props are. Now, we'll also learn state which deals with data - the very data that a Component can hold, be changed / processed according to your App's needs.
Let's begin by updating /src/App.js and walk through the items the same way we did earlier.
import React, { useState, useEffect } from "react";
import "./App.css";
import { useQuery } from "@apollo/react-hooks";
import { gql } from "apollo-boost";

import Product from "./Product";

const GET_PRODUCTS = gql`
    query getProducts {
        products {
            edges {
                node {
                    id
                    name
                    description
                    slug
                    price
                    image {
                        sourceUrl
                    }
                }
            }
        }
    }
`;

function App() {
    const [products, setProducts] = useState([]);
    const { error, loading, data } = useQuery(GET_PRODUCTS);

    useEffect(() => {
        if (error) {
            setProducts([]);
        }

        if (!loading && data && data.products) {
            setProducts(data.products.edges.map(p => p.node));
        }
    }, [error, loading, data]);

    const searchProducts = e => {
        const currentSearch = e.target;

        setProducts(
            currentSearch.value === ""
                ? data.products.edges.map(p => p.node)
                : prevProducts =>
                      prevProducts.filter(product => {
                          return product.name
                              .toLowerCase()
                              .includes(currentSearch.value.toLowerCase());
                      })
        );
    };

    return (
        <div className="productCatalog">
            <h2>WP React and Beyond Catalog</h2>
            <div className="productSearch">
                <input
                    type="text"
                    placeholder="Search for a product"
                    onChange={e => searchProducts(e)}
                />
            </div>
            <div className="productList">
                {(loading && (
                    <p className="text-white">Fetching products...</p>
                )) ||
                    (error && <p>Error :(</p>) ||
                    (products.length >= 1 ? (
                        products.map(product => (
                            <Product
                                key={product.id}
                                imgSrc={product.image.sourceUrl}
                                name={product.name}
                                description={product.description}
                                link={"products/" + product.slug}
                                price={product.price}
                                extraClass="blue"
                            />
                        ))
                    ) : (
                        <p className="text-white">No products...</p>
                    ))}
            </div>
        </div>
    );
}

export default App;
So let's get down from top to bottom of the changes:
-
import React, { useState, useEffect } from "react";- We addeduseStateanduseEffectfor later use. Those two are basically React Hooks. Up until now, you haven't seen aClass Component. In earlier releases of React until React Hooks was released, when you need to usestatefunctionality, you have to convert your component to aClass Component. We'll not go through that here but if you want to learn about it, see React Class Component here. So React Hooks according to the documentation allows you to use state and other React features without writing a class. Click here to learn the motivation of why React Hooks was created -
const [products, setProducts] = useState([]);-useStateis a hook (a special function) that let's us "hook" into React features such as usingstatein this case. This array destructuring basically sets two variables for us ready to use. One isproductswhich is where we'll save the fetched products from ouruseQuerycall andsetProductsas a function to update ourproductsin ourstate. You could also observe that we initializeproductsas an empty array[]. -
useEffect- This allows us to perform and do something whenerror,loading,datachanges. Our main concern really here is to just set theproducts stateby callingsetProducts()function oncedatais available. And if by any means something went wrong anderroris set, we want to set ourproductsback to an empty array and let our users know that an error occurred.
useEffect(() => {
    if (error) {
        setProducts([]);
    }

    if (!loading && data && data.products) {
        setProducts(data.products.edges.map(p => p.node));
    }
}, [error, loading, data]);- Event handling via
onChange- So let's say, you type something at the search box such as "a" we want to search whose product name includes "a" andonChangefunction here basically tells us that when the search box value changes, we want to runsearchProductspassing down the current event so we can get the value and do some filtering.
<input
    type="text"
    placeholder="Search for a product"
    onChange={e => searchProducts(e)}
/>searchProducts- this function handles the search box change.
It saves the event target (e.target) so we can use the value in filtering down the products.
const currentSearch = e.target;So when the value of the search box is empty, we just set it back to all products we fetched initially which is saved to data:
setProducts(
  currentSearch.value === ""
    ? data.products.edges.map(p => p.node)
  ...
)
and if it's not, we go through all the products in our current state and use the JS native filter function to check if each product iteration includes the current search value and set it as the current products in our state by using setProducts().
setProducts(
  ...
    : prevProducts =>
        prevProducts.filter(product => {
          return product.name
            .toLowerCase()
            .includes(currentSearch.value.toLowerCase());
        })
);
NOTE: This search implementation is good only for a small set of data. It can only search from the fetched data set. Sooner or later you'll have to implement pagination and use GraphQL query to get products by "name", etc.
For reference, check this out.
You may have noticed that each Product Component has a View Product button but it doesn't work when clicked. Going to /products/wax-jacket results doesn't take you to that specific product. What we actually want to happen here is to show the Product specific itself. To keep things simple, we'll use the same layout we have in our Product list but also fetch the categories of the product as an additional info.
Let's begin installing a package. Since we're changing URL's here, we want to use react-router-dom. Run command below:
npm install react-router-dom
We'll have to update first /src/index.js, just copy and paste the code below.
// /src/index.js
import React from "react";
import ReactDOM from "react-dom";
import "./index.css";
import App from "./App";
import ProductDetail from "./ProductDetail";
import { BrowserRouter, Route, Switch } from "react-router-dom"; // added for `react-router-dom`

import ApolloClient from "apollo-boost";
import { ApolloProvider } from "@apollo/react-hooks";

const client = new ApolloClient({
    uri: "https://dev.eternusglobal.com/react/graphql"
});

ReactDOM.render(
    <ApolloProvider client={client}>
        {/** Since we're dealing now with multiple paths, notice how components get passed as Prop per route **/}
        <BrowserRouter>
            <Switch>
                <Route exact path="/" component={App} />
                <Route path="/products/:slug" component={ProductDetail} />
            </Switch>
        </BrowserRouter>
    </ApolloProvider>,
    document.getElementById("root")
);
We imported BrowserRouter, Route and Switch to allow us to work with URL's.
import { BrowserRouter, Route, Switch } from "react-router-dom";Now to use the following imports above, we have to add those under ApolloProvider component as shown below:
...

ReactDOM.render(
  <ApolloProvider client={client}>
    <BrowserRouter>
      <Switch>
        <Route exact path="/" component={App} />
        <Route path="/products/:slug" component={ProductDetail} />
      </Switch>
    </BrowserRouter>
  </ApolloProvider>,
  document.getElementById("root")
);
A <Switch> looks through all its children <Route> elements and renders the first one whose path matches the current URL. So for, below we load the App Component when the URL exactly matches /. Notice the exact attribute:
<Route exact path="/" component={App} />Lastly, when he hit /products/:slug which should be based from the product's slug, we will use the ProductDetail Component. This component will be in charge of displaying the details of the product per URL, /products/wax-jacket or /denim-shirt, etc.
Create our ProductDetail Component file at /src/ProductDetail.js
import React from "react";
import "./App.css";
import { useQuery } from "@apollo/react-hooks";
import gql from "graphql-tag";
import { Link, useParams } from "react-router-dom";

const GET_PRODUCT_DETAILS = gql`
    query getProductBySlug($slug: String) {
        product: productBy(slug: $slug) {
            name
            description
            price
            image {
                sourceUrl
            }
            categories {
                edges {
                    node {
                        name
                    }
                }
            }
        }
    }
`;

function ProductDetail() {
    const { slug } = useParams();
    const { error, loading, data } = useQuery(GET_PRODUCT_DETAILS, {
        variables: { slug }
    });

    if (loading) return <p className="text-white">Fetching...</p>;
    if (error) return <p className="text-white">ERROR: {error.message}</p>;

    const {
        image: { sourceUrl: imgSrc },
        price,
        name,
        description,
        categories: { edges: categories }
    } = data.product;

    return (
        <div className="productList">
            <figure className="black product">
                <img src={imgSrc} alt={name} />
                <div className="price">{price}</div>
                <figcaption>
                    <h3>{name}</h3>
                    <div dangerouslySetInnerHTML={{ __html: description }} />
                    <br />
                    <p>
                        Category:{" "}
                        {categories
                            .map(category => category.node.name)
                            .join(",")}
                    </p>
                    <Link to="/">Go Back</Link>
                </figcaption>
            </figure>
        </div>
    );
}

export default ProductDetail;
The Component code is pretty similar with the App Component we had earlier where we fetched all the products in our WP GraphQL endpoint. We still have the loading, error, data thing based from the useQuery call which is defined at the gql query but this time, it's saved in GET_PRODUCT_DETAILS constant variable. The only thing you probably notice is now we are passing variables to our query.
const GET_PRODUCT_DETAILS = gql`
  query getProductBySlug($slug: String) {
    product: productBy(slug: $slug) {
      name
      description
      ...
    }
  }
}
$slug here is specified that is should be a String and we passed whatever value there is in the GraphQL query in getProductBySlug.
Notice also how we added and fetched the categories in one go:
...
  image {
    sourceUrl
  }
  categories {
    edges {
      node {
        name
      }
    }
  }
...
That's the real power of GraphQL, in REST API you probably have to issue additional fetch request to get the categories of the Product specifying the id of the product.
Then in return statement we just show the categories, comma separated.
<p>Category: {categories.map(category => category.node.name).join(",")}</p>One last thing, we have to update our link in the Product Component because we're using the A tag <a href="#"></a>. We'll have to use React Router's Link to be able to pass in the slug of each product viewed.
So in /src/Product.js, we update it with the following code:
import React from "react";
import { Link } from "react-router-dom";

function Product({ imgSrc, name, description, link, price, color = "black" }) {
    return (
        <figure className={color !== "black" ? `${color} product` : `product`}>
            <img src={imgSrc} alt={name} />
            <div className="price">{price}</div>
            <figcaption>
                <h3>{name}</h3>
                <div dangerouslySetInnerHTML={{ __html: description }} />
                <Link to={link}>View Product</Link>
            </figcaption>
        </figure>
    );
}

export default Product;
This may come new to you. You asked, where's props. It's still there but we just used our new learned technique we've been using called object destructuring here so we can make our code a little bit cleaner and easier to read - no more doing the props.name or props.price thing.
So what happened with our Product Component here?
First, we imported Link from React Router.
import { Link } from "react-router-dom";and lastly use it and update our A tag.
<Link to={link}>View Product</Link>where link here follows and matches the pattern we specified earlier, e.g: /products/denim-shirt or /products/wax-jacket.
So that's it, clicking the View Product should load the ProductDetail Component and fetch the details for that product and show it to us. For reference, check this out.
Here goes some suggestions to further learn React and this is meant for Further Learning list.
At certain point in your app, you'll have to implement pagination because getting all products at once takes too much time. Since we're using Apollo GraphQL client, implementing pagination is easy. Check pagination implemenation out here. Our WP backend is using cursor-based pagination so definitely go that route. I think Relay is applicable too. I'll leave the decision up to you. You can do it. 💪
So far, we only focused on displaying our list of products. But we could also further enhance our Product Catalog App by providing a filter functionality for Categories or even Tags. We already did a filter exercise when we implemented our Product search functionality. So basically this would require you to do the following:
- Add
categoriesin GraphQL queryGET_PRODUCTS - Create a
categoriesstate and list it in a SELECT tag. - Add an
onChangeevent handler and create a function to filter down the products as per selected option.
Sounds easy, right? Pretty sure it is, you can do it. 💪
This is the same filtering exercise but your target here is the current price of each Product. So in pure HTML, you create a range slider by something like this below:
<input type="range" min="1" max="100" value="50" class="slider" id="myRange" />All you have to do now is get the current range value and filter the products whose price are within the range.
Best of luck, for sure you can do it. 💪
Here goes some suggestions to take you to the next level and is meant to for More Challenge list.
Here's a more challenging exercise, implement an Add to Cart functionality. This requires you create a products in your App's state which in turned allows you to add products in your cart, update the quantity and remove as well.
What's great about this exercise is that this allows you to think from the very beginning. On how we created a Component which is in this case is a Cart component with products added in it. I won't spoil so much as this should be meant to give you more challenge.
So best of luck! Stay strong, you can do it. 💪
Last but not the least, if you made it this far and have implemented the pre-requisite of Add to Cart functionality then you're a godamn hero already. Yay! This is probably the last task that you can be ever proud once you get to finished this.
Here's WooCommerce WordPress API as my gift to you. You sure need to be calling API call's here and you can use axios as your client to send those requests.
This sure is gonna be worth your time and you can show it off in your portfolio so go for it. So go for the kill! 💪