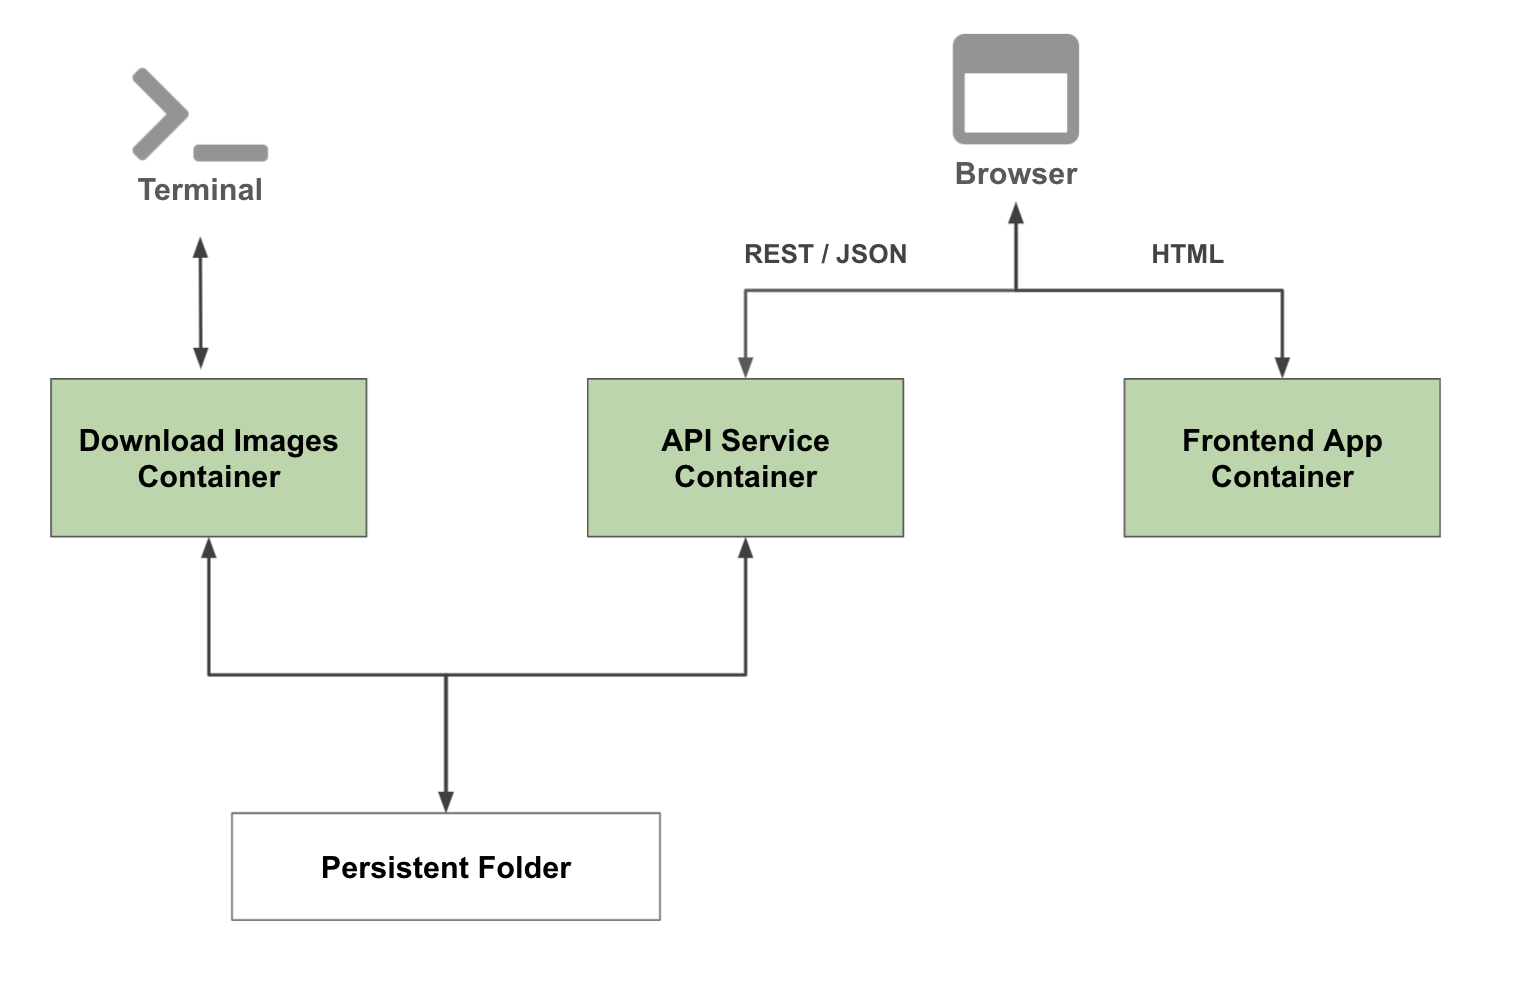
In this tutorial we will setup three simple containers and use a persistent folder to share content from one to the other. The following architecture is what we will implement today:
- Have Docker installed
- Cloned this repository to your local machine with a terminal up and running
- Check that your Docker is running with the following command
docker run hello-world
Install Docker Desktop
- To make sure we can run multiple container go to Docker>Preferences>Resources and in "Memory" make sure you have selected > 4GB
Follow the instructions for your operating system.
If you already have a preferred text editor, skip this step.
- Clone or download from here
- Run
docker container ls - Stop any container that is running
- Run
docker system prune - Run
docker image ls
-
Build image by running
docker build -t frontend-app -f Dockerfile . -
Run container by running
docker run --rm --name frontend-app -ti frontend-app -
Can we see the index.html inside the
frontend-appcontainer? -
Since
http-serveris installed in the container we can run it by typinghttp-serverin the docker shell -
Go to
http://localhost:8080/on a browser and do we see anything? -
Where is our index.html?
-
Now exit the
frontend-appcontainer and rundocker run --rm --name frontend-app -ti --mount type=bind,source="$(pwd)",target=/app frontend-appfor windows put in your current working directory path -
Run
http-serverin the docker shell -
Go to
http://localhost:8080/on a browser and do we see anything? -
We need to expose the port
8080from the container to the host so that we can access the web site running inside thefrontend-appcontainer -
Now exit the
frontend-appcontainer and rundocker run --rm --name frontend-app -ti --mount type=bind,source="$(pwd)",target=/app -p 8080:8080 frontend-appfor windows put in your current working directory path -
Run
http-serverin the docker shell -
Go to
http://localhost:8080/and Yeah!!! you should see our app in the browser
- Rather that type in all the commands for
docker buildanddocker runwith all the parameters each time going forward we will write them into adocker-shellfile so that it is easier for us to use and also can be share by your team member so the container is started up in the exact way by everyone
Type the command
cd frontend-app- Run
sh docker-shell.shordocker-shell.batfor windows
To install a new node package use npm install <package name> from the docker shell
To run development web server run http-server from the docker shell
Test the web app by going to http://localhost:8080/
First let is create a persistent-folder that will be used to save the downloaded images and also mounted to multiple containers so we can share content between containers.
- Create a folder
persistent-folderat the same level as our container folders. So you should have your directories like this:
├── api-service
├── database-server
├── download-images
├── frontend-app
└── persistent-folder
Type the command
cd download-images- Run
sh docker-shell.shordocker-shell.batfor windows
in the download-images directory to startup (build and run) the docker container. The container contains a Linux kernel and will install all dependencies for the image downloader. Running this command for the first time will take around 90 seconds (depending on the system you're using). This command automatically builds and runs the Docker container, where you should automatically be entered into the Linux kernel in the app Python virtual environment.
If you exit the Docker container, and run the command docker images | grep download-images, you'll see some nice information about the image name, tag, image ID, creation date, and size
Now that you are inside the Docker container, run the example command
python -m cli --nums 10 --search "oyster mushrooms" "crimini mushrooms" "amanita mushrooms" --opp "search"
python -m cli --opp "verify"
where
numsis the number of images to downloadsearchcontains the search termsoppis the operation whether tosearchorverifythe images
Images will be downloaded in a sub-directory named persistent-folder/dataset
Type the command
cd api-service- Run
sh docker-shell.shordocker-shell.batfor windows
To install a new python package use pipenv install requests from the docker shell
To run development api service run uvicorn_server from the docker shell
Test the API service by going to http://localhost:9500/
Since we have 3 containers running let's access data across them:
1) Read the list of of images downloaded by the download-images from the api-service container and expose it as a REST API
- Add a new route (A Fast API method to generate a REST API) to return a list of labels and path
- Add this code block to the api/service.py:
@app.get("/get_demo_images")
async def get_demo_images():

    label_names = glob(os.path.join(dataset_path, '*'))
    print("Labels:", label_names)

    # Generate a list of labels and path to images
    data_list = []
    for label in label_names:
        # Images
        image_files = os.listdir(label)
        data_list.extend([(label.split("/")[-1], os.path.join(dataset_path, label, f))
                         for f in image_files])

    print("Full size of the dataset:", len(data_list))
    print("data_list:", data_list[:5])

    # Convert to json
    data_list = [{'label': itm[0], 'path':itm[1]} for itm in data_list]

    return data_list
- Go to
http://localhost:9500/get_demo_imagesand what do you see?
- In our
frontend-appcontainer we will add a javascript code block to talk to the backend to read the list of data and display it in HTML - Open
index.htmlfile and add this code block in the<script></script>section:
    # Add in script to pull demo data
    // API URL
    var BASE_API_URL = 'http://localhost:9500/';
    axios.defaults.baseURL = BASE_API_URL;

    function build_image_list() {
        // Get a reference to the UI element image_list_container
        var image_list_container = document.getElementById("image_list_container");

        axios.get('/get_demo_images')
            .then((response) => {
                console.log(response.data);

                // build list
                let list = "<ol>";
                response.data.forEach(function (item, index) {
                    list += "<li>" + item["label"] + " : " + item["path"] + "</li>"
                });


                list += "</ol>"

                image_list_container.innerHTML = list;
            });
    }

    // Call Build image list
    build_image_list();
- Go to
http://localhost:8080/and what do we see now?