AWS에서 제공하는 쿠버네티스 환경 Amazon Elastic Kubernetes Service(Amazon EKS)에서 클러스터와 노드를 구성합니다.
Github main branch에 푸쉬하게 되면 ArgoCD가 Pull해와서 Kubernetes에 애플리케이션을 배포하게 됩니다.
본 프로젝트에서는 EKS 사용법과 Ingress로 ALB를 설정할 때 겪은 트러블 슈팅, Auth Server와 Redis를 연결시켜주는 방법, kubectl 관련 명령어, 사용자 추가 방법 들을 알아보고 적용시켜 staging 환경에서의 EKS를 구성하는 것이 목표입니다.
- USE
- 구성
- Project Explanation
- Start
- EKS로 클러스터와 노드 생성
- ekctl 설치 ~ alb설치 과정
- Ingress로 alb를 설정할 때 알아둘 것
- Auth-Server와 redis 연결하기
- kubectl 명령어 사용하기
- ArgoCD 설치하기
- namespace
- clean up
- Kubernetes
- EKS (Kubernetes 버전 1.21)
- node (t3.large 35)
- CD tool
- ArgoCD
- Monitoring
- Prometheus
- Grafna
├── README.md
├── dump.rdb
├── eks초기설정
│   ├── AWSLoadBalancerControllerIAMPolicy
│   ├── cluster-role-trust-policy.json
│   ├── iam_policy.json
│   └── node-role-trust-policy.json
├── k8s
│   ├── deployment-apiserver.yaml
│   ├── deployment-authserver.yaml
│   ├── deployment-redis.yaml
│   ├── grafana.yaml
│   ├── ingress-argo.yaml
│   ├── ingress.yaml
│   ├── service-apiserver.yaml
│   ├── service-authserver.yaml
│   └── service-redis.yaml
├── make-cluster-2.yaml
├── make-cluster.md
└── make-cluster.yaml
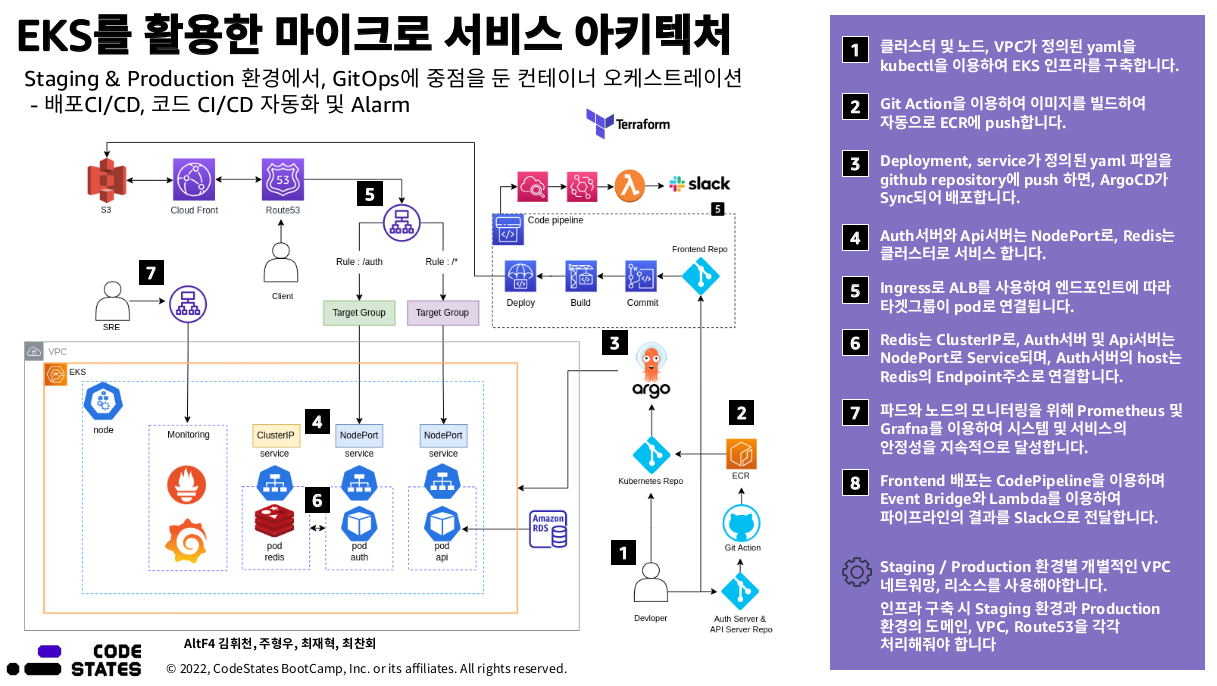
- EKS로 클러스터와 노드를 생성한다.
- deploymnet로는 API Server, Auth Server, Redis 총 3개로 구성한다.
- Service는 3개로써, API Server와 Auth Server는 nodePort로, Redis는 ClusterIP로 구성한다.
- Ingress는 alb를 이용하여 구성한다 (ingress controller 및 ingress)
- ArgoCD와 Github를 이용하여 클러스터를 관리한다.
- 모니터링으로는 프로메티우스와 Grafana를 이용해 구성한다.
- EKS 사용자 추가하기
- 명령어 정리
EKS 클러스터를 생성하는 방법은 2가지가 있다. 첫번째 방법은 콘솔을 이용하는 것이고, 두번째 방법은 eksctl를 이용하는 방법이 있다.
eksctl create cluster -f cluster.yaml
공식문서 (url 넣기)를 기반으로 eksctl을 설치 후 간단하게 클러스터를 생성할 수 있다. 하지만 클러스터만 생성 될 뿐 노드는 생성하지 못한다.
노드까지 생성할려면 다음 명령어를 실행하면 된다.
eksctl create cluster \
--name cluster-1 \
--version 1.21 \
--region us-west-2 \
--nodegroup-name c1-nodes \
--node-type t3.medium \
--nodes 2
이와같이 eksctl에 여러가지 옵션을 줄 수 있다.
yaml로도 클러스터와 노드를 정의해서 사용할 수 있다.
make-cluster.yaml을 실행시켜 원하는대로 노드와 권한, vpc 등을 정의해서 시작할 수 있다.
실행명령어는 다음과 같다.
kubectl apply -f make-cluster.yaml
1-1. ekctl 다운
curl --silent --location "https://github.com/weaveworks/eksctl/releases/latest/download/eksctl_$(uname -s)_amd64.tar.gz" | tar xz -C /tmp
1-2. 압축 해제된 이진파일 옮기기
sudo mv /tmp/eksctl /usr/local/bin
1-3. 버전확인
eksctl version
2-1. 생성(생성되는데 시간이 조금 걸림)
eksctl create cluster --name staging --region ap-northeast-2
(eksctl create cluster --name my-cluster --region region-code)
2-2. 리소스 보기(클러스터 노드 확인)
kubectl get nodes -o wide
2-3. 클러스터에 실행중인 워크로드 확인
kubectl get pods --all-namespaces -o wide
2-4. 클러스터와 통신
aws eks update-kubeconfig --region region-code --name my-cluster
3-1. IAM 정책 생성
curl -o iam_policy.json https://raw.githubusercontent.com/kubernetes-sigs/aws-load-balancer-controller/v2.4.0/docs/install/iam_policy.json
3-2. IAM 정책 만들기
aws iam create-policy \
--policy-name AWSLoadBalancerControllerIAMPolicy \
--policy-document file://iam_policy.json
3-3. eksctl을 이용해 kubectl을 사용하여 IAM 역할을 생성하고 AWS 로드 밸런서 컨트롤러의 kube-system 네임스페이스에 aws-load-balancer-controller라는 Kubernetes 서비스 계정을 추가
eksctl create iamserviceaccount \
--cluster=staging \
--namespace=kube-system \
--name=aws-load-balancer-controller \
--attach-policy-arn=arn:aws:iam::060701521359:policy/AWSLoadBalancerControllerIAMPolicy \
    --approve


(eksctl create iamserviceaccount \
--cluster=my-cluster \
--namespace=kube-system \
--name=aws-load-balancer-controller \
--attach-policy-arn=arn:aws:iam::111122223333:policy/AWSLoadBalancerControllerIAMPolicy \
--override-existing-serviceaccounts \
--approve)
⚠️ Warning
no IAM OIDC provider associated with cluster
문구가 뜨면 try 뒤 부터 복사한다음 --approve를 붙여서 실행 후 위 명령어 다시 실행합니다
eksctl utils associate-iam-oidc-provider --region=ap-northeast-2 --cluster=staging --approve
4-1. eks-charts 리포지토리 추가
helm repo add eks https://aws.github.io/eks-charts
4-2. 최신 차트가 적용되도록 로컬 리포지토리를 업데이트
helm repo update
4-3. aws 로드밸런서 컨트롤러 설치
helm install aws-load-balancer-controller eks/aws-load-balancer-controller \
-n default \
--set clusterName=staging \
--set serviceAccount.create=false \
--set serviceAccount.name=aws-load-balancer-controller

( helm install aws-load-balancer-controller eks/aws-load-balancer-controller \
-n kube-system \
--set clusterName=cluster-name \
--set serviceAccount.create=false \
--set serviceAccount.name=aws-load-balancer-controller )
4-4. 다음과 같이 떠야함
> kubectl get deployment -n kube-system aws-load-balancer-controller
    NAME                           READY   UP-TO-DATE   AVAILABLE   AGE
    aws-load-balancer-controller   2/2     2            2           47s
키 - kubernetes.io/cluster/pj4-staging
값 - shared 또는 owned

(키 - kubernetes.io/cluster/cluster-name)
(값 - shared 또는 owned)
5-1. 프라이빗 서브넷에 태그 추가
키 - kubernetes.io/role/internal-elb
값 - 1
5-2. 퍼블릭 서브넷에 태그 추가
키 - kubernetes.io/role/elb
값 - 1
curl -o eks-console-full-access.yaml https://amazon-eks.s3.us-west-2.amazonaws.com/docs/eks-console-full-access.yaml
kubectl apply -f eks-console-full-access.yaml
6-2. 사용자 추가 RBAC(마스터권한)
eksctl create iamidentitymapping \
--cluster 클러스터이름 \
--arn arn:aws:iam::xxxxxxxxxxxx:user/유저이름 \
--username 유저이름 \
--group system:masters
6-3. 확인
eksctl get iamidentitymapping --cluster eksworkshop-eksctl
6-4. 사용자 추가에 관한 내용은 아래 블로그에 정리해 두었습니다.
# k8s/ingress.yaml
apiVersion: networking.k8s.io/v1
kind: Ingress
metadata:
  name: project4
  namespace: default
  annotations:
    kubernetes.io/ingress.class: alb
    alb.ingress.kubernetes.io/scheme: internet-facing
    alb.ingress.kubernetes.io/group.name: project4--staging
    alb.ingress.kubernetes.io/certificate-arn: arn:aws:acm:ap-northeast-2:xxxxxxxxxxxx:certificate/104f70c8-4cbb-4873-aed9-eb9bfbeeb021
    alb.ingress.kubernetes.io/listen-ports: '[{"HTTP": 80}, {"HTTPS":443}]'
spec:
  rules:
  - host: "eks.devops-altf4.click"
    http:
      paths:
      - path: /auth
        pathType: Prefix
        backend:
          service:
            name: auth-server
            port:
              number: 80

      - path: /
        pathType: Prefix
        backend:
          service:
            name: api-server
            port:
              number: 80
인터넷에서 ingress alb를 찾아보면 첫 문장에 다음과 같이 2개로 나뉘어져 있습니다.
apiVersion: networking.k8s.io/v1
apiVersion: extensions/v1beta1
https://kubernetes.io/docs/reference/using-api/deprecation-guide/
ingress 에 apiVersion 중 extensions/v1beta1 는 1.14 버전에 deprecated 되었고 1.22 버전부터는 사용할 수 없으니 networking.k8s.io/v1 로 변경하라고 명시되어 있습니다.
두개의 버전에 따라 변경점은 아래 블로그에서 확인할 수 있습니다.
https://findmypiece.tistory.com/308
⚠️ Warning
만약 다음과 같은 에러가 난다면 ingress 컨트롤러를 지우고 다음의 명령어를 추가해서 설치합니다.
```Warning  FailedDeployModel  24s (x7 over 3m16s)  ingress  (combined from similar events): Failed deploy model due to AccessDeniedException: User: arn:aws:sts::060701521359:assumed-role/eksctl-staging-addon-iamserviceaccount-kube-Role1-TNFF6IU9WWLU/1653979665832449172 is not authorized to perform: waf-regional:GetWebACLForResource on resource: arn:aws:waf-regional:ap-northeast-2:060701521359:*/* with an explicit deny in a service control policy
       status code: 400, request id: 13eb850c-1cee-4dbe-97b0-cd1916e7cbb3```
추가명령어 : --set enableWaf=false --set enableWaf2=false --set enableShield=false
(1) Endpoint를 직접 하드코딩해서 넣어주는 방법
Auth 서버는 Redis를 호스트합니다.
그런데 auth 서버는 NodePort이고, redis는 ClusterIP로 서비스 하기 때문에 host를 다른 값으로 적어주어야 합니다.
즉, 로컬상에서는 Auth server의 호스트를 127.0.0.1로 주었다면 쿠버네티스 상에서는 Redis Service의 endpoint 주소로 넣어야 합니다.
> kubectl describe service redis-service
Name:              redis-service
Namespace:         default
Labels:            <none>
Annotations:       <none>
Selector:          app=redis
Type:              ClusterIP
IP Family Policy:  SingleStack
IP Families:       IPv4
IP:                10.100.161.238
IPs:               10.100.161.238
Port:              redis  6379/TCP
TargetPort:        6379/TCP
Endpoints:         192.168.115.20:6379
Session Affinity:  None
Events:            <none>
kubectl describe service redis-service
describe 명령어를 입력해서 얻은 endpoint 주소를 auth 서버에 host로 넣어줍니다.
혹은 다음과 같이 찾을 수 있습니다.
> kubectl get endpoints
NAME         ENDPOINTS           AGE
kubernetes   192.168.49.2:8443   54m
redis        172.17.0.3:6379     22s
(2) redis의 endpoint는 바뀔 수 있으니 endpoint를 고정시켜줄 수 있습니다.
//redis-endpoint.yaml
apiVersion: v1
kind: Endpoints
metadata:
 # the name here should match the name of the Service
 name: redis
subsets:
 - addresses:
     - ip: 원하는 IP 주소
   ports:
     - port: 6379
# auth-server/app.js
const Redis = require('ioredis');
const express = require('express');
//const axios = require('axios');
const bodyParser = require('body-parser');
const port = 3005;


const redis_client = new Redis({
  host : '192.168.115.20',
  port : '6379'
});
(3) 도메인으로 auth서버와 Redis를 연결 시 킬 수도 있습니다
const client = redis.createClient({
  host: "redis.default.svc.cluster.local",
  //서비스이름.네임스페이스.svc.클러스터 내에서 사용가능한 최상위 도메인
  port: 6379,
})
api-service.default.svc.cluster.local
api-service는 서비스의 이름을 뜻한다.
default는 해당 서비스가 속한 네임스페이스이다.
svc는 서비스를 뜻하며, 접근하고자 하는 리소스를 나타낸다.
cluster.local은 클러스터 내에서 사용 가능한 최상위 도메인이다.
간단히 말하면, 접근하고자 하는 서비스의 이름과 네임스페이스만 안다면 이렇게 조합된 도메인을 통해 해당 서비스에 접근할 수 있게 됩니다.
kubectl logs ~ -> 파드 대해 로그 기록을 볼 수 있습니다.
kubectl describe ~ -> 디플로이먼트, 서비스에 대한 내용을 확인할 수 있습니다.
kubectl get all -> pod 및 service, 레플리카셋을 불러올 수 있습니다.
kubectl describe ingress ~ -> ingress에 대한 내용을 볼 수 있습니다.
kubectl exec -it redis -- redis-cli redis라는 이름을 가진 파드에 직접 연결해서 PING을 날려볼 수 있습니다.
kubectl get ns -> 모든 네임스페이스를 불러 옵니다.
kubectl port-forward pod/auth-server-76ffb98979-cfmmc 3005:3005 -> 파드를 포트포워딩으로 로컬호스트상에 노출시킵니다.
ArgoCD를 설치하는 법은 ArgoCD 홈페이지를 참고하길 바랍니다.
ArgoCD 공식홈페이지
그러나 githube의 프라이빗 레파지토리에 연결하기 위해서는 pub키가 필요합니다.
⚠️ Warning
ssh키는 id_ed25519가 필요합니다.
키 설치는 다음에서 확인할 수 있습니다.
https://gist.github.com/hrdtbs/ba50868d7d608b89f958fe32dc35fdd4
생성한 pub키를 깃허브 setting -> Deploy keys 에 등록합니다.
프라이빗 레파지토리에 연결하려면 다음과 같은 명령어를 입력합니다.
argocd repo add git@레파지토리 --ssh-private-key-path ~/.ssh/id_ed25519 --name id_ed25519
예시
argocd repo add git@github.com:devops-team-AltF4/Kubernetes.git --ssh-private-key-path ~/.ssh/id_ed25519 --name id_ed25519
본 레파지토리 처럼 k8s안에 deployment, service, ingress 들을 넣어넣고 생성하시길 바랍니다.
argoCD에서 path설정할 때 레파지토리 안의 폴더만 볼 수 있게 등록하기 위함입니다.
$ kubectl get all
NAME                 TYPE        CLUSTER-IP   EXTERNAL-IP   PORT(S)   AGE
service/kubernetes   ClusterIP   10.96.0.1    <none>        443/TCP   55d
$ kubectl get all -o wide
NAME                 TYPE        CLUSTER-IP   EXTERNAL-IP   PORT(S)   AGE   SELECTOR
service/kubernetes   ClusterIP   10.96.0.1    <none>        443/TCP   55d   <none>
$ kubectl get all -o wide -n default
NAME                 TYPE        CLUSTER-IP   EXTERNAL-IP   PORT(S)   AGE   SELECTOR
service/kubernetes   ClusterIP   10.96.0.1    <none>        443/TCP   55d   <none>
-n 은 네임스페이스 약자로 네임스페이스를 지정하는 옵션
namespace 내 같은 이름의 파드는 불가능 하며 다른 네임스페이스라면 같은 이름의 파드를 생성할 수 있습니다.
Namespaces 란 동일한 물리 클러스터를 기반으로 하는 여러 가상 클러스터를 지원하며, 이런 가상 클러스터를 네임스페이스라고 합니다.
쿠버네티스 클러스터내에서 논리적인 분리 단위 이며 쿠버네티스의 Namespace 별로 리소스를 구분되어 있습니다.
eksctl delete cluster --name 클러스터이름 --region ap-northeast-2