See the demo site made from this template IN ACTION: https://hotlink-archive-template.pages.dev/
This guide is for an easy way to host files for hotlinking on AO3 or elsewhere, using github and cloudflare pages.
I've encountered far too many dead links in fanfics and forums simply because a hosting service decided to dump older files, or they decided to change their TOS to no longer allow hotlinking or certain kinds of content (nsfw, fictional graphic content). See Optional Steps for even more options.
This is an easy, barebones way to permanently host images that you don't want deleted unexpectedly or that you can't host elsewhere. (Emphasis on barebones. This will not be a nice portfolio style site. Unless you decide to code that yourself!) You can follow the link above for an example of this type of site.
It is also EASY to upload and use on mobile devices after initial setup!
-
Cloudflare Pages/Workers is a free to use static site hosting service. This will publish your files and make them available online. This will publish your files and make them available online. There is a limit to the amount of data you can upload for free, but you can pay for proper hosting if you want to exceed it.
-
Github is a code sharing/storage platform. Your files will go here first before being published on Pages. You can edit and upload files through your browser at github.com, or through Github Desktop, a program you install on your computer. There are limits to Github repositories, but they are also generous (suggested 1GB to 5GB per repo).
1. Create a github account

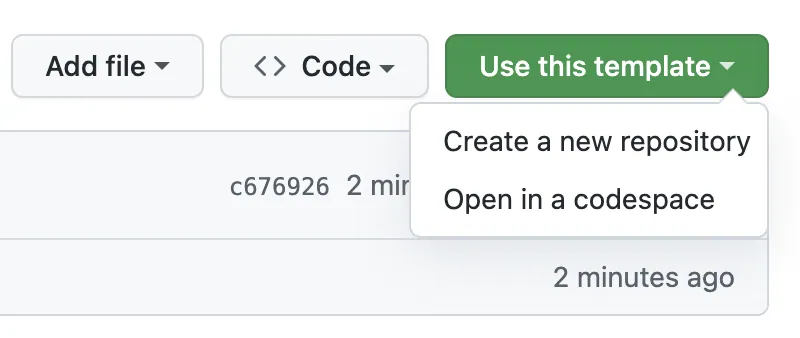
2. Copy this template repository hotlink-archive-template
Your website will be contained in a repository, a place where all the files and the revision history for your project are stored.
This template repository uses an "Action" (using python) to automatically create a "home" page with an Index of all the files in your repository every time it is updated.
NOTE: I recommend you set your repository to Private. Github's history feature is extensive, so if you have sensitive content or think you might want to delete something later, it will be hard to get rid of it completely once it's been committed and publicly available.
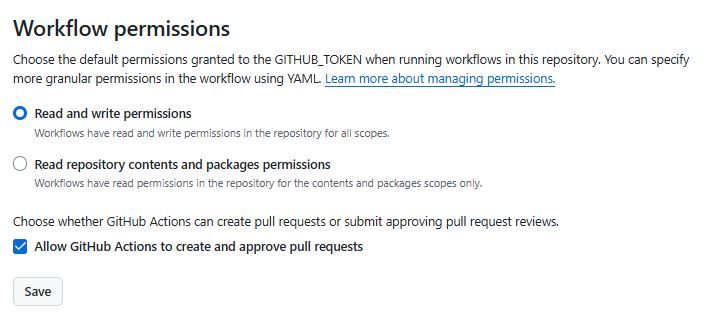
3. Enable Action permissions
In order for the Action script to work, you need to give Actions permission to read and write in your repository.
Within your repository, go to the tab Settings > Actions > General > Workflow Permissions
4. Create a Cloudflare account
5. Create a Pages (or Workers) project and link it to your Github repository
Your Pages project will create the front end of the site where the images will be displayed. You will be able to link those images to other platforms like AO3.
You can create either a Workers or Pages project by going to Add > Pages (or Workers). Name your project WISELY! This name will be your site's URL.
Workers vs. Pages
-
Workers is subsuming Pages on Cloudflare and now has all the same static hosting capabilities, in addition to its original server-side processing services. If you'd like to, read more about this.
-
While Workers has similar capabilities, I recommend Pages for this project. Pages has the added bonus of a cleaner URL if you do not have your own domain: “MySite.pages.dev” in Pages vs Workers' “MySite.username.workers.dev”
You will be prompted to import an existing Git repository. You will need to give it access to your Github to do this.
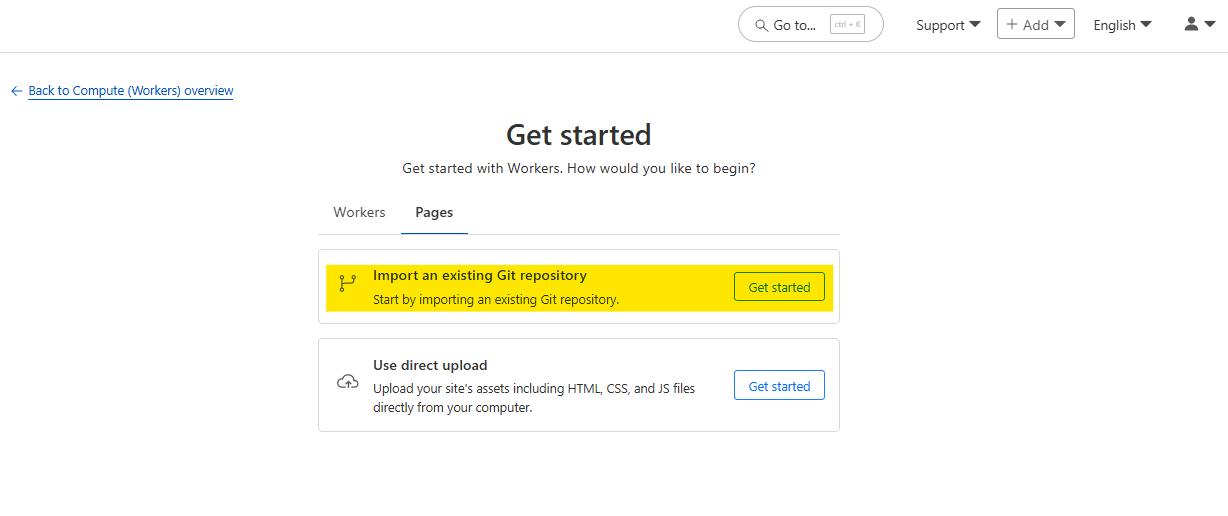
Select the repository on your Github you made for your project, then hit "Begin Setup".
- Name your project WISELY! This name will be your site's URL.
- You do not need to change any settings on the next page, so hit "Save and Deploy". Your image hosting site will now be live!
- The URL will be "https://ProjectName.pages.dev". It may take a few minutes to become accessible.
Now you're done with the basic setup!
You can add any files you want to link to on AO3/elsewhere through mobile, desktop browser, or the Github desktop program!
Here is how to do it on Github.com:
- Open up the repository that you made (it can be found at github.com/username/repositoryname). You will see a list of folders and files that are in that repository.
- Click into the folder "fan-stuff".
- In the top right, go Add file > Upload files and drag in the images you want added. You will need to name the images BEFORE you upload them, as there is not an easy renaming feature within Github's browser interface.
- In the Commit changes box, choose a title for what action you are doing. This will help you backtrack uploads if needed.
- For example, it could be "Uploaded Batman Art". Make sure it's set to "commit directly to the main branch", then commit those changes. This will upload the files.
Now, if you visit your site, you will see your uploaded image under the "fan-stuff" folder!
To embed/link your image, navigate to your file on your Pages site and copy the URL in the address bar. This URL is what you will use to embed your photo (using HTML or "add image as URL" tools some sites have).
Continue onto More Setup to customize your site and implement more advanced settings. See Tips/Troubleshooting if you're running into problems.
Github’s web UI is great, but it has major limitations. I highly recommend that you use Github Desktop during the initial setup, as well as when you want to make major organizational changes to your files/site. Once you have everything set, though, you can use Github in your browser to upload whatever files you want to hotlink at the moment.
- Download Github Desktop and “clone” (download a copy of) the repository you made.
- This is the best time to rename/rearrange folders + files, etc.
- There are other methods in the Troubleshooting section if you need, but Github Desktop is by far the easiest way
- see Adding/Renaming Folders for important info on how to properly rename/add folders
- see About the Index Page for how to customize your Index pages
- Once you’re done editing, “push” (upload) all the changes you made to your online Github repository.
Having some sort of text editor like Notepad++ is useful for editing any code, the automatic color-coding is very helpful. You can edit in plain old Notepad as well, it just won’t look as nice.
The template repository uses a python Action to automatically create an HTML "home" page with an Index of ALL the files in the folder every time it is updated.
This is particularly convenient for mobile use, as you can upload a file, and the python action automatically updates the Index page.
- If you don’t want this, just disable the “create-index” Action and delete the .py files. You can just type in the file locations to get to each file, or you can manually maintain an home/Index page yourself, which isn't hard if you know some basic HTML and can remember to do it consistently.
- Also note that if you wish to change any of the content on your Index pages, you must edit the "index.py" file, not the "index.html" file. The "index.html" file gets re-written every time the "create-index" Action is run in order to keep the file index up to date.
Disclaimer: This is a bit convoluted because I am extremely unqualified to be working with python OR HTML. There’s probably an easy way to do this, but I don’t have the skill to do it, and most of the stuff here is copied from stuff I found around. If you know a better way to do things, please let me know, it’d make my life easier too!
Adding or renaming folders involves some extra steps.
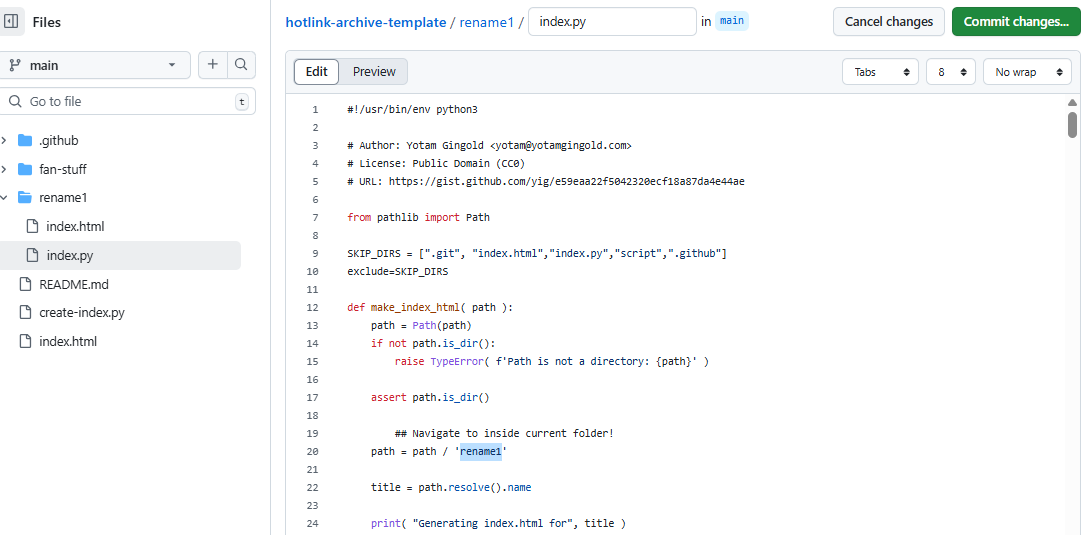
1. The "index.py" file inside the folder needs to be edited to match the parent folder name.
The place you need to do this is found near the top of the file (highlighted below)
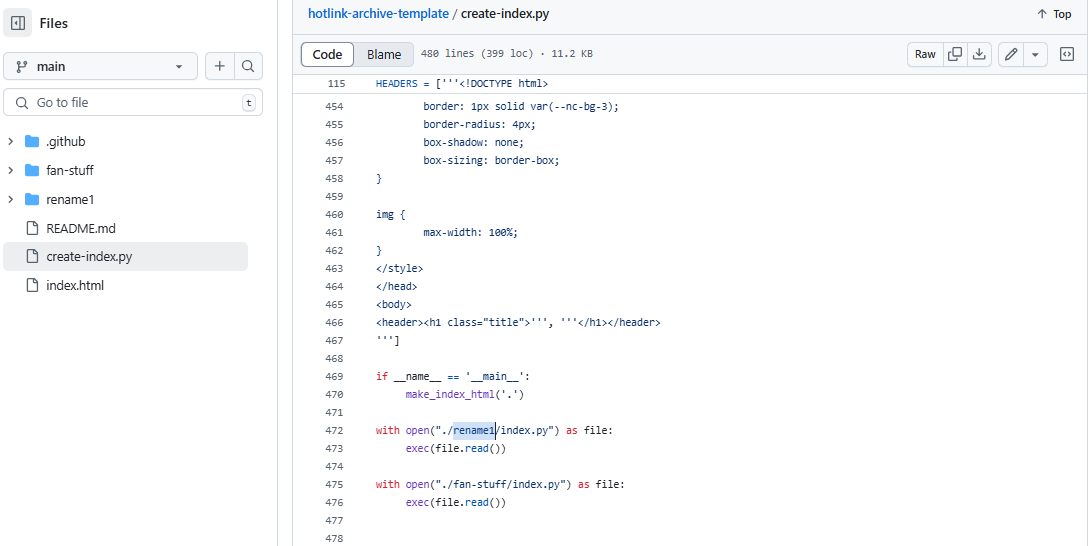
2. Then the outer-most "create-index.py" file needs to be updated to match the new name as well. If you’ve added a new folder, duplicate and adjust the code to match.
The place you need to do this is found at the bottom (highlighted below)
- If you don’t need any folders at all, great! Just delete them and their contents! No need to edit any files. (Don’t delete “index.html” or “create-index.py” or “.github/workflows”!)
- If you would like to have these folders for later use, leave them as-is and simply edit the index files.
- The relevant lines of code at the bottom of "create-index.py" like in the previous step for renaming folders. You may delete this code, or comment it out (using # at the beginning of a line will make it “invisible” to the computer)
- Then, add the folder’s name to the “exclusions” list at the top of the "create-index.py" file so that it doesn’t show up on your Index page (highlighted below)
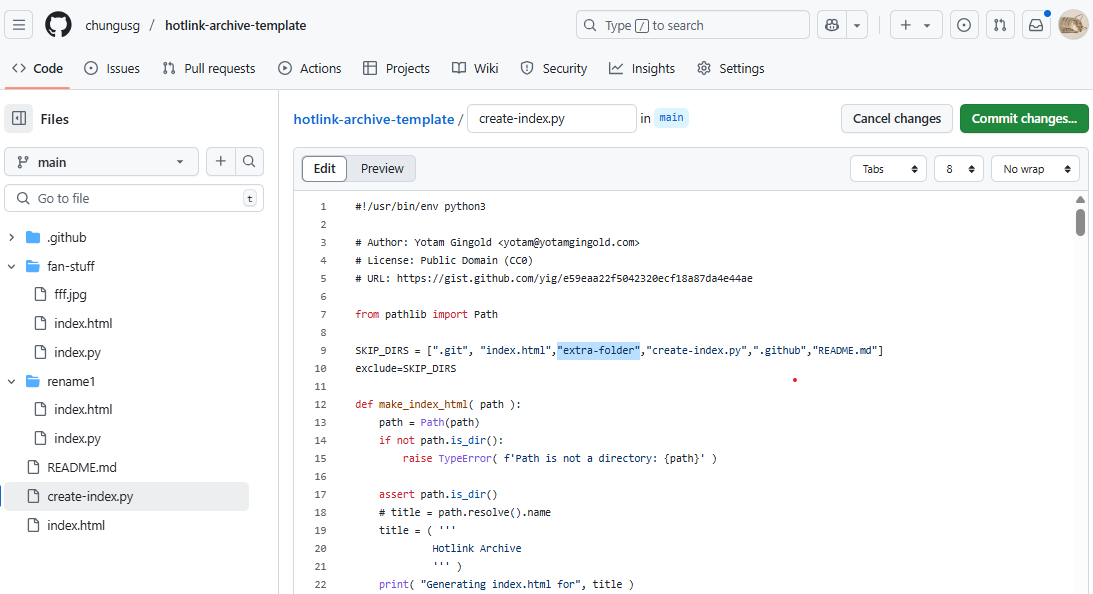
- You can also use this same concept to create "invisible" files/folders. Any files/folders included in the "exclusions" list in "(create-)index.py" will not be listed on the Index page, however they can still be found through the direct URL to the file.
- On the flipside, this means simply hiding the file/folder from the Index page does not get rid of the file from your site. Anyone who has the URL will be able to find that file unless you remove it, or move its location to change the URL
It’s not possible to rename image/media files on Github’s web UI (it is possible with the local Git program). The "create-index" Action lists out the names of your files exactly, so you will end up with ugly strings of numbers and letters on your Index page if you don't rename them, which is terrible to look at and also plain old CONFUSING to navigate.
So if you're uploading on mobile or through Github on browser, name your files with easy to remember and distinctive filenames before you go ahead and upload them. This makes everything much easier, and it makes your Index page look nice :)
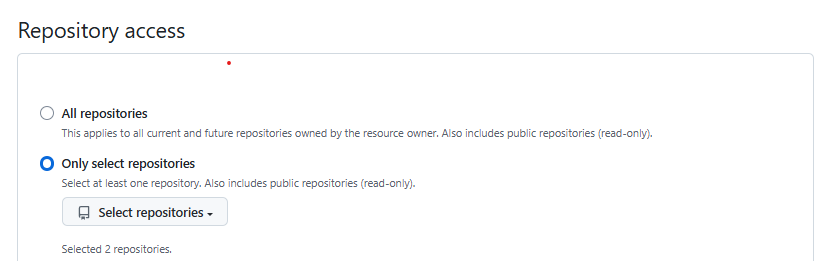
Check to see if your Pages is retrieving from the correct branch, and if it has automatic deployments enabled.
Check your Github applications Repository Access settings. Go to your ACCOUNT Settings > Integrations - Applications > Cloudflare > Repository Access
Go back to step 3 in Basic Setup and check if you’ve given Actions permission to read and write. If that’s not the issue, check to see if you’ve set up your "index.py" files correctly. The folder names should correspond to the parent folders, and the "create-index.py" file in the outer-most folder should have the correct folder names at the VERY BOTTOM.
It isn’t possible to directly rename a folder in Github’s web UI, doing it using Git on your computer is the most foolproof way to do it. But there is a way (except for media files).
-
Go into the folder you want to rename and select a file such as “index.html” and enter the “edit” mode.
-
Go to the file name and backspace until you can edit the parent folder name as well. This will create a new folder with the new name.
You’ll have to do this to every file in the folder until they’re all in the new folder.
Unfortunately, you can’t do this with media files like png/jpg/etc, because entering the “edit” mode on a photo “breaks” it somehow, and bye-bye image :’) (Don’t worry if this happens, just don’t commit the change or roll it back in your history).
You can play with cloudflare and github to make deployment of your site a manual step you have to trigger, instead of automatic with each commit (default setting). This is a safeguard in case you accidentally make a change or delete something from your github, it won't affect your website.
You could do a semi-automatic deployment with a "Production" branch on your github that is separate from the branch you edit. This creates an extra step before anything is published on Cloudflare. A safeguard against accidental changes/deletion of sorts :)
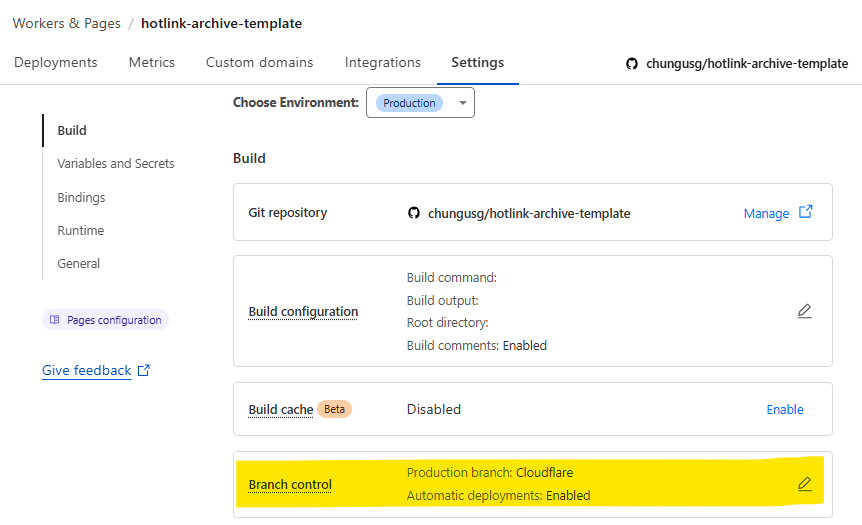
- Go to Settings > Build tab > Branch Control
- Choose your Production Branch (MAIN or CLOUDFLARE) and enable (or disable) automatic deployments
- If you choose MAIN, every change you commit to MAIN will be published to Pages
- If you choose CLOUDFLARE, any changes you make to MAIN will not show up on your Pages site until you Pull from MAIN to CLOUDFLARE
- To Pull changes from MAIN to CLOUDFLARE, go to your github repository
- Above your files on the Left, you will see a toggle to choose which branch you are on.
- Choose Cloudflare. There will be a message like "This branch is 7 commits ahead of, 2 commits behind main." Click "2 commits behind"
- Click "Create a Pull Request". Then click "Merge Pull Request". If everything is correct, this should trigger a build on your Cloudflare
Or you can create a manual command that you have to enter on github to trigger a deployment on cloudflare. If you're paranoid about anything happening to your site due to a mishap on the Github side, this is a safe choice. Unless you manually trigger the command, your Pages site will be completely untouched no matter if something happens to your repo.
This can be done in many ways, I think the most straightforward is with Deploy Hooks (maybe in conjunction with Actions if you want to make it mobile-friendly), and might be a bit complicated, but not too hard to figure out with some Google-fu.
Here’s some links I think will be useful (note: I don’t use this method, so these haven’t been tested)
Although this guide is written with Cloudflare's Github integration in mind, particularly for easy online/mobile access, you can also keep your files locally on your PC and directly upload your assets onto your Pages project. This gives you full control over what happens to your files. (Keeping backups is a good idea. You can still use Github Desktop to do this, just keep your repository on your PC.)
- Simply clone/download the repository as it is, customize it as you like, and create a NEW Pages project on Cloudflare, using "Direct Upload" to upload your files
- Once you have connected a Pages project with Github, there is no way to change the deployment method to Direct Upload or vice versa. Direct Upload is also not available for Workers.
One thing that will NOT work the same is the "create-index" Action that only works on Github.
- I have made a "create-index.exe" that will execute the "create-index.py" files in the exact same way as they would work with the Action. You do not have to install python for this to work (if I did everything right). Simply run "create-index.exe" whenever you make a change and want to update the "index.html" files
- Remember, this is EXACTLY THE SAME as the "create-index" Action, meaning you have to edit each "index.py" file when you rename folders, add a folder, want to exclude a file from the Index page, etc. (See Adding/Renaming Folders for how to do this)
Find me on Bluesky. Or if you have a problem, open an Issue on this project :)
I'll try to answer your questions as best I can! But really, I am the most amateur of amateurs and figured this all out using Google, so I might not be of much help ^^;
I also recommend Squidge Images (an offshoot of Squidge.org) as a fairly trustworthy alternative. However, Squidge Images does have some additional rules that Squidge does not, and what crosses the line is at their discretion.