This repo provides a hands-on step-by-step cookbook, with commentary, on how to create a system for the "Cognitive Fifth Industrial Revolution" (5IR) enabled by AI "collaborative robots".
Our motivation is to avoid this:
"It took us 4 days to come up with a ChatGPT app, then it took 4 months to take it public to paying customers."
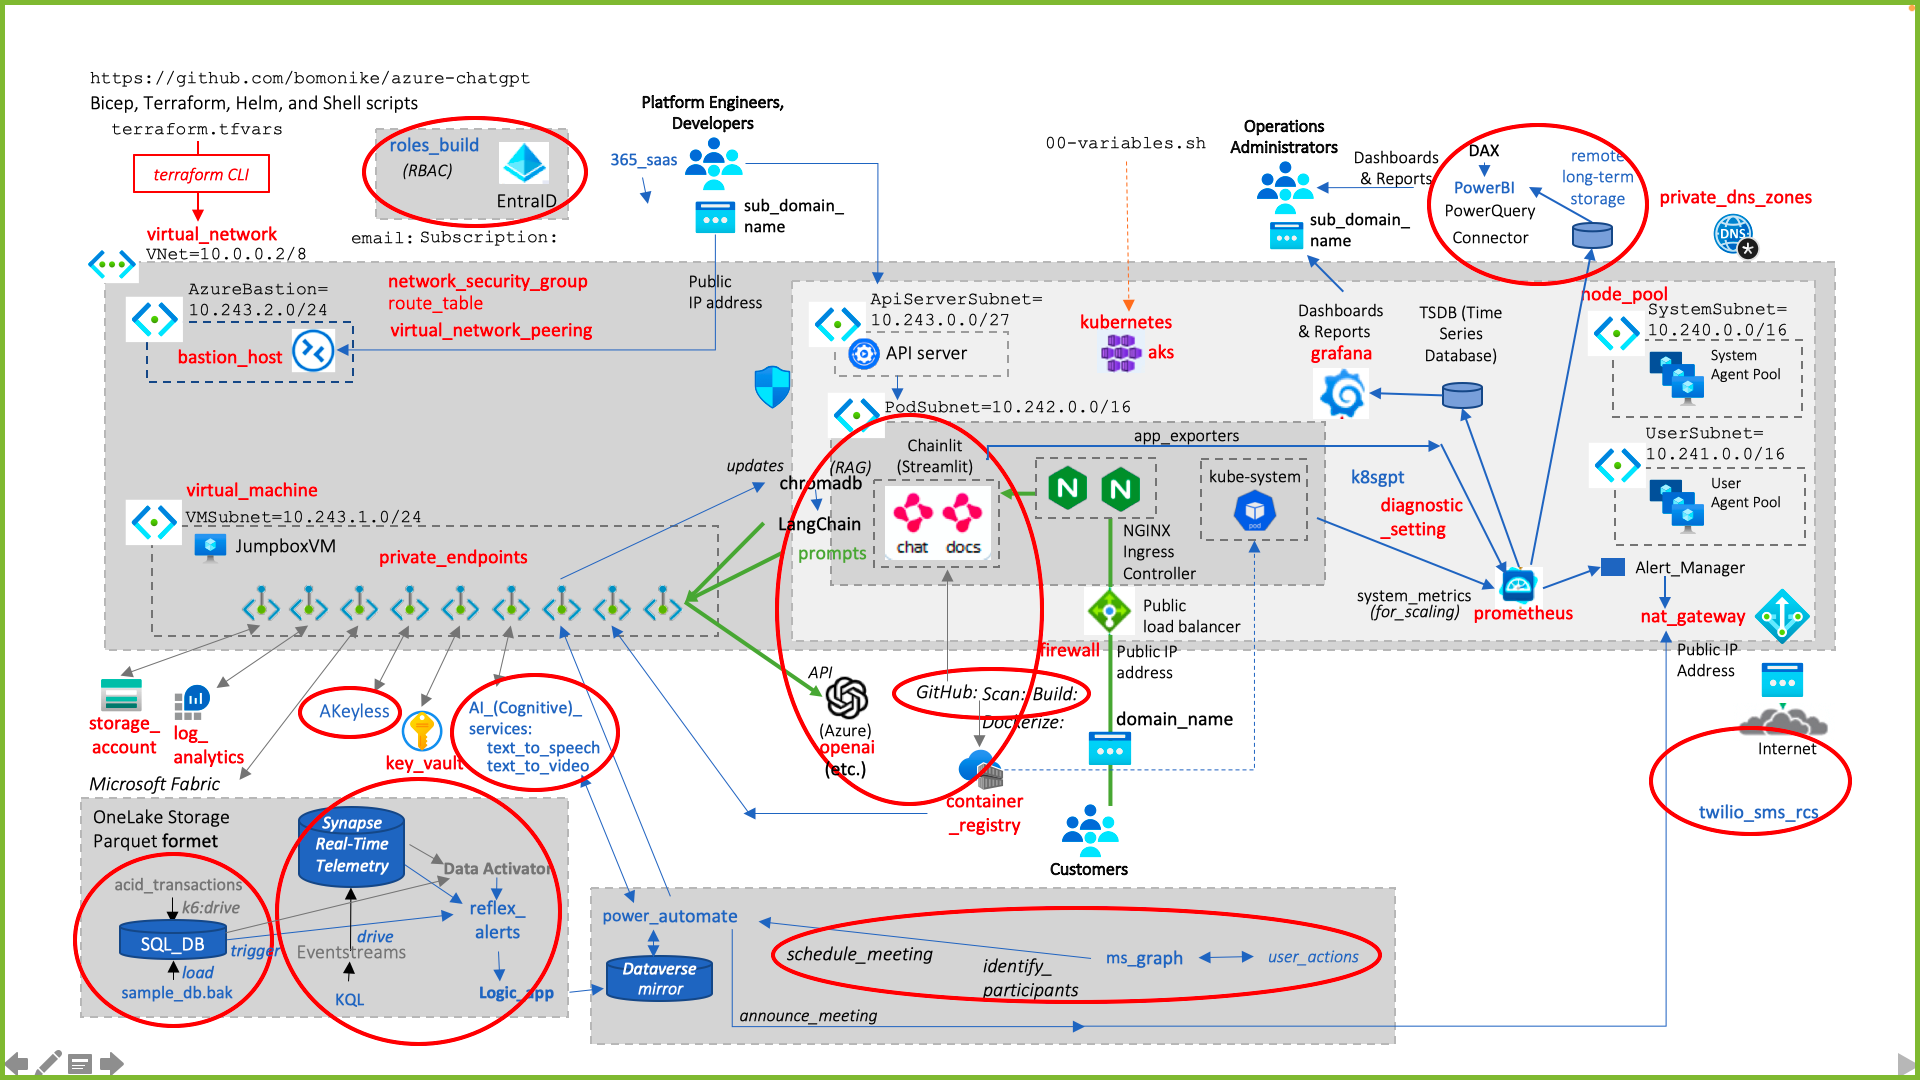
The complexity of the diagram below is why it takes so long. And it doesn't include everything.
Before we configure and run the deployment in a sequential way, let's first use a conceptually logical tour of the architectual components.
-
This GitHub repo README shows all the steps and code to customize our template for
-
technical creatives: Platform Engineers and Developers to build web apps with 1.a GUI generated using Chainlit, an adaptation of the Streamlit library.
-
The apps make API requests from one of the OpenAI LLMs offered through Azure.
-
The "etc" means that LangChain can alternately reference other LLMs as well. That's because
-
LangChain is an open-sourced component used to fine-tune the LLM using RAG (Retrieval Augmented Generation).
-
It works by storing custom tokens and weights in a ChromaDB vector store, then
-
sending it ahead of prompts entered by app users.
-
Modern developers have their code in GitHub.com so their code can be automatically scanned and reviewed by the team before automated builds by "Continuous Delivery" workflow tools.
App users can be just Developers making calls to LLM APIs locally from a developer's laptop.
However, when it's desired to have customers access the app from a public IP address -- paying customers who can sue the company or make nasty comments to others -- we now need to define secure and scalable ingress and egress of data around the apps.
-
For that, we need a domain name unique to the world, and various social media accounts based on the same branding.
-
Engineers and developers would need a sub-domain name to access the system.
-
Operations Administrators who monitor the system, take backups, and onboard users should also use a separate sub-domain to provide segmentation to reduce the "blast radius" in case an account is compromised.
-
To define permissions securely, an administrator email used solely for Azure setup creates a subscription ID -- for each department or other grouping to administer billing and security.
-
TODO: Individual work accounts can then be set up using least-privilege Attribute-based and RBAC (Role-Based Access Control) by running a script named "role_build". This automation saves hours of onboarding time for administrators while improving security and accuracy.
-
Creation of Azure resources is automated using IaC (Infrastructure as Code) Terraform CLI commands. ALternately, Opentofu or Bicep commands can be used.
-
Values for variables controlling infrastructure provisioning are manually entered in file terraform.tfvars.
-
A virtual_network (aka Vnet) is created to house several subnets.
BTW: Red lettering in this diagram indicates the name of a folder already defined to provide Terraform module code that provisions the component. Blue lettering indicates the name of a folder that is under construction.
-
The network_security_group, route_table, virtual_network_peering are established.
-
private_dns_zones
-
nat_gateway to the public internet.
-
The AzureBastion subnet provides an entryway for Developers into the virtual network.
-
The VMSubnet holds a virtual_machine with a Jumpbox and
-
Private endpoints protect communications through private IPs with services outside the virtual network. The endpoints are managed by the Private Link service.
-
QUESTION: Private endpoints connect to the storage_account,
-
log_analytics,
-
Microsoft Fabric OneLake Storage.
-
So that secrets never end up being exposed in GitHub, we save them in a centrally administered Akeyless multi-cloud vault because
-
instances of Azure Key Vault can be accidentally deleted during development work.
-
When establishing AI (formally called Cognitive) services such as text-to-speech and speech-to-text, the Azure Portal GUI must be used to acknowledge Microsoft's Responsible AI agreement checkbox before automation is allowed.
NOTE: Additional manual prerequisites are also needed to manually obtain "capacity units" for Microsoft Fabric, a service name for Azure OpenAI, API keys, etc.
-
For easier troubleshooting and reliability, apps are Dockerized into run-time Docker containers
-
stored in the ACR (Azure Container Registry) service.
-
Dockerization enables containers to be orchestrated by Kubernetes.
-
Setup application code to be Dockerize as containers into the Azure Container Registry (ACR).
-
Application containers are loaded by the Kubernetes kube-system
-
AKS (Azure Kubernetes Service) provides management functionality to Kubernetes.
-
The node pool consist of a System Agent Pool and a User Agent Pool, each in a separate Subnet.
-
The API Server subnet runs the PodSubnet that house apps.
-
File "00-variables.sh" is updated by the teams to customize values used to control Kubernetes deployment script behavior.
-
Since a key feature of the app is to have responses based on updates of custom vectors in that custom ChromaDB,
-
Power Automate can reference a Dataverse database itself updated as a mirror by
-
Logic apps triggered to perform updates.
Later in this README, we'll also show how to surround the app within a scalable and secure cloud infrastructure for use by non-technical customers.
four categories of potential harm (hate, sexual, violence, and self-harm). LEARN:
-
When Terraform runs, it sets up the virtual network and all resources that run within it, including Private DNS Zones, Public IP addresses for the bastion_host used to enter the network.
-
File 00-variables.sh contains custom values for Helm and Ansible to build within Kubernetes.
-
Setup Bicep and Terraform Infrastructure code to be scanned so that security vulnerabilities can be identified before resources are created.
-
When the sample apps are loaded -- the sample Q&A chatbot (like a "Magic 8 ball" from the 1970s) and a doc query app.
NOTE: Microsoft Power Virtual Agents can create "bots". But its logic is defined programmatically. ChatGPT bots interact using Natural Language based on new LLM containing a large corpus of vectored words.
-
If the app is used by customers, we need to provide them a registered domain name that resolves to a public IP address.
-
For scalability, we have a load balancer in front of a firewall reaching an NGINX Ingress Controller cluster.
-
Their GUI is generated using Chainlit that looks like OpenAI's ChatGPT web GUI.
-
The apps are intelligent because they recognize English language, enabled by API calls to the OpenAI LLM ChatGPT, but augmented by private custom data (using LangChain to reference vectors in a ChromaDB vector store).
-
The custom vector store is updated in real-time when Eventstreams to a Microsoft Fabric KQL database trigger alerts from a Reflex within Data Activator.
-
Automated responses include the creation and calendar invite to a new meeting based on lookups of participant availability in Microsoft Graph, orchestrated by Power Automate.
-
VIDEO: Microsoft Fabric linked to Dataverse in Dynamics 365 and Power Apps integration with Dataverse "Common Data Model" in Power apps.
-
SMS texts & RCS videos to mobile phones throughout the world are sent through a NAT Gateway to the Twilio service.
-
The Synapse workspace is within a managed VNet (Virtual Network) with Managed Private Endpoints to keep the Data Lake Gen2 storage away from public access.
-
Developers are granted access based their IP address being on the IP AllowList (Whitelist).
-
The cluster is monitored by Prometheus feeding Grafana dashboards watched by Kubernetes Monitoring Engineers.
-
Some Terraform (main.tf) files define least-privilege RBAC (Role-Based Access Controls) to reduce the "blast radius" in case credentials are stolen due to phishing, etc.
Implementing several parts of this repo provides you real achievements to brag about on your resume:
A. Saved hours of onboarding time for every employee and improved security and accuracy by automating least-privilege custom RBAC rule assignments into Azure Entra.
B. Overcome resistance to GenAI ChatGPT use by adding to the LLM real-time updates using LangChain referencing custom RAG ChromaDB vector database.
C. Reduced troubleshooting time by adding ACID transactions to SQL databases on Azure.
D. Improved responsiveness by introducing Data Activator to issue alerts based on custom triggers.
E. Improved cycle time by completely automating meeting setup using interactions with Microsoft Graph.
F. Improved flexibility and training by enabling PowerBI to analyze the Prometheus time series database used for Kubernetes automating scaling and troubleshooting.
G. Improved resolution time by enabling apps to send SMS to phones all over the world (via Twillo APIs).
A. Establish Prerequisites: domain name, keys, etc.
B. Run Terraform to establish Azure resources
C. Run Shell Scripts:
D. Clean up resources
E. Use Docker and Helm to establish Kubernetes cluster
F. Test functionality and performance
G. Roadmap for more
The steps to make this happen.
Commentary about the technology used is presented to explain the configurations.
- Install Perequisite Utilities
- Files and Folders in This Repo
- Secrets Management
- Customize Variable Values
-
Domain host name & emails dns_zone_name&dns_zone_resource_group_name
-
ssh_public_key
-
grafana_admin_user_object_id&service_account_name
-
chainlit&service_account_name
-
F. Test functionality and performance:
This repo runs on Apple MacBook running macOS.
But NGINX commands in scripts run on Linux machines.
On your macOS machine, install these utilities, perhaps in one run of my mac-setup.zsh:
-
macOS command-line (xcode-install)
-
Ruby, Homebrew
-
brew install --cask vscode
- Visual Studio Code installed on one of the supported platforms along with the HashiCorp Terraform.
- Visual Studio Code installed on one of the supported platforms along with the HashiCorp Terraform.
-
brew install jq, git, python, miniconda, ai cli, terraform, curl, .net, prometheus, grafana
-
brew install azurecli
- Install Azure CLI version 2.49.0 or later installed. To install or upgrade, see Install Azure CLI.
To verify the azcli version:
az --version
- Install Azure CLI version 2.49.0 or later installed. To install or upgrade, see Install Azure CLI.
-
An active Azure subscription. If you don't have one, create a free Azure account before you begin.
Microsoft Fabric
PowerBI
Microsoft 365
-
Use the Azure Portal GUI to sign up for a Cognitive Multi-Service Resource and check the box acknowledging terms of Responsible AI.
-
The deployment must be started by a
User Access AdministratororOwnerwho has sufficient permissions to assign roles. -
Set the Subscription:
az account set -s "${SUBSCRIPTION_ID}" -
Login to Azure using the default browser (such as Edge or Chrome):
az login
Alternately,
az login --use-device-code
In response to:
To sign in, use a web browser to open the page https://microsoft.com/devicelogin and enter the code FC3MU3JCX to authenticate.
Highlight the code and press Command+C to copy to your invisible Clipboard.
open https://microsoft.com/devicelogin
Paste the code and select the email of the administrator.
Provide the password for the admin account.
"Enter the code displayed in the authenticator app on your mobile phone."
Open Auth0 to select "Microsoft" to get the code to type in the browser page.
When you see "You have logged into Microsoft Azure!", close the browser tab created.
If "No subscriptions found" appears, use the Azure Portal GUI to create a Subscription.
-
Assign Azure account
Microsoft.Resources/deployments/writepermissions at the subscription level.
-
Open a Terminal.
-
Navigate (after creating a folder) to the folder where you want to create a repository from GitHub.com.
PROTIP: Our team uses the bomonike GitHub organization, which is why that name is part of the URL. That folder is at the root so we have a separate account ssh and gpg for it.
-
Open an internet browser window to this URL:
open https://github.com/bomonike/azure-chatgbt.git
-
Optionally, click "Fork" in GitHub
-
Click the green "Code" button
-
Optionally, click the "Fork" button if you intend on contributing back.
-
Switch back to your Terminal app.
-
If you forked, download without forking:
git clone https://github.com/bomonike/azure-chatgbt.git
CAUTION: If that repository is not found (being private), please connect with me at
https://linkedin.com/in/wilsonmar
At the repo's root folder are these standard files from ls -al
- .env
- .gitattributes
- .gitignore
- CHANGELOG.md
- CODE_OF_CONDUCT.md
- CONTRIBUTING.md
- LICENSE.md
- README.md
- robot.png
where all variables are declared; these might or might not have a default value. File CONTRIBUTING.md describes both the above standard files and the contents of folder:
- .vscode contains a
NOTE: GitHub was designed to house text, not images. So images referenced in this README are retrieved from a cloudinary.com account so image sizing can be done dynamically adjusted for different screen sizes.
An image for the repo should be a PNG, JPG, or GIF file under 1 MB in size. For the best quality rendering, the recommended size is at least 640 by 320 pixels (1280 by 640 pixels for best display).
PROTIP: Since file names ending in ".bat" are almost always edited in Windows, enforce their line endings have Carriage Return and Line Feed special characters:
*.bat text eol=crlf
Folders in this repo:
- .github/workflow holds GitHub Actions yaml files specifying automation upon git push
- scripts holds CLI shell (.sh) and PowerShell (.psm) files
- scripts/.chainlit
- scripts/.vscode to hold yml files to configure Kubernetes
- terraform HCL-format (defined by HashiCorp) to hold IaC (Infrastructure as Code) to automate the creation of resources
See my notes about Terraform files.
NOTE: Terraform is not the only IaC technology. Microsoft's Bicep templates enable Microsoft Fabric clusters.
The basic files in each resource created by Terraform are:
- main.tf specifies the resources to be provisioned the how to configure each.
- variables.tf declares all variables (which might have a default value).
- terraform.tfvars overrides values in variables.tf
- outputs.tf which defines the variables and values generated within Terraform scripts.
- terraform.tf
-
VIEW: terraform/providers.tf. Its contents:
provider "azurerm" {
  features {}
}
The file defines features of the Terraform providers specified in the file of the same name as the file at the root.
There is also a kubernetes/providers.tf
- register-preview-features.sh described in the next section.
This needs to be done manually.
Results from this effort are pasted in env (environment) files referenced by automation scripts.
See https://wilsonmar.github.io/azure-onboarding
-
Obtain a domain name.
-
Obtain/specify email addresses.
-
To register any preview feature used by the AKS cluster, run the
VIEW: register-preview-features.shregister-preview-features.shBash script in theterraformfolder?: -
Install az-preview extensions (of version 0.5.140 or later, such as 1.0.0b6):
az extension add --name aks-preview --allow-preview true
PROTIP: At time of writing, "No suitable stable version of 'aks-preview' to install. Add
--allow-previewto try preview versions". So if that's not specified:Default enabled including preview versions for extension installation now. Disabled in May 2024. Use '--allow-preview true' to enable it specifically if needed. Use '--allow-preview false' to install stable version only.
The installed extension 'aks-preview' is in preview.
Later, to update to the latest version of the extension released:
az extension update --name aks-preview --allow-preview true
-
The script refreshes the registration of the Microsoft.ContainerService resource provider...
az provider register --namespace Microsoft.ContainerService
To avoid storing secrets in GitHub, establish an instance of a Secrets Management service. Options:
- Within AKeyless.com in the cloud.
- Within the HashiCorp cloud service
Terraform Providers provide the logic for how the terraform client communicates with cloud providers (including Azure, AWS, GCP, etc.).
This repo's providers.tf file contains:
provider "azurerm" {
features {}
}See https://github.com/hashicorp/terraform-provider-azurerm
OpenTofu (at opentofu.org) is a fork of Terraform v1.5.6 (as of January, 2024) after HashiCorp placed Terraform under the BUSL license. OpenTofu is open-source, community-driven, and managed by the Linux Foundation.
Terraform's Azure Provider "azurerm" (Resource manager), documented at https://registry.terraform.io/providers/hashicorp/azurerm/latest/docs specifies that when terraform init is run, the Terraform client creates a .terraform folder with sub-folders modules and terraorm. Into those sub-folders are downloaded "mappings" the terraform client uses to call Azure Resource Manager (ARM) API's. and Manage resources in Microsoft Azure.
Because the file terraform.lock.hcl and folder .terraform are created dynamically, an entry in this repo's
keeps them from being uploaded to GitHub.
- https://www.toptal.com/developers/gitignore/api/terraform
- https://www.freecodecamp.org/news/gitignore-what-is-it-and-how-to-add-to-repo/
- https://www.atlassian.com/git/tutorials/saving-changes/gitignore
- https://github.com/github/gitignore
For more information on the data sources and resources supported by the Azure Provider, see Hashicorp's documentation.
To learn the basics of Terraform using this provider, follow the hands-on get started tutorials. If you are interested in the Azure Provider's latest features, see the changelog for version information and release notes.
https://github.com/paolosalvatori/aks-openai-chainlit-terraform/
ATTIBUTION: This repo is adapted from several examples. Paolo's github as referenced in his blog.
Terraform modules contain variables specified in these files:
???
- As described at https://developer.hashicorp.com/terraform/language/values/variables#variable-definitions-tfvars-files,
-
PROTIP: To switch between use of dev, stage, demo and prod environments over the lifecycle of assets, making a change in a tfvars file into GitHub is NOT necessary because the environment to use can be specified in values overridden at run-time. That can be achieved by having a separate shell file to run for each stage of development. For example, during "dev", this command would be used:
TF_VAR_environment="dev" \
TF_VAR_delete_lock="false"
TF_VAR_instance_type="t2.micro"
TF_VAR_instance_count=1
TF_VAR_tags='{"project":"123457"}'
terraform plan
Alternately,
terraform plan -var="environment=dev"
Since there are dozens of specifications in a complex setup such as what is in this repo:
-
Open a Text Editor (such as Visual Studio Code) to edit the file embedded in all scripts to consistently provide values to system variables referenced:
VIEW: 00-variables.sh -
VIEW terraform.tfvars
Specify custom values for variables in the file:
name_prefix                              = "Atum"
domain                                   = "babosbird.com"
subdomain                                = "sally"
kubernetes_version                       = "1.28.3"
ssh_public_key                           = "ssh-rsa AAAAB3NzaC1yc2EAAAADAQABAAABAQDDRHrICSTesKCNyH6vN4K3YwhDUO89cqnEDz2bcZ0sLn9mU6hwyXHna5vME8Y/A8Jbj4XiMyePbAJsX8R/Yyq5pZSiqYpPqSdRGOGqKxQPMBE8WFN1RZmrbrb0ElVQtdWWhlCis4PyMn76fbH6Q8zf/cPzzm9GTimVw62BGhdqdHHru7Sy3I+WRGVA3Z2xHqpda+4nd9LYQW3zkHP98TbIM5OW8kVhRUtmg3c0tOViU6CsGP9w4FU8TU7wLWoeig69kv6UgikwnJYXkItiLecCbVqOeGwbHZQmawcqEY674E3jgJkJ5nQVblCODR0ODNCtrCDVyT6pX0Hdt1ivIpkf"
vm_enabled                               = true
location                                 = "eastus"
admin_group_object_ids                   = ["4e4d0501-e693-4f3e-965b-5bec6c410c03"]
web_app_routing_enabled                  = true
dns_zone_name                            = "babosbird.com"
dns_zone_resource_group_name             = "DnsResourceGroup"
namespace                                = "chainlit"
service_account_name                     = "chainlit-sa"
#deployment_script_primary_script_uri     = "https://paolosalvatori.blob.core.windows.net/scripts/install-packages-for-chainlit-demo.sh"
grafana_admin_user_object_id             = "0c5267b2-01f3-4a59-970e-0d9218d5412e"
vnet_integration_enabled                 = true
openai_deployments      = [
{
 name = "gpt-35-turbo-16k"
 model = {
   name = "gpt-35-turbo-16k"
   version = "0613"
 }
},
{
 name = "text-embedding-ada-002"
 model = {
   name = "text-embedding-ada-002"
   version = "2"
 }
}
]
For the magic8ball:
name_prefix            = "magic8ball"
domain                 = "contoso.com"
subdomain              = "magic"
namespace              = "magic8ball"
service_account_name   = "magic8ball-sa"
ssh_public_key         = "XXXXXXX"
vm_enabled             = true
location               = "westeurope"
admin_group_object_ids = ["XXXXXXXX-XXXX-XXXX-XXXX-XXXXXXXXXXXX"] -
name_prefixspecifies a prefix for all the Azure resources. -
domain: specifies the domain part (e.g., subdomain.domain) of the hostname of the ingress object used to expose the chatbot via the NGINX Ingress Controller. -
subdomain: specifies the subdomain part of the hostname of the ingress object used to expose the chatbot via the NGINX Ingress Controller. -
namespace: specifies the namespace of the workload application that accesses the Azure OpenAI Service. -
ssh_public_key: specifies the SSH public key used for the AKS nodes and jumpbox virtual machine. It's created by _____ -
vm_enabled: a boleean value that specifies whether deploying or not a jumpbox virtual machine in the same virtual network of the AKS cluster. -
location: specifies the region (e.g., westeurope) where deploying the Azure resources. -
admin_group_object_ids: when deploying an AKS cluster with Entra and Azure RBAC integration, this array parameter contains the list of Entra group object IDs that will have the admin role of the cluster.
azure_active_directory_role_based_access_control
service_account_name: specifies the name of the service account of the workload application that accesses the Azure OpenAI Service. This is not the API key from https://platform.openai.com/api-keys. Use this:
-
Get to the Azure OpenAI service at:
https://portal.azure.com/#view/Microsoft_Azure_ProjectOxford/CognitiveServicesHub/~/OpenAI
-
Click "Create Azure OpenAI" for message:
Azure OpenAI Service is currently available to customers via an application form. The selected subscription has not been enabled for use of the service and does not have quota for any pricing tiers. Click here to request access to Azure OpenAI service.
-
Click "Click here to request access to Azure OpenAI service" for the form at:
-
Fill out the form.
-
When you get a reply, copy the code in file terraform/terraform.tfvars
service_account_name = "chainlit-sa"
00-variables.sh contain values to variables within helm files.
-
Open a Text Editor (such as Visual Studio Code) to edit the file embedded in all shell scripts to consistently provide values to system variables referenced:
acrName="CoralAcr" acrResourceGrougName="CoralRG" location="FranceCentral" attachAcr=false imageName="magic8ball" tag="v2" containerName="magic8ball" federatedIdentityName="Magic8BallFederatedIdentity" image="$acrName.azurecr.io/$imageName:$tag" imagePullPolicy="IfNotPresent" # Always, Never, IfNotPresent managedIdentityName="OpenAiManagedIdentity"
subscriptionId=$(az account show --query id --output tsv) subscriptionName=$(az account show --query name --output tsv)
tenantId=$(az account show --query tenantId --output tsv)
title="Magic 8 Ball" label="Pose your question and cross your fingers!" temperature="0.9" imageWidth="80"
openAiName="CoralOpenAi" openAiResourceGroupName="CoralRG" openAiType="azure_ad" openAiBase="https://coralopenai.openai.azure.com/" openAiModel="gpt-35-turbo" openAiDeployment="gpt-35-turbo"
nginxNamespace="ingress-basic" nginxRepoName="ingress-nginx" nginxRepoUrl="https://kubernetes.github.io/ingress-nginx" nginxChartName="ingress-nginx" nginxReleaseName="nginx-ingress" nginxReplicaCount=3
cmNamespace="cert-manager" cmRepoName="jetstack" cmRepoUrl="https://charts.jetstack.io" cmChartName="cert-manager" cmReleaseName="cert-manager"
email="paolos@microsoft.com" clusterIssuerName="letsencrypt-nginx" clusterIssuerTemplate="cluster-issuer.yml"
aksClusterName="CoralAks" aksResourceGroupName="CoralRG"
namespace="magic8ball" serviceAccountName="magic8ball-sa" deploymentTemplate="deployment.yml" serviceTemplate="service.yml" configMapTemplate="configMap.yml" secretTemplate="secret.yml"
ingressTemplate="ingress.yml" ingressName="magic8ball-ingress" dnsZoneName="contoso.com" dnsZoneResourceGroupName="DnsResourceGroup" subdomain="magic8ball" host="$subdomain.$dnsZoneName"
-
Customize the value of each variable:
- acrName="PaolosAcr" acrResourceGrougName="PaolosRG" location="eastus"
When fully deployed, these resources should be listed using the Azure portal, Azure CLI, or Azure PowerShell:
To list the deployed resources in the resource group defined as
- "${aksResourceGroupName}":
-
Using Azure CLI:
az resource list --resource-group "${aksResourceGroupName}"
* Alternately, using Azure CLI:

```azurepowershell
Get-AzResource -ResourceGroupName "${aksResourceGroupName}"
terraform plan -var-file="test.tfvars"
terraform plan -var-file="demo.tfvars"
terraform plan -var-file="prod.tfvars"
Here's the sequence of actions to run Terraform (without the error checking code):
# Navigate to the teraform folder
# Initialize Terraform:
terraform init

# Validate Terraform configuration files:
terraform validate

# Format Terraform configuration files:
terraform fmt

# Review the terraform plan:
terraform plan

# Create Resources:
terraform apply

# Verify Resources:
1. Resource Group Name
2. Resource Group Location
3. Virtual Network Name
4. Virtual Network Subnet Name
5. Compare with names present in c2-variables.tf to reconfirm it has overrided it and took from terraform.tfvarsInitializing the backend...
Initializing modules...
- acr_private_dns_zone in modules/private_dns_zone
- acr_private_endpoint in modules/private_endpoint
- aks_cluster in modules/aks
- bastion_host in modules/bastion_host
- blob_private_dns_zone in modules/private_dns_zone
- blob_private_endpoint in modules/private_endpoint
- container_registry in modules/container_registry
- grafana in modules/grafana
- key_vault in modules/key_vault
- key_vault_private_dns_zone in modules/private_dns_zone
- key_vault_private_endpoint in modules/private_endpoint
- kubernetes in modules/kubernetes
- log_analytics_workspace in modules/log_analytics
- nat_gateway in modules/nat_gateway
- node_pool in modules/node_pool
- openai in modules/openai
- openai_private_dns_zone in modules/private_dns_zone
- openai_private_endpoint in modules/private_endpoint
- prometheus in modules/prometheus
- storage_account in modules/storage_account
- virtual_machine in modules/virtual_machine
- virtual_network in modules/virtual_network
Initializing provider plugins...
- Finding hashicorp/helm versions matching ">= 2.7.1"...
- Finding latest version of hashicorp/random...
- Finding hashicorp/azurerm versions matching "3.85.0"...
- Finding gavinbunney/kubectl versions matching ">= 1.7.0"...
- Finding hashicorp/kubernetes versions matching ">= 2.16.0"...
- Installing hashicorp/azurerm v3.85.0...
- Installed hashicorp/azurerm v3.85.0 (signed by HashiCorp)
- Installing gavinbunney/kubectl v1.14.0...
- Installed gavinbunney/kubectl v1.14.0 (self-signed, key ID AD64217B5ADD572F)
- Installing hashicorp/kubernetes v2.26.0...
- Installed hashicorp/kubernetes v2.26.0 (signed by HashiCorp)
- Installing hashicorp/helm v2.12.1...
- Installed hashicorp/helm v2.12.1 (signed by HashiCorp)
- Installing hashicorp/random v3.6.0...
- Installed hashicorp/random v3.6.0 (signed by HashiCorp)
Partner and community providers are signed by their developers.
If you'd like to know more about provider signing, you can read about it here:
https://www.terraform.io/docs/cli/plugins/signing.html
Terraform has created a lock file .terraform.lock.hcl to record the provider
selections it made above. Include this file in your version control repository
so that Terraform can guarantee to make the same selections by default when
you run "terraform init" in the future.
Terraform has been successfully initialized!
You may now begin working with Terraform. Try running "terraform plan" to see
any changes that are required for your infrastructure. All Terraform commands
should now work.
If you ever set or change modules or backend configuration for Terraform,
rerun this command to reinitialize your working directory. If you forget, other
commands will detect it and remind you to do so if necessary.
When terraform apply runs, it creates a state file named ".terraform.*" which contains a definition of all the resources and their configurations, including secrets. So the file is specified in .gitignore to so it does not get uploaded to GitHub.
However, since terraform is declarative, the file is used to determine what resources are updated when terraform files are changed.
We need to use one of these mechanisms to store it securely:
- in an encrypted file still in the GitHub (and unencrypted when needed), with the unencryption key retrieved from the Akeyless cloud.
- in an Azure blob;
- in HashiCorp's cloud
- in spacelift.io
For additional information, see:
Run 01-build-docker-image.sh in the scripts folder to build container images using the Dockerfile referencing various yaml files in the same folder:
-
Assuming that the Docker Agent was installed as part of Prerequisites.
-
Change the value of $tag within 00-variables.sh.
VIEW: 01-build-docker-images.sh
#!/bin/bash

# Variables
source ./00-variables.sh

# Use a for loop to build the docker images using the array index
for index in ${!images[@]}; do
# Build the docker image
docker build -t ${images[$index]}:$tag -f Dockerfile --build-arg FILENAME=${filenames[$index]} --build-arg PORT=$port .
done

# PREVIOUSLY:Build the docker image
docker build -t $imageName:$tag -f Dockerfile .-
Ensure that the Docker client is running.
-
Review the Dockerfile (at time of this writing, the file's contents):
VIEW: Dockerfile -
TODO: Instead of using VirtualEnv, substitute use of Miniconda3 and download from the Conda rather than PyPi :
RUN python -m venv /opt/venv ENV PATH="/opt/venv/bin:$PATH"
-
Instead: TODO: Setup Conda environment "py311" for Python 3.11 from Conda.
-
TODO: Use Conda to load packages in the Conda library specified in the requirements.txt file at:
VIEW: /scripts/requirements.txt -
QUESTION: ENTRYPOINT ["streamlit"
The Azure Container Registry (ACR) is used to build, store, and manage container images and other artefacts in a private registry for deployments to Kubernetes. See https://wilsonmar.github.io/kubernetes
- Under your Azure Subscription, create a ACR (Azure Container Registry) instance (instead of using Docker Hub, Quey, Artifactory, etc.):
For additional information about ACR:
- https://medium.com/@anjkeesari/create-azure-container-registry-acr-using-terraform-bf5b3dbabb97
- https://registry.terraform.io/providers/hashicorp/azurerm/latest/docs/resources/container_registry.html
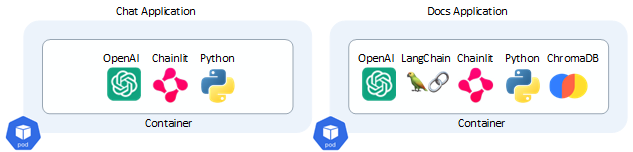
End-users interact with a Chat application (on the "front-end") to hold conversations with users via interactive chat.
A traditional Chat app, such as the iMessage app on iPhones between people, has a human on both ends of the conversation.
Two applications are constructed by this repo:
-
Both apps are written in Python and run within a Docker Container orchestrated as a pod within the Kubernetes container orchestrator.
View the "front-end" Chat app Python program source at:
chat.pyThe app is used by humans to interact with a non-human "Docs Application".
View the Docs app Python program source at:
doc.pyREMEMBER: imports in Python source assume that when the <a href="#DockerfileDockerfile was run, it downloaded dependencies specified in the Requirements.txt file and included them all in the Docker container generated.
Both apps make API calls to two AI (Artificial Intelligence) services.
-
The Azure OpenAI Service uses OpenAI's large language models (LLMs) that became famous in 2023 for its ability to generate new content based on existing content. LLMs also enable content summarization, semantic search, and natural language to code translation. Users can access the service through REST APIs, Python SDK, or the web-based interface in the Azure OpenAI Studio.
The version of OpenAI used is specified in the terraform.tfvars file:
openai_deployments = [
{ name = "gpt-35-turbo-16k" model = { name = "gpt-35-turbo-16k" version = "0613" } }, { name = "text-embedding-ada-002" model = { name = "text-embedding-ada-002" version = "2" } } ]
This is made possible by large language models (LLMs) like OpenAI ChatGPT, which are deep learning algorithms capable of recognizing, summarizing, translating, predicting, and generating text and other content. LLMs leverage the knowledge acquired from extensive datasets, enabling them to perform tasks that go beyond teaching AI human languages. These models have found success in diverse domains, including understanding proteins, writing software code, and more. Apart from their applications in natural language processing, such as translation, chatbots, and AI assistants, large language models are also extensively employed in healthcare, software development, and various other fields.
The OpenAI platform services provide "cognitive services" powered by models created by OpenAI. One of the models available through this service is the ChatGPT-4
Azure OpenAI Service listens and responds to REST API access to several of OpenAI's language models:
- GPT-3,
- Codex
- Embeddings
- GPT-4 is designed for interactive conversational tasks. It allows developers to integrate natural language understanding and generation capabilities into their applications.
- ChatGPT-35 Turbo
The Chat Completion API of the Azure OpenAI Service provides a dedicated interface for interacting with the ChatGPT and GPT-4 models. This API is currently in preview and is the preferred method for accessing these models. The GPT-4 models can only be accessed through this API.
GPT-3, GPT-3.5, and GPT-4 models from OpenAI are prompt-based. With prompt-based models, the user interacts with the model by entering a text prompt, to which the model responds with a text completion. This completion is the model’s continuation of the input text. While these models are extremely powerful, their behavior is also very sensitive to the prompt. This makes prompt construction an important skill to develop. For more information, see Introduction to prompt engineering.
Prompt construction can be difficult. In practice, the prompt acts to configure the model weights to complete the desired task, but it's more of an art than a science, often requiring experience and intuition to craft a successful prompt. The goal of this article is to help get you started with this learning process. It attempts to capture general concepts and patterns that apply to all GPT models. However it's important to understand that each model behaves differently, so the learnings may not apply equally to all models.
Prompt engineering refers to the process of creating instructions called prompts for Large Language Models (LLMs), such as OpenAI’s ChatGPT. With the immense potential of LLMs to solve a wide range of tasks, leveraging prompt engineering can empower us to save significant time and facilitate the development of impressive applications. It holds the key to unleashing the full capabilities of these huge models, transforming how we interact and benefit from them. For more information, see Prompt engineering techniques.
For more about the Azure OpenAI Service and Large Language Models (LLMs), see:
-
The Chainlit service creates ChatGPT-like user interfaces (UIs) for AI applications.
Chainlit is an open-source Python package based on the "Streamlit" general-purpose UI library, but purpose-built for AI applications to enable conversational experiences and information retrieval.
Chainlit can trace its own Chain of Thought, which allows users to explore the reasoning process directly within the UI. This feature enhances transparency and enables users to understand how the AI arrives at its responses or recommendations.
Chainlit is configured based on this (toml Tom's Obvious Minimal Language)file: VIEW: /scripts/.chainlit/config.toml
- true or false values sets each feature on or off.
Chainlit integrates with LangChain (described below), LlamaIndex, and LangFlow.
For more information about Chainlit, see:
The "Docs Application" container setup and run by this repo additionally contains an instance of the LangChain and "ChromaDB" Vector Database.
- true or false values sets each feature on or off.
-
LangChain adds custom vector embeddings for "Retrieval-Augmented Generation (RAG)" by augmenting LLMs such as OpenAI's GPT-x, Google's PaLM (Pathways Language Model), Anthropic's Claude, VIEW: Facebook's LLaMa, Hugging Face, etc.
LangChain facilitates applications such as document analysis, summarization, chatbots, and code analysis.
LangChain's integrations cover an extensive range of systems, tools, and services, making it a comprehensive solution for language model-based applications. LangChain integrates with the major cloud platforms and with API wrappers for various purposes like news, movie information, and weather, as well as support for Bash, web scraping, and more.
LangChain offers various functionalities for document handling, code generation, analysis, debugging, and interaction with databases and other data sources.
LangChain can reference vector embeddings in memory as np.array for small amounts of data.
But at scale, LangChain references data in a vector embedding model (database) such as ChromaDB.
Vectors retrieved from the custom vector embeddings are added to the question text/instructions.
This approach also enables the most up-to-date information added from the custom store.
- BOOK: Generative AI with LangChain By Ben Auffarth, from Packt Publishing December 2023. 360 pages. References github.com/benman1/generative_ai_with_langchain
- Introduction
- https://www.youtube.com/@LangChain
- Playlist by Greg Kamradt (Data Indy)
- https://www.youtube.com/watch?v=ySus5ZS0b94
-
ChromaDB (at docs.trychroma.com) is a vector embeddings database that augments LLMs with custom private data.
ChromaDB is open-source. It competes with MongoDB Atlas, startup Pinecone, etc.
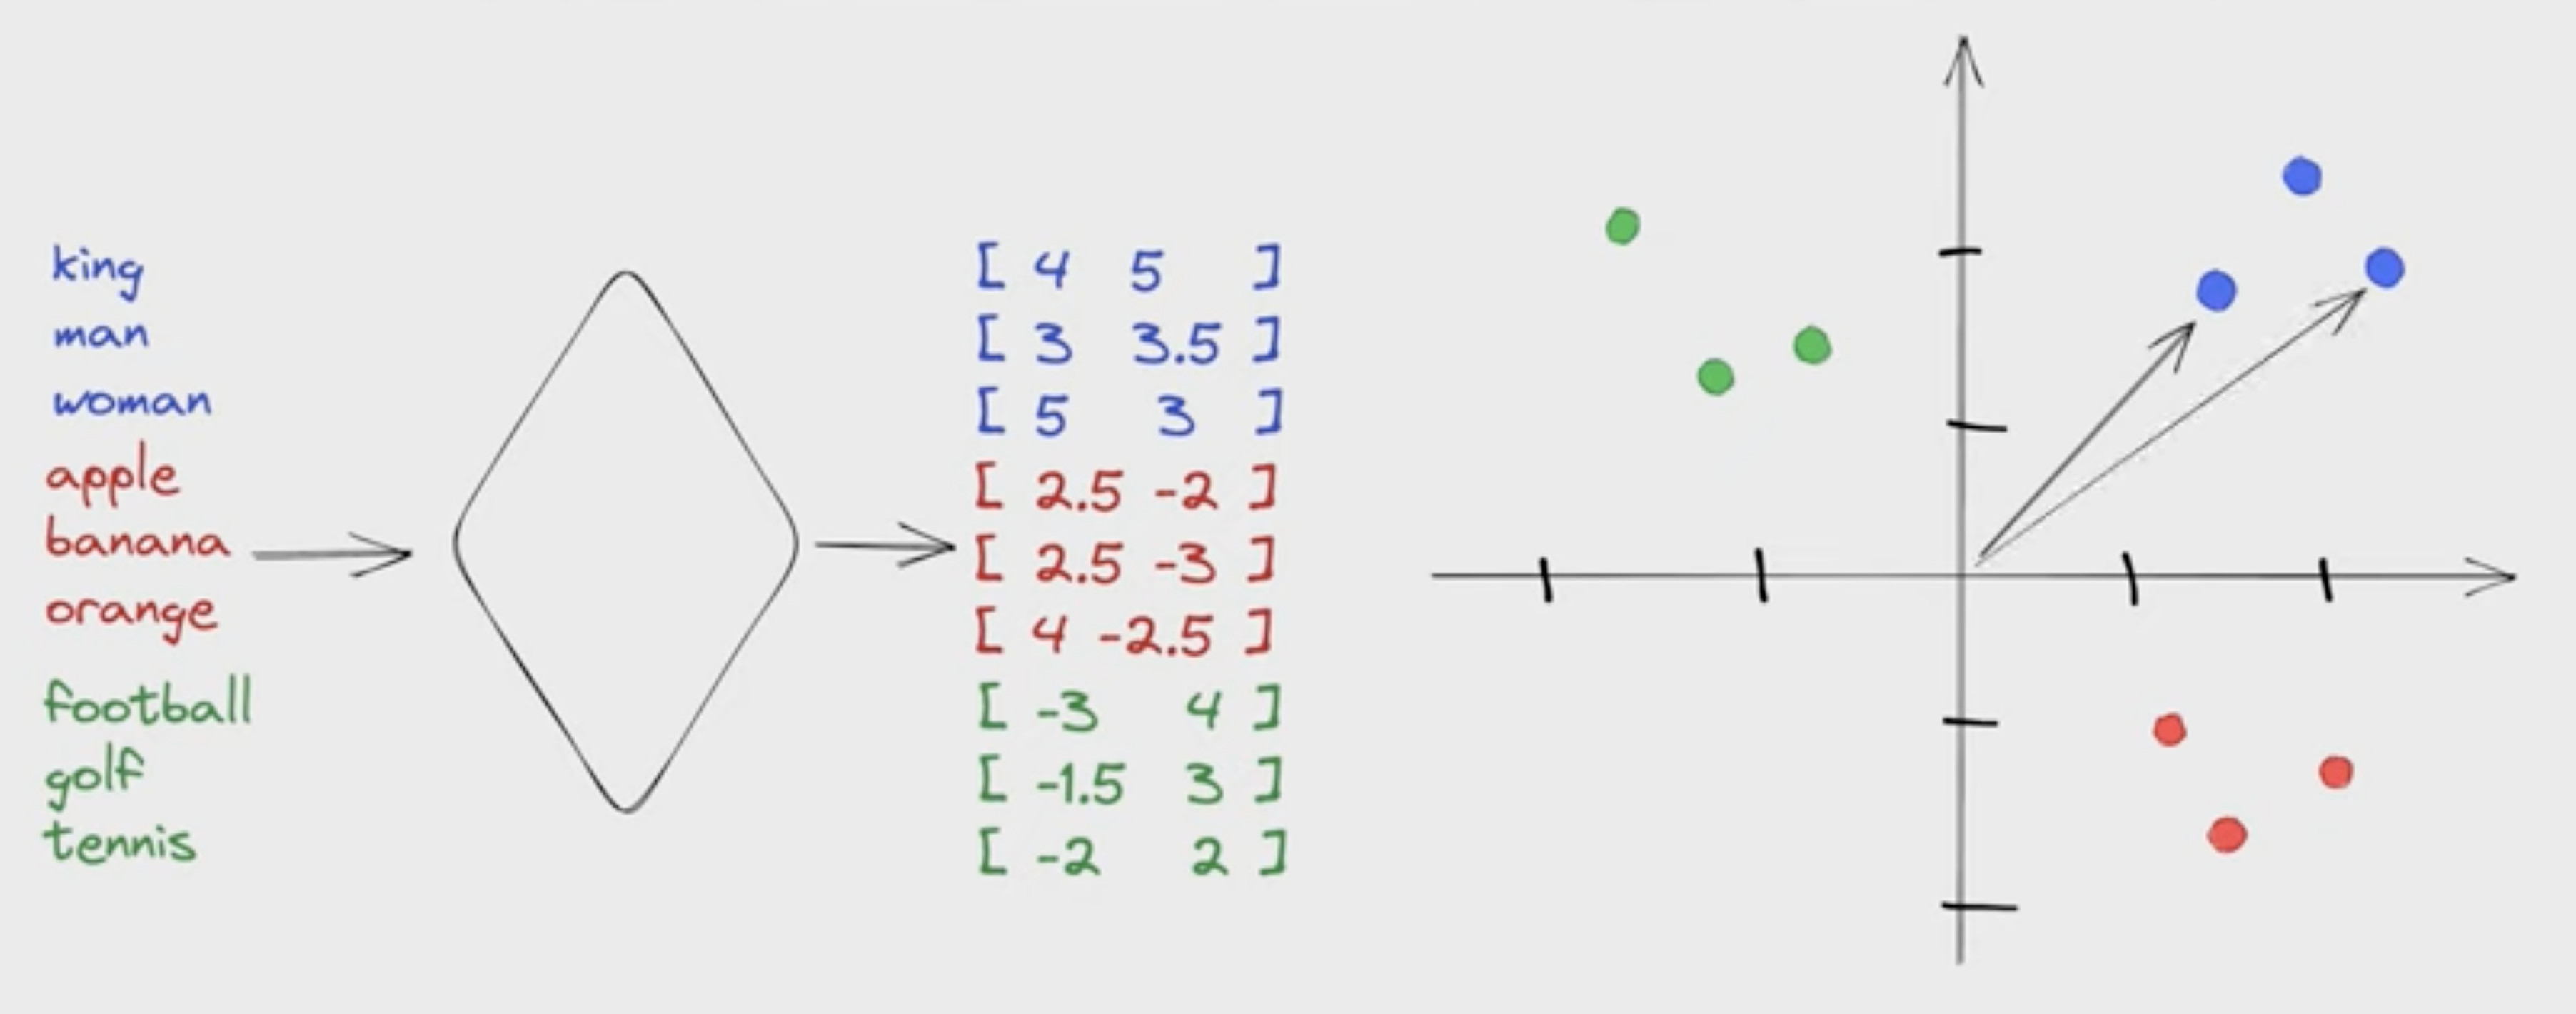
A vector database is a new type of database for the AI era because it defines relationships between words using vector arrays.
As this diagram illustrates: in a vector database, each word is stored as an array of many dimensions. One dimension may be "fruitiness", "a type of game", etc.
Conceptually similar words would have similar vector values in one or more dimensions.
The relationship between words can be measured with a search for cosine similarity using an algorithm such as "nearest neighbor search". The smaller the cumulative distance (across dimensions) between two arrays, the more alike they are with each other.
After words are attached to images, this technique is used to find visually similar images. This capability is used for reverse image search or content-based image retrieval.
This technique is how vector databases provides private search engines and recommendation systems to suggest relevant articles or products based on user interests.
Unusual patterns in vector embeddings can detect fraud and other anomalies.
-
ChromaDB is installed when packages listed in the requirements.txt file are downloaded.
-
Create a collection similar to tables in the relations database. By default, Chroma converts text into the embeddings
The default all-MiniLM-L6-v2, one of many sentence transformer, maps sentences & paragraphs to a 384 dimensional dense vector space trained on a diverse dataset comprising over 1 billion training pairs. But be aware that input text longer than 256-word pieces is truncated. It is compatible with https://platform.openai.com/docs/api-reference
-
Add text documents to the newly created collection with metadata and a unique ID. The collection converts it into embedding.
-
Query the collection by text or embedding to receive similar documents. Results can be filtered out based on metadata.
For more, see
-
-
Facebook AI Similarity Search (FAISS) is a widely used vector database because Facebook AI Research develops it and offers highly optimized algorithms for similarity search and clustering of vector embeddings. FAISS is known for its speed and scalability, making it suitable for large-scale applications. It offers different indexing methods like flat, IVF (Inverted File System), and HNSW (Hierarchical Navigable Small World) to organize and search vector data efficiently.
-
SingleStore: SingleStore aims to deliver the world’s fastest distributed SQL database for data-intensive applications: SingleStoreDB, which combines transactional + analytical workloads in a single platform.
-
Astra DB: DataStax Astra DB is a cloud-native, multi-cloud, fully managed database-as-a-service based on Apache Cassandra, which aims to accelerate application development and reduce deployment time for applications from weeks to minutes.
-
Milvus: Milvus is an open source vector database built to power embedding similarity search and AI applications. Milvus makes unstructured data search more accessible and provides a consistent user experience regardless of the deployment environment. Milvus 2.0 is a cloud-native vector database with storage and computation separated by design. All components in this refactored version of Milvus are stateless to enhance elasticity and flexibility.
-
Qdrant: Qdrant is a vector similarity search engine and database for AI applications. Along with open-source, Qdrant is also available in the cloud. It provides a production-ready service with an API to store, search, and manage points—vectors with an additional payload. Qdrant is tailored to extended filtering support. It makes it useful for all sorts of neural-network or semantic-based matching, faceted search, and other applications.
-
Pinecone: Pinecone is a fully managed vector database that makes adding vector search to production applications accessible. It combines state-of-the-art vector search libraries, advanced features such as filtering, and distributed infrastructure to provide high performance and reliability at any scale.
-
Vespa: Vespa is a platform for applications combining data and AI, online. By building such applications on Vespa helps users avoid integration work to get features, and it can scale to support any amount of traffic and data. To deliver that, Vespa provides a broad range of query capabilities, a computation engine with support for modern machine-learned models, hands-off operability, data management, and application development support. It is free and open source to use under the Apache 2.0 license.
-
Zilliz: Milvus is an open-source vector database, with over 18,409 stars on GitHub and 3.4 million+ downloads. Milvus supports billion-scale vector search and has over 1,000 enterprise users. Zilliz Cloud provides a fully-managed Milvus service made by the creators of Milvus. This helps to simplify the process of deploying and scaling vector search applications by eliminating the need to create and maintain complex data infrastructure. As a DBaaS, Zilliz simplifies the process of deploying and scaling vector search applications by eliminating the need to create and maintain complex data infrastructure.
-
Weaviate: Weaviate is an open-source vector database used to store data objects and vector embeddings from ML-models, and scale into billions of data objects from the same name company in Amsterdam. Users can index billions of data objects to search through and combine multiple search techniques, such as keyword-based and vector search, to provide search experiences.
TODO: Extract Finance, Customer, Telemetry, or Semantic KPIs data stored in Microsoft Fabric OneLake to load as additional embeddings in the ChromaDB vector store to influence formulation of responses by OpenAI.
We are aiming for converational search that makes use of Real-Time Telemetry data from Microsoft Fabric.
We add custom vector embeddings so that the Chat can answer questions about telemetry statistics compared against SLIs (Service Level Indicators) - the real numbers that indicate actual performance:
-
SLAs (Sevice Level Agreements) - the agreements made with clients or users
-
SLOs (Service Level Objectives) - the objectives that must be achieved to meet the SLA
For more about this topic:
NOTE: The scope of apps here are not voice-enabled such as Amazon Alexa, Apple Siri, etc. which makes use of the Azure AI Speech service through the Azure Speech Studio SDK:
- Speaker voice Recognition
- OpenAI Whisper Speech-to-Text
- Speech translation
- Text-to-Speech
The github repo downloaded provides a set of scripts invoking Terraform modules to deploy the following resources within Azure:

The diagram above is based on Paolo's vsdx as referenced in his blog.
Items in red are Terraform Modules (below).
Terraform (.tf modules to deploy an Azure Kubernetes Service(AKS) cluster and Azure OpenAI Service and how to deploy a Python chatbot that authenticates against Azure OpenAI using Entra workload identity and calls the Chat Completion API of the ChatGPT model. Azure Kubernetes Service(AKS) cluster communicates with Azure OpenAI Service via an Azure Private Endpoint.
Within folder terraform/modules are module folders, listed alphabetically below. Each (of 112 Azure resources at last counting) is documented by Terraform under:
https://registry.terraform.io/providers/hashicorp/azurerm/latest/docsWithin each folder are several basic Terraform files (main.tf, outputs.tf, variables.tf).
-
VIEW each main.tf file:
- aks
- bastion_host
- container_registry
- deployment_script
- diagnostic_setting
- firewall
- grafana
- key_vault
- kubernetes
- log_analytics
- nat_gateway
- network_security_group
- node_pool
- openai
- private_dns_zone
- private_endpoint
- prometheus
- route_table
- storage_account
- virtual_machine
- virtual_network
- virtual_network_peering
PROTIP: Internally, Terraform arranges the sequence which resources are created.
-
aks defines these Azure resources:
- "azurerm_user_assigned_identity" "aks_identity" {
- "azurerm_kubernetes_cluster" "aks_cluster" {
- "azurerm_monitor_diagnostic_setting" "settings" {
-
bastion_host defines these Azure resources:
- "azurerm_public_ip" "public_ip" {
- "azurerm_bastion_host" "bastion_host" {
- "azurerm_monitor_diagnostic_setting" "settings" {
- "azurerm_monitor_diagnostic_setting" "pip_settings" {
-
container_registry defines these Azure resources:
- "azurerm_container_registry" "acr" {
- "azurerm_user_assigned_identity" "acr_identity" {
- "azurerm_monitor_diagnostic_setting" "settings" {
-
deployment_script defines these Azure resources:
- "azurerm_user_assigned_identity" "script_identity" {
- "azurerm_role_assignment" "network_contributor_assignment" {
- "azurerm_resource_deployment_script_azure_cli" "script" {
-
diagnostic_setting defines these Azure resources:
- "azurerm_monitor_diagnostic_setting" "settings" {
- "azurerm_monitor_diagnostic_setting" "settings" {
-
firewall defines these Azure resources:
- "azurerm_public_ip" "pip" {
- "azurerm_firewall" "firewall" {
- "azurerm_firewall_policy" "policy" {
- "azurerm_firewall_policy_rule_collection_group" "policy" {
- "azurerm_monitor_diagnostic_setting" "settings" {
- "azurerm_monitor_diagnostic_setting" "pip_settings" {
-
grafana defines these Azure resources:
- "azurerm_dashboard_grafana" "grafana" {
- "azurerm_role_assignment" "grafana" {
- "azurerm_role_assignment" "grafana_admin" {
render real-time ingested IoT Eventstream through a KQL database to Grafana, using a virtual Raspberry Pi IoT Hub Simulator assessing Microsoft Fabric Azure Data Explorer via a Power BI Pro license.
-
key_vault defines these Azure resources:
- "azurerm_key_vault" "key_vault" {
- "azurerm_monitor_diagnostic_setting" "settings" {
-
kubernetes contains these *.tf (Terraform HCL) files:
-
Additionally, ConfigMap yaml for use by Prometheus:
-
log_analytics defines these Azure resources:
- "azurerm_log_analytics_workspace" "log_analytics_workspace" {
- "azurerm_log_analytics_solution" "la_solution" {
-
nat_gateway defines these Azure resources:
- "azurerm_public_ip" "nat_gategay_public_ip" {
- "azurerm_nat_gateway" "nat_gateway" {
- "azurerm_nat_gateway_public_ip_association"
- "azurerm_subnet_nat_gateway_association" "nat-avd-sessionhosts" {
-
network_security_group defines these Azure resources:
- "azurerm_network_security_group" "nsg" {
- "azurerm_monitor_diagnostic_setting" "settings" {
-
node_pool defines these Azure resources:
- "azurerm_kubernetes_cluster_node_pool" "node_pool" {
- "azurerm_kubernetes_cluster_node_pool" "node_pool" {
-
openai defines these Azure resources:
- "azurerm_cognitive_account" "openai" {
- "azurerm_cognitive_deployment" "deployment" {
- "azurerm_monitor_diagnostic_setting" "settings" {
-
private_dns_zone defines these Azure resources:
- "azurerm_private_dns_zone" "private_dns_zone" {
- "azurerm_private_dns_zone_virtual_network_link" "link" {
-
private_endpoint defines these Azure resources:
- "azurerm_private_endpoint" "private_endpoint" {
- "azurerm_private_endpoint" "private_endpoint" {
-
prometheus defines these Azure resources:
- "azurerm_monitor_workspace" "workspace" {
- "azurerm_monitor_data_collection_endpoint" "dce" {
- "azurerm_monitor_data_collection_rule" "dcr" {
- "azurerm_monitor_data_collection_rule_association" "dcra" {
- "azurerm_monitor_alert_prometheus_rule_group" "node_recording_rules_rule_group" {
- "azurerm_monitor_alert_prometheus_rule_group" "kubernetes_recording_rules_rule_group" {
- "azurerm_monitor_alert_prometheus_rule_group" "node_and_kubernetes_recording_rules_rule_group_win" {
- "azurerm_monitor_alert_prometheus_rule_group" "node_recording_rules_rule_group_win" {
-
route_table defines these Azure resources:
- "azurerm_route_table" "rt" {
- "azurerm_subnet_route_table_association" "subnet_association" {
- (no output.tf)
-
storage_account defines these Azure resources:
- "azurerm_storage_account" "storage_account" {
- "azurerm_storage_account" "storage_account" {
-
virtual_machine defines these Azure resources:
- "azurerm_public_ip" "public_ip" {
- "azurerm_network_security_group" "nsg" {
- "azurerm_network_interface" "nic" {
- "azurerm_network_interface_security_group_association" "nsg_association" {
- "azurerm_linux_virtual_machine" "virtual_machine" {
- "azurerm_virtual_machine_extension" "azure_monitor_agent" {
- "azurerm_monitor_data_collection_rule" "linux" {
- "azurerm_monitor_data_collection_rule_association"
-
virtual_network defines these Azure resources:
- "azurerm_virtual_network" "vnet" {
- "azurerm_subnet" "subnet" {
- "azurerm_monitor_diagnostic_setting" "settings" {
-
virtual_network_peering defines these Azure resources:
- [no output.tf]
- "azurerm_virtual_network_peering" "peering" {
- "azurerm_virtual_network_peering" "peering-back" {
-
User-defined Managed Identity: a user-defined managed identity used by the AKS cluster to create additional resources like load balancers and managed disks in Azure.
-
User-defined Managed Identity: a user-defined managed identity used by the chatbot application to acquire a security token via Microsoft Entra Workload ID to call the Chat Completion API of the ChatGPT model provided by the Azure OpenAI Service.
Terraform modules are parametric, so you can choose any network plugin:
- Azure CNI with static IP allocation
- Azure CNI with dynamic IP allocation
- Azure CNI Powered by Cilium
- Azure CNI Overlay
- BYO CNI
- Kubenet
-
Azure Bastion Host: a separate Azure Bastion is deployed in the AKS cluster virtual network to provide SSH connectivity to both agent nodes and virtual machines.
-
Azure NAT Gateway: a bring-your-own (BYO) Azure NAT Gateway to manage outbound connections initiated by AKS-hosted workloads. The NAT Gateway is associated to the
SystemSubnet,UserSubnet, andPodSubnetsubnets. The outboundType property of the cluster is set touserAssignedNatGatewayto specify that a BYO NAT Gateway is used for outbound connections. NOTE: you can update theoutboundTypeafter cluster creation and this will deploy or remove resources as required to put the cluster into the new egress configuration. For more information, see Updating outboundType after cluster creation.
-
Azure Private Endpoints: an Azure Private Endpoint is created for each of the following resources:
- Azure OpenAI Service
- Azure Container Registry
- Azure Key Vault
- Azure Storage Account
- API Server when deploying a private AKS cluster.
The
main.tfmodule creates Azure Private Endpoints and Azure Private DNDS Zones for each of the following resources:- Azure OpenAI Service
- Azure Container Registry
- Azure Key Vault
- Azure Storage Account
/>
In particular, it creates an Azure Private Endpoint and Azure Private DNS Zone to the Azure OpenAI Service as shown in the following code snippet:
module "openai_private_dns_zone" { source = "./modules/private_dns_zone" name = "privatelink.openai.azure.com" resource_group_name = azurerm_resource_group.rg.name tags = var.tags virtual_networks_to_link = { (module.virtual_network.name) = { subscription_id = data.azurerm_client_config.current.subscription_id resource_group_name = azurerm_resource_group.rg.name } } }
module "openai_private_endpoint" { source = "./modules/private_endpoint" name = "${module.openai.name}PrivateEndpoint" location = var.location resource_group_name = azurerm_resource_group.rg.name subnet_id = module.virtual_network.subnet_ids[var.vm_subnet_name] tags = var.tags private_connection_resource_id = module.openai.id is_manual_connection = false subresource_name = "account" private_dns_zone_group_name = "AcrPrivateDnsZoneGroup" private_dns_zone_group_ids = [module.acr_private_dns_zone.id] }
### Azure Private DNS Zones

1. [Azure Private DNS Zones](https://registry.terraform.io/providers/hashicorp/azurerm/latest/docs/data-sources/private_dns_zone): an [Azure Private DNS Zone](https://docs.microsoft.com/en-us/azure/dns/private-dns-overview) is created for each of the following resources:
- Azure OpenAI Service
- Azure Container Registry
- Azure Key Vault
- Azure Storage Account
- API Server when deploying a private AKS cluster.
<br /><br />

### Network Security Groups

1. [Azure Network Security Groups](https://registry.terraform.io/providers/hashicorp/azurerm/latest/docs/data-sources/network_security_group): subnets hosting virtual machines and Azure Bastion Hosts are protected by [Azure Network Security Groups](https://docs.microsoft.com/en-us/azure/virtual-network/network-security-groups-overview) that are used to filter inbound and outbound traffic.


1. Workload namespace and service account: the [Kubectl Terraform Provider](https://registry.terraform.io/providers/cpanato/kubectl/latest/docs) and [Kubernetes Terraform Provider](https://registry.terraform.io/providers/hashicorp/kubernetes/latest/docs) are used to create the namespace and service account used by the chat applications.


### Azure Storage Account

1. [Azure Storage Account](https://registry.terraform.io/providers/hashicorp/azurerm/latest/docs/resources/storage_account): this storage account is used to store the boot diagnostics logs of both the service provider and service consumer virtual machines. Boot Diagnostics is a debugging feature that allows you to view console output and screenshots to diagnose virtual machine status.


<em><strong>Utility Services:</strong></em>

### Azure Key Vault

1. [Azure Key Vault](https://registry.terraform.io/providers/hashicorp/azurerm/latest/docs/resources/key_vault): an Azure Key Vault used to store secrets, certificates, and keys that can be mounted as files by pods using [Azure Key Vault Provider for Secrets Store CSI Driver](https://github.com/Azure/secrets-store-csi-driver-provider-azure). For more information, see [Use the Azure Key Vault Provider for Secrets Store CSI Driver in an AKS cluster](https://learn.microsoft.com/en-us/azure/aks/csi-secrets-store-driver) and [Provide an identity to access the Azure Key Vault Provider for Secrets Store CSI Driver](https://learn.microsoft.com/en-us/azure/aks/csi-secrets-store-identity-access).

TODO: Read sensitive configuration data such as passwords or SSH keys from a pre-existing Azure Key Vault resource. For more information, see [Referencing Azure Key Vault secrets in Terraform](https://thomasthornton.cloud/2022/02/26/referencing-azure-key-vault-secrets-in-terraform/).


### Azure OpenAI Service

1. [Azure OpenAI Service](https://registry.terraform.io/providers/hashicorp/azurerm/latest/docs/resources/cognitive_account): an [Azure OpenAI Service](https://learn.microsoft.com/en-us/azure/cognitive-services/openai/overview) with a [GPT-3.5](https://learn.microsoft.com/en-us/azure/cognitive-services/openai/concepts/models#chatgpt-gpt-35-turbo) model used by the chatbot application. Azure OpenAI Service gives customers advanced language AI with OpenAI GPT-4, GPT-3, Codex, and DALL-E models with the security and enterprise promise of Azure. Azure OpenAI co-develops the APIs with OpenAI, ensuring compatibility and a smooth transition from one to the other.


### Monitoring

1. Azure Monitor ConfigMaps for [Azure Monitor managed service for Prometheus](https://learn.microsoft.com/en-us/azure/azure-monitor/essentials/prometheus-metrics-overview) and `cert-manager` [Cluster Issuer](https://cert-manager.io/docs/configuration/) are deployed using the [Kubectl Terraform Provider](https://registry.terraform.io/providers/cpanato/kubectl/latest/docs) and [Kubernetes Terraform Provider](https://registry.terraform.io/providers/hashicorp/kubernetes/latest/docs).`

1. [Azure Monitor workspace](https://registry.terraform.io/providers/hashicorp/azurerm/3.83.0/docs/resources/monitor_workspace): An [Azure Monitor workspace](https://learn.microsoft.com/en-us/azure/azure-monitor/essentials/azure-monitor-workspace-overview) is a unique environment for data collected by [Azure Monitor](https://learn.microsoft.com/en-us/azure/azure-monitor/essentials/data-platform-metrics). Each workspace has its own data repository, configuration, and permissions. Log Analytics workspaces contain logs and metrics data from multiple Azure resources, whereas Azure Monitor workspaces currently contain only metrics related to [Prometheus](https://learn.microsoft.com/en-us/azure/azure-monitor/essentials/prometheus-metrics-overview). Azure Monitor managed service for Prometheus allows you to collect and analyze metrics at scale using a Prometheus-compatible monitoring solution, based on the [Prometheus](https://aka.ms/azureprometheus-promio). This fully managed service allows you to use the [Prometheus query language (PromQL)](https://aka.ms/azureprometheus-promio-promql) to analyze and alert on the performance of monitored infrastructure and workloads without having to operate the underlying infrastructure. The primary method for visualizing Prometheus metrics is [Azure Managed Grafana](https://learn.microsoft.com/en-us/azure/managed-grafana/overview). You can connect your [Azure Monitor workspace](https://learn.microsoft.com/en-us/azure/azure-monitor/essentials/azure-monitor-workspace-overview) to an [Azure Managed Grafana](https://learn.microsoft.com/en-us/azure/managed-grafana/overview) to visualize Prometheus metrics using a set of built-in and custom Grafana dashboards.

1. [Azure Managed Grafana](https://registry.terraform.io/providers/hashicorp/azurerm/latest/docs/resources/dashboard_grafana): an [Azure Managed Grafana](https://learn.microsoft.com/en-us/azure/managed-grafana/overview) instance used to visualize the [Prometheus metrics](https://learn.microsoft.com/en-us/azure/azure-monitor/containers/prometheus-metrics-enable?tabs=azure-portal) generated by the [Azure Kubernetes Service(AKS)](https://docs.microsoft.com/en-us/azure/aks/intro-kubernetes) cluster deployed by the Bicep modules. [Azure Managed Grafana](https://learn.microsoft.com/en-us/azure/managed-grafana/overview) is a fully managed service for analytics and monitoring solutions. It's supported by Grafana Enterprise, which provides extensible data visualizations. This managed service allows to quickly and easily deploy Grafana dashboards with built-in high availability and control access with Azure security.

1. [Prometheus](https://prometheus.io/): the AKS cluster is configured to collect metrics to the [Azure Monitor workspace](https://learn.microsoft.com/en-us/azure/azure-monitor/essentials/azure-monitor-workspace-overview) and [Azure Managed Grafana](https://learn.microsoft.com/en-us/azure/managed-grafana/overview). Nonetheless, the [kube-prometheus-stack](https://artifacthub.io/packages/helm/prometheus-community/kube-prometheus-stack) Helm chart is used to install [Prometheus](https://prometheus.io/) and [Grafana](https://grafana.com/) on the AKS cluster.

1. [Azure Log Analytics Workspace](https://registry.terraform.io/providers/hashicorp/azurerm/latest/docs/resources/log_analytics_workspace): a centralized [Azure Log Analytics](https://docs.microsoft.com/en-us/azure/azure-monitor/logs/log-analytics-workspace-overview) workspace is used to collect the diagnostics logs and metrics from all the Azure resources:
- Azure OpenAI Service
- Azure Kubernetes Service cluster
- Azure Key Vault
- Azure Network Security Group
- Azure Container Registry
- Azure Storage Account
- Azure jump-box virtual machine
<br /><br />


<a name="Compute"></a>

### Compute

1. [NGINX Ingress Controller](https://docs.nginx.com/nginx-ingress-controller/): this sample compares the managed and unmanaged NGINX Ingress Controller. While the managed version is installed using the [Application routing add-on](https://learn.microsoft.com/en-us/azure/aks/app-routing), the unmanaged version is deployed using the [Helm Terraform Provider](https://registry.terraform.io/providers/hashicorp/helm/latest/docs). You can use the Helm provider to deploy software packages in Kubernetes. The provider needs to be configured with the proper credentials before it can be used.

1. [Azure Virtual Machine](https://registry.terraform.io/providers/hashicorp/azurerm/latest/docs/resources/linux_virtual_machine): Terraform modules can optionally create a jump-box virtual machine to manage the private AKS cluster.


> **NOTE**
> In a production environment, we strongly recommend deploying a [private AKS cluster](https://docs.microsoft.com/en-us/azure/aks/private-clusters) with [Uptime SLA](https://docs.microsoft.com/en-us/azure/aks/uptime-sla). For more information, see [private AKS cluster with a Public DNS address](https://docs.microsoft.com/en-us/azure/aks/private-clusters#create-a-private-aks-cluster-with-a-public-dns-address). Alternatively, you can deploy a public AKS cluster and secure access to the API server using [authorized IP address ranges](https://learn.microsoft.com/en-us/azure/aks/api-server-authorized-ip-ranges).


<hr />

<a name="GitHub-Workflow-Actions"></a>

## GitHub Workflow Actions

<a target="_blank" href="https://www.youtube.com/watch?v=yfBtjLxn_6k">VIDEO</a>:
<a target="_blank" href="https://www.youtube.com/watch?v=-hVG9z0fCac&list=PLArH6NjfKsUhvGHrpag7SuPumMzQRhUKY&pp=iAQB">VIDEO</a>:
TODO: In the <tt>.github/workflow</tt> folder are GitHub Actions yaml files that define how to work.

1. <a target="_blank" href="https://github.com/bomonike/azure-chatgbt/blob/main/.github/workflows/generator-generic-ossf-slsa3-publish.yml">VIEW: file <strong>generator-generic-ossf-slsa3-publish.yml</strong>

The workflow (at <a target="_blank" href="https://github.com/slsa-framework/slsa-github-generator/">github.com/slsa-framework/slsa-github-generator
</a>) generates a supply-chain provenance file of the project to meet <a target="_blank" href="https://wilsonmar.github.io/slsa/">SLSA</a> for "level 3" as defined in <a target="_blank" href="https://slsa.dev/spec/v0.1/requirements">v0.1/requirements</a> from <a target="_blank" href="https://slsa.dev">slsa.dev</a>, an initiative of the <a target="_blank" href="https://www.openssf.org/">OpenSSF</a>.

Workflows are automatically invoked when a <tt>git push</tt> is performed.

For more on this topic:
* https://wilsonmar.github.io/github-actions
* https://github.com/actions
* https://github.blog/2022-02-02-build-ci-cd-pipeline-github-actions-four-steps/
* https://github.com/marketplace?category=&query=&type=actions&verification=
<br /><br />

1. TODO: Add a GitHub Workflow to scan IaC code for vulnerabilities

The ability to check for vulnerabilities before they are even created is a major benefit for using IaC (Terraform, Azure Resource Manager, Bicep) code.

WARNING: Scanning by a third-party in the cloud means your code is read and possibly retained by those third-parties, a potential security risk.


1. TODO: Add a step in the GitHub workflow to create a SBOM (Software Bill of Materials) by iteratively (exhaustively) following the chain of packages referenced in each program. This would add many more to the list of 138 in the file. This enables raising an alert if any package:

* is not of the latest version ;
* has an open <a target="_blank" href="https://github.com/marketplace/actions/dependency-review">GitHub Dependabot alert</a>;
* has been found <a target="_blank" href="https://github.com/marketplace/actions/aqua-security-trivy">by Aqua Trivy</a> or <a target="_blank" href="https://github.com/marketplace/actions/snyk">Snyk</a> to have a vulnerability reported to CISA as a CVE;
* contains code that can potentially be malicious actions such as exfiltration of data to a possible adversary (such as China, Russia, North Korea, Iran, etc.)
* contains <a target="_blank" href="https://github.com/marketplace/actions/markdown-link-check">markdown text with broken links</a>
<br /><br />

1. TODO: Use <a target="_blank" href="https://github.com/marketplace/actions/gitguardian-shield-action">Git Guardian</a> to highlight code that appears to have gibberish that might be a password, API key, or other secret;

1. TODO: <a target="_blank" href="https://github.com/marketplace/actions/git-semantic-version">Determine the semantic version of a repo</a> based on git history.

1. TODO: <a target="_blank" href="https://github.com/marketplace/actions/gh-release">Create a new release</a>
1. TODO: Run <a target="_blank" href="https://github.com/marketplace/actions/gitguardian-shield-action">Git Guardian</a>

1. TODO: Add a step to <a target="_blank" href="https://github.com/marketplace/actions/todo-to-issue">convert TODO comments in code to GitHub Issues.

<hr />


<a name="Subnet-IP-Addresses"></a>

### Subnet IP Addresses

As specified in the diagram (below):

* 10.0.0.2/8 = VNet
* 10.240.0.0/16 = SystemSubnet
* 10.241.0.0/16 = UserSubnet
* 10.242.0.0/16 = PodSubnet
* 10.243.0.0/27 = ApiServerSubnet
* 10.243.2.0/24 = AzureBastion
* 10.243.1.0/24 = VMSubnet
* 10.243.1.0/24 = PodSubnet
<br /><br  />


<a name="Shell-Scripts"></a>

## Shell Scripts


<a name="install-nginx-via-helm-and-create-sa.sh"></a>

## install-nginx-via-helm-and-create-sa.sh

The [Azure Deployment Script <tt><strong>resource_deployment_script_azure_cli</strong></tt> at [https://registry.terraform.io/providers/hashicorp/azurerm/latest/docs/resources/](https://registry.terraform.io/providers/hashicorp/azurerm/latest/docs/resources/resource_deployment_script_azure_cli) is used to run the </tt><strong>install-nginx-via-helm-and-create-sa.sh</strong></tt> Bash script which:

* creates the namespace and service account for the sample application and
* installspackages to the AKS cluster via [Helm](https://helm.sh/). For more information from Terraform about deployment scripts, see [azurerm_resource_deployment_script_azure_cli](https://registry.terraform.io/providers/hashicorp/azurerm/latest/docs/resources/resource_deployment_script_azure_cli)

- [NGINX Ingress Controller](https://docs.nginx.com/nginx-ingress-controller/)
- [Cert-Manager](https://cert-manager.io/docs/)
- [Prometheus](https://prometheus.io/)
<br /><br />

For more about Terraform:
- [Azure OpenAI Terraform deployment for sample chatbot](https://github.com/Azure-Samples/azure-openai-terraform-deployment-sample/)
- [Terraform module for deploying Azure OpenAI Service.](https://registry.terraform.io/modules/Azure/openai/azurerm/latest)
- <a target="_blank" href="https://www.udemy.com/course/azure-kubernetes-service-with-azure-devops-and-terraform/learn/lecture/23628292#overview">Terraform install</a>
<br /><br />


<hr />

## Kubernetes Components

Each cluster contains the following Docker containers and Kubernetes services:

<a target="_blank" href="https://res.cloudinary.com/dcajqrroq/image/upload/v1708723970/openai/workload.png"><img alt="workload.png" src="https://res.cloudinary.com/dcajqrroq/image/upload/v1708723970/openai/workload.png"></a>

All the containers above are collectively represented by one of group of <strong>purple icons</strong> at the right side of the diagram above and at the <a href="#Infrastructure-Architecture-Diagram">Infrastructure Architecture Diagram (below)</a>.

NOTE: <a target="_blank" href="https://learn.microsoft.com/en-us/azure/container-apps/overview">Azure Container Apps</a> serverless can

For more:
- https://learn.microsoft.com/en-us/azure/aks/


<a name="install-packages-for-chainlit-demo.sh"></a>

### install-packages-for-chainlin-demo.sh

<a target="_blank" href="https://github.com/bomonike/azure-chatgbt/tree/main/scripts/install-packages-for-chainlin-demo.sh">
<strong>VIEW: install-packages-for-chainlin-demo.sh</strong></a> which installs:
* kubectl as $clusterName using az commands to $subscriptionId
* helm using curl to download from the internet
helm is used to install: https://cert-manager.io/docs/installation/helm/
* prometheus

* jetstack
* https://github.com/jetstack
* Jetstack is cert-manager inventor/maintainer James Munnelly

* cert-manager jetstack [v1.8.0] at
* https://cert-manager.io/docs/releases/
* https://artifacthub.io/packages/search?org=cert-manager
* https://medium.com/@dikshantdevops/how-to-setup-cert-manager-in-your-cluster-358d519da2c5
* issues and renewes X.509 certificates from within Kubernetes clusters
* seamlessly integrates with Let’s Encrypt, a free and widely trusted certificate authority,
* https://venafi.com/open-source/cert-manager/

<pre>kubectl apply -f https://github.com/cert-manager/cert-manager/releases/download/v1.12.0/cert-manager.crds.yaml
helm repo add jetstack https://charts.jetstack.io
helm repo update
kubectl get cert-manager -n cert-manager
</pre>

That's in:
* terraform/modules/kubernetes/cluster_issuers.tf
* scripts/cluster-issuer-nginx.yml
* scripts/cluster-issuer-webapprouting.yml /Users/wilsonmar/bomonike/azure-chatgbt/scripts/install-packages-for-chainlit-demo.sh

* $namespace using kubectl

* $serviceAccountName
<br /><br />


<hr />

<a name="09-deploy-apps.sh"></a>

### 09-deploy-apps.sh

<a target="_blank" href="https://github.com/bomonike/azure-chatgbt/tree/main/scripts/09-deploy-apps.sh">
<strong>VIEW: 09-deploy-apps.sh</strong></a> runs kubectl apply by referencing:

* <a target="_blank" href="#docs-configmap.yml">docs-configmap.yml</a> ?
* <a target="_blank" href="#docs-deployment.yml">docs-deployment.yml</a>
* <a target="_blank" href="#docs-ingress.yml">docs-ingress.yml</a> ?
* <a target="_blank" href="#docs-service.yml">docs-service.yml</a> ?

* <a target="_blank" href="#chat-configmap.yml">chat-configmap.yml</a>  ?
* <a target="_blank" href="#chat-deployment.yml">chat-deployment.yml</a>
* <a target="_blank" href="#chat-ingress.yml">chat-ingress.yml</a>  ?
* <a target="_blank" href="#chat-service.yml">chat-service.yml</a>

* <a target="_blank" href="#cluster-issuer-webapprouting.yml">cluster-issuer-webapprouting.yml</a> ?
* <a target="_blank" href="#cluster-issuer-nginx.yml">cluster-issuer-nginx.yml</a> ?

* <a target="_blank" href="#docs.py">docs.py</a> ?
* <a target="_blank" href="#chainlit.md">chainlit.md</a>
<br /><br />

<hr />

<a name="10-configure-dns.sh"></a>

### 10-configure-dns.sh

<a target="_blank" href="https://github.com/bomonike/azure-chatgbt/tree/main/scripts/10-configure-dns.sh">
VIEW: 10-configure-dns.sh</a>

<tt>apt install -y jq</tt>

* Choose the ingress controller to use based on $ingressClassName
* Retrieve the public IP address of the NGINX ingress controller based on $publicIpAddress
For each $subdomain
* Remove the A record
* Create the A record


<hr />

<a name="chat-configmap.yml"></a>

### chat-configmap.yml

<a target="_blank" href="https://github.com/bomonike/azure-chatgbt/blob/main/scripts/chat-configmap.yml">VIEW: chat-configmap.yml</a>


<a name="chat-ingress.yml"></a>

### chat-ingress.yml

<a target="_blank" href="https://github.com/bomonike/azure-chatgbt/blob/main/scripts/chat-ingress.yml">VIEW: chat-ingress.yml</a>


<a name="chat-service"></a>

### chat-service.yml

<a target="_blank" href="https://github.com/bomonike/azure-chatgbt/blob/main/scripts/chat-service.yml">VIEW: chat-service.yml</a>


<a name="cluster-issuer-nginx.yml"></a>

### cluster-issuer-webapprouting.yml

<a target="_blank" href="https://github.com/bomonike/azure-chatgbt/blob/main/scripts/cluster-issuer-webapprouting.yml">VIEW: cluster-issuer-webapprouting.yml</a>


<a name="cluster-issuer-webapprouting.yml"></a>

### cluster-issuer-nginx.yml

<a target="_blank" href="https://github.com/bomonike/azure-chatgbt/blob/main/scripts/cluster-issuer-nginx.yml">VIEW: cluster-issuer-nginx.yml</a>


<hr />

## docs app

<a name="docs.py"></a>

### docs.py

<a target="_blank" href="https://github.com/bomonike/azure-chatgbt/blob/main/scripts/docs.py">docs.py</a>


<a name="docs-configmap.yml"></a>

### docs-configmap.yml

<a target="_blank" href="https://github.com/bomonike/azure-chatgbt/blob/main/scripts/docs-configmap.yml">VIEW: docs-configmap.yml</a>


<a name="docs-ingress.yml"></a>

### docs-ingress.yml

<a target="_blank" href="https://github.com/bomonike/azure-chatgbt/blob/main/scripts/docs-ingress.yml">VIEW: docs-ingress.yml</a>


<a name="docs-service.yml"></a>

### docs-service.yml

<a target="_blank" href="https://github.com/bomonike/azure-chatgbt/blob/main/scripts/docs-service.yml">VIEW: docs-service.yml</a>


<a name="chainlit.md"></a>

### chainlit.md

<a target="_blank" href="https://github.com/bomonike/azure-chatgbt/blob/main/scripts/chainlit.md">chainlit.md</a>


<hr />

<a name="03-push-docker-image.sh"></a>

### 03-push-docker-image.sh

<a target="_blank" href="https://github.com/bomonike/azure-chatgbt/tree/main/scripts/03-push-docker-image.sh">
VIEW: 03-push-docker-image.sh</a> that it references from 00-variables.sh:

* $acrName
Creates:
* $loginServer

```bash
#!/bin/bash

# Variables
source ./00-variables.sh

# Login to ACR
az acr login --name $acrName

# Retrieve ACR login server. Each container image needs to be tagged with the loginServer name of the registry.
loginServer=$(az acr show --name $acrName --query loginServer --output tsv)

# Tag the local image with the loginServer of ACR
docker tag ${imageName,,}:$tag $loginServer/${imageName,,}:$tag

# Push latest container image to ACR
docker push $loginServer/${imageName,,}:$tag
-
Cert-Manager: the Kubernetes
cert-managerpackage and Let's Encrypt certificate authority are used to issue a TLS/SSL certificate to the chat applications. -
Let's encrypt creates free SSL/TLS certificate so websites can communicate using HTTPS (secure HTTP).
Create a self-signed public certificate to authenticate your application Microsoft identity platform
The containers are retrieved by the Azure Kubernetes Service (AKS) built upon the open-source Kubernetes framework from Google.
To continue running with a cluster of containers when another one fails, Kubernetes runs several clusters, each consists of the same set of "pods":
Each cluster communicates with the Azure OpenAI Service via an Azure Private Endpoint.
- Azure Kubernetes Service: A public or private Azure Kubernetes Service(AKS) cluster composed of a:
- A
systemnode pool in a dedicated subnet. The default node pool hosts only critical system pods and services. The worker nodes have node taint which prevents application pods from beings scheduled on this node pool. - A
usernode pool hosting user workloads and artifacts in a dedicated subnet.
The repo provides a template to deploy an Azure Kubernetes Service(AKS) cluster and Azure OpenAI Service using Terraform modules using the Azure Provider Terraform Provider.
How to deploy a Python chatbot that authenticates against Azure OpenAI using Entra workload identity and calls the Chat Completion API of a ChatGPT model. For a Bicep version of the demo, see How to deploy and run an Azure OpenAI ChatGPT application on AKS via Bicep.
In a production environment, we strongly recommend deploying a private AKS cluster with Uptime SLA. For more information, see private AKS cluster with a Public DNS address. Alternatively, you can deploy a public AKS cluster and secure access to the API server using authorized IP address ranges.
The following table contains the code from the openai.tf Terraform module used to deploy the Azure OpenAI Service.
zzz
resource "azurerm_cognitive_account" "openai" {
  name                          = var.name
  location                      = var.location
  resource_group_name           = var.resource_group_name
  kind                          = "OpenAI"
  custom_subdomain_name         = var.custom_subdomain_name
  sku_name                      = var.sku_name
  public_network_access_enabled = var.public_network_access_enabled
  tags                          = var.tags

  identity {
    type = "SystemAssigned"
  }

  lifecycle {
    ignore_changes = [
      tags
    ]
  }
}

resource "azurerm_cognitive_deployment" "deployment" {
  for_each             = {for deployment in var.deployments: deployment.name => deployment}

  name                 = each.key
  cognitive_account_id = azurerm_cognitive_account.openai.id

  model {
    format  = "OpenAI"
    name    = each.value.model.name
    version = each.value.model.version
  }

  scale {
    type = "Standard"
  }
}

resource "azurerm_monitor_diagnostic_setting" "settings" {
  name                       = "DiagnosticsSettings"
  target_resource_id         = azurerm_cognitive_account.openai.id
  log_analytics_workspace_id = var.log_analytics_workspace_id

  enabled_log {
    category = "Audit"

    retention_policy {
      enabled = true
      days    = var.log_analytics_retention_days
    }
  }

  enabled_log {
    category = "RequestResponse"

    retention_policy {
      enabled = true
      days    = var.log_analytics_retention_days
    }
  }

  enabled_log {
    category = "Trace"

    retention_policy {
      enabled = true
      days    = var.log_analytics_retention_days
    }
  }

  metric {
    category = "AllMetrics"

    retention_policy {
      enabled = true
      days    = var.log_analytics_retention_days
    }
  }
}
Azure Cognitive Services use custom subdomain names for each resource created through the Azure portal, Azure Cloud Shell, Azure CLI, Bicep, Azure Resource Manager (ARM), or Terraform. Unlike regional endpoints, which were common for all customers in a specific Azure region, custom subdomain names are unique to the resource. Custom subdomain names are required to enable features like Azure Active Directory (Entra) for authentication. In our case, we need to specify a custom subdomain for our Azure OpenAI Service as our chatbot application will use an Entra security token to access it. By default, the main.tf module sets the value of the custom_subdomain_name parameter to the lowercase name of the Azure OpenAI resource. For more information on custom subdomains, see Custom subdomain names for Cognitive Services.
This terraform module allows you to pass an array containing the definition of one or more model deployments in the deployments parameter. For more information on model deployments, see Create a resource and deploy a model using Azure OpenAI.
As an alternative, you can use the Terraform module for deploying Azure OpenAI Service. to deploy an Azure OpenAI Service.
Below you can read the code of the private_dns_zone and private_endpoint modules used, respectively, to create the Azure Private Endpoints and Azure Private DNDS Zones.
resource "azurerm_private_dns_zone" "private_dns_zone" {
  name                = var.name
  resource_group_name = var.resource_group_name
  tags                = var.tags

  lifecycle {
    ignore_changes = [
      tags
    ]
  }
}

resource "azurerm_private_dns_zone_virtual_network_link" "link" {
  for_each = var.virtual_networks_to_link

  name                  = "link_to_${lower(basename(each.key))}"
  resource_group_name   = var.resource_group_name
  private_dns_zone_name = azurerm_private_dns_zone.private_dns_zone.name
  virtual_network_id    = "/subscriptions/${each.value.subscription_id}/resourceGroups/${each.value.resource_group_name}/providers/Microsoft.Network/virtualNetworks/${each.key}"

  lifecycle {
    ignore_changes = [
      tags
    ]
  }
}resource "azurerm_private_endpoint" "private_endpoint" {
name = var.name
location = var.location
resource_group_name = var.resource_group_name
subnet_id = var.subnet_id
tags = var.tags
private_service_connection {
name = "${var.name}Connection"
private_connection_resource_id = var.private_connection_resource_id
is_manual_connection = var.is_manual_connection
subresource_names = try([var.subresource_name], null)
request_message = try(var.request_message, null)
}
private_dns_zone_group {
name = var.private_dns_zone_group_name
private_dns_zone_ids = var.private_dns_zone_group_ids
}
lifecycle {
ignore_changes = [
tags
]
}
}The following code snippet from the main.tf Terraform module creates the user-defined managed identity used by the chatbot to acquire a security token from Azure Active Directory via Entra workload identity.
resource "azurerm_user_assigned_identity" "aks_workload_identity" {
  name                = var.name_prefix == null ? "${random_string.prefix.result}${var.workload_managed_identity_name}" : "${var.name_prefix}${var.workload_managed_identity_name}"
  resource_group_name = azurerm_resource_group.rg.name
  location            = var.location
  tags                = var.tags

  lifecycle {
    ignore_changes = [
      tags
    ]
  }
}

resource "azurerm_role_assignment" "cognitive_services_user_assignment" {
  scope                = module.openai.id
  role_definition_name = "Cognitive Services User"
  principal_id         = azurerm_user_assigned_identity.aks_workload_identity.principal_id
  skip_service_principal_aad_check = true
}

resource "azurerm_federated_identity_credential" "federated_identity_credential" {
  name                = "${title(var.namespace)}FederatedIdentity"
  resource_group_name = azurerm_resource_group.rg.name
  audience            = ["api://AzureADTokenExchange"]
  issuer              = module.aks_cluster.oidc_issuer_url
  parent_id           = azurerm_user_assigned_identity.aks_workload_identity.id
  subject             = "system:serviceaccount:${var.namespace}:${var.service_account_name}"
}
The above code snippet performs the following steps:
- Creates a new user-defined managed identity.
- Assign the new managed identity to the Cognitive Services User role with the resource group as a scope.
- Federate the managed identity with the service account used by the chatbot. The following information is necessary to create the federated identity credentials:
- The Kubernetes service account name.
- The Kubernetes namespace that will host the chatbot application.
- The URL of the OpenID Connect (OIDC) token issuer endpoint for Entra workload identity
For more information, see the following resources:
- How to configure Azure OpenAI Service with managed identities
- Use Entra workload identity with Azure Kubernetes Service (AKS)
Open the Azure Portal, and navigate to the resource group. Open the Azure Open AI Service resource, navigate to Keys and Endpoint, and check that the endpoint contains a custom subdomain rather than the regional Cognitive Services endpoint.

Open to the <Prefix>WorkloadManagedIdentity managed identity, navigate to the Federated credentials, and verify that the federated identity credentials for the magic8ball-sa service account were created correctly, as shown in the following picture.
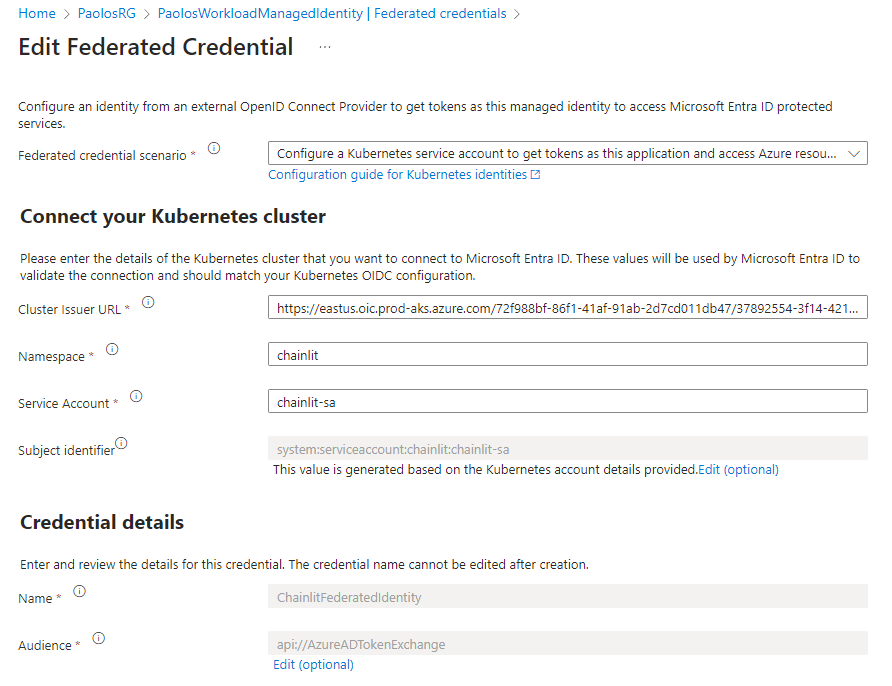
Workloads deployed on an Azure Kubernetes Services (AKS) cluster require Azure Active Directory (Entra) application credentials or managed identities to access Entra protected resources, such as Azure Key Vault and Microsoft Graph. Entra workload identity integrates with the capabilities native to Kubernetes to federate with external identity providers.
Entra workload identity uses Service Account Token Volume Projection to enable pods to use a Kubernetes service account. When enabled, the AKS OIDC Issuer issues a service account security token to a workload and OIDC federation enables the application to access Azure resources securely with Entra based on annotated service accounts.
Entra workload identity works well with the Azure Identity client libraries and the Microsoft Authentication Library (MSAL) collection if you use a registered application instead of a managed identity. Your workload can use any of these libraries to seamlessly authenticate and access Azure cloud resources.
For more information, see the following resources:
- Azure Workload Identity open-source project
- Use an Entra workload identity on Azure Kubernetes Service (AKS
- Deploy and configure workload identity on an Azure Kubernetes Service (AKS) cluster
- Modernize application authentication with workload identity sidecar
- Tutorial: Use a workload identity with an application on Azure Kubernetes Service (AKS)
- Workload identity federation
- Use Entra Workload Identity for Kubernetes with a User-Assigned Managed Identity
- Use Entra workload identity for Kubernetes with an Entra registered application
- Azure Managed Identities with Workload Identity Federation
- Entra workload identity federation with Kubernetes
- Azure Active Directory Workload Identity Federation with external OIDC Identy Providers
- Minimal Entra Workload identity federation
In the Azure Identity client libraries, you can choose one of the following approaches:
- Use
DefaultAzureCredential, which will attempt to use theWorkloadIdentityCredential. - Create a
ChainedTokenCredentialinstance that includesWorkloadIdentityCredential. - Use
WorkloadIdentityCredentialdirectly.
The following table provides the minimum package version required for each language's client library.
| Language | Library | Minimum Version | Example |
|---|---|---|---|
| .NET | Azure.Identity | 1.9.0 | Link |
| Go | azidentity | 1.3.0 | Link |
| Java | azure-identity | 1.9.0 | Link |
| JavaScript | @azure/identity | 3.2.0 | Link |
| Python | azure-identity | 1.13.0 | Link |
The following client libraries are the minimum version required
| Language | Library | Image | Example | Has Windows |
|---|---|---|---|---|
| .NET | microsoft-authentication-library-for-dotnet | ghcr.io/azure/azure-workload-identity/msal-net | Link | Yes |
| Go | microsoft-authentication-library-for-go | ghcr.io/azure/azure-workload-identity/msal-go | Link | Yes |
| Java | microsoft-authentication-library-for-java | ghcr.io/azure/azure-workload-identity/msal-java | Link | No |
| JavaScript | microsoft-authentication-library-for-js | ghcr.io/azure/azure-workload-identity/msal-node | Link | No |
| Python | microsoft-authentication-library-for-python | ghcr.io/azure/azure-workload-identity/msal-python | Link | No |
The sample makes use of a Deployment Script to run the install-nginx-via-helm-and-create-sa.sh Bash script that creates the namespace and service account for the sample application and installs the following packages to the AKS cluster via Helm.
This sample uses the NGINX Ingress Controller to expose the chatbot to the public internet.
# Install kubectl
az aks install-cli --only-show-errors

# Get AKS credentials
az aks get-credentials \
  --admin \
  --name $clusterName \
  --resource-group $resourceGroupName \
  --subscription $subscriptionId \
  --only-show-errors

# Check if the cluster is private or not
private=$(az aks show --name $clusterName \
  --resource-group $resourceGroupName \
  --subscription $subscriptionId \
  --query apiServerAccessProfile.enablePrivateCluster \
  --output tsv)

# Install Helm
curl https://raw.githubusercontent.com/helm/helm/main/scripts/get-helm-3 -o get_helm.sh -s
chmod 700 get_helm.sh
./get_helm.sh &>/dev/null

# Add Helm repos
helm repo add prometheus-community https://prometheus-community.github.io/helm-charts
helm repo add ingress-nginx https://kubernetes.github.io/ingress-nginx
helm repo add jetstack https://charts.jetstack.io

# Update Helm repos
helm repo update

if [[ $private == 'true' ]]; then
  # Log whether the cluster is public or private
  echo "$clusterName AKS cluster is public"

  # Install Prometheus
  command="helm install prometheus prometheus-community/kube-prometheus-stack \
  --create-namespace \
  --namespace prometheus \
  --set prometheus.prometheusSpec.podMonitorSelectorNilUsesHelmValues=false \
  --set prometheus.prometheusSpec.serviceMonitorSelectorNilUsesHelmValues=false"

  az aks command invoke \
    --name $clusterName \
    --resource-group $resourceGroupName \
    --subscription $subscriptionId \
    --command "$command"

  # Install NGINX ingress controller using the internal load balancer
  command="helm install nginx-ingress ingress-nginx/ingress-nginx \
    --create-namespace \
    --namespace ingress-basic \
    --set controller.replicaCount=3 \
    --set controller.nodeSelector.\"kubernetes\.io/os\"=linux \
    --set defaultBackend.nodeSelector.\"kubernetes\.io/os\"=linux \
    --set controller.metrics.enabled=true \
    --set controller.metrics.serviceMonitor.enabled=true \
    --set controller.metrics.serviceMonitor.additionalLabels.release=\"prometheus\" \
    --set controller.service.annotations.\"service\.beta\.kubernetes\.io/azure-load-balancer-health-probe-request-path\"=/healthz"

  az aks command invoke \
    --name $clusterName \
    --resource-group $resourceGroupName \
    --subscription $subscriptionId \
    --command "$command"

  # Install certificate manager
  command="helm install cert-manager jetstack/cert-manager \
    --create-namespace \
    --namespace cert-manager \
    --set installCRDs=true \
    --set nodeSelector.\"kubernetes\.io/os\"=linux"

  az aks command invoke \
    --name $clusterName \
    --resource-group $resourceGroupName \
    --subscription $subscriptionId \
    --command "$command"

  # Create cluster issuer
  command="cat <<EOF | kubectl apply -f -
apiVersion: cert-manager.io/v1
kind: ClusterIssuer
metadata:
  name: letsencrypt-nginx
spec:
  acme:
    server: https://acme-v02.api.letsencrypt.org/directory
    email: $email
    privateKeySecretRef:
      name: letsencrypt
    solvers:
    - http01:
        ingress:
          class: nginx
          podTemplate:
            spec:
              nodeSelector:
                "kubernetes.io/os": linux
EOF"

  az aks command invoke \
    --name $clusterName \
    --resource-group $resourceGroupName \
    --subscription $subscriptionId \
    --command "$command"

  # Create workload namespace
  command="kubectl create namespace $namespace"

  az aks command invoke \
    --name $clusterName \
    --resource-group $resourceGroupName \
    --subscription $subscriptionId \
    --command "$command"

  # Create service account
  command="cat <<EOF | kubectl apply -f -
apiVersion: v1
kind: ServiceAccount
metadata:
  annotations:
    azure.workload.identity/client-id: $workloadManagedIdentityClientId
    azure.workload.identity/tenant-id: $tenantId
  labels:
    azure.workload.identity/use: "true"
  name: $serviceAccountName
  namespace: $namespace
EOF"

  az aks command invoke \
    --name $clusterName \
    --resource-group $resourceGroupName \
    --subscription $subscriptionId \
    --command "$command"

else
  # Log whether the cluster is public or private
  echo "$clusterName AKS cluster is private"

  # Install Prometheus
  helm install prometheus prometheus-community/kube-prometheus-stack \
    --create-namespace \
    --namespace prometheus \
    --set prometheus.prometheusSpec.podMonitorSelectorNilUsesHelmValues=false \
    --set prometheus.prometheusSpec.serviceMonitorSelectorNilUsesHelmValues=false

  # Install NGINX ingress controller using the internal load balancer
  helm install nginx-ingress ingress-nginx/ingress-nginx \
    --create-namespace \
    --namespace ingress-basic \
    --set controller.replicaCount=3 \
    --set controller.nodeSelector."kubernetes\.io/os"=linux \
    --set defaultBackend.nodeSelector."kubernetes\.io/os"=linux \
    --set controller.metrics.enabled=true \
    --set controller.metrics.serviceMonitor.enabled=true \
    --set controller.metrics.serviceMonitor.additionalLabels.release="prometheus" \
    --set controller.service.annotations."service\.beta\.kubernetes\.io/azure-load-balancer-health-probe-request-path"=/healthz

  helm install $nginxReleaseName $nginxRepoName/$nginxChartName \
    --create-namespace \
    --namespace $nginxNamespace

  # Install certificate manager
  helm install cert-manager jetstack/cert-manager \
    --create-namespace \
    --namespace cert-manager \
    --set installCRDs=true \
    --set nodeSelector."kubernetes\.io/os"=linux

  # Create cluster issuer
  cat <<EOF | kubectl apply -f -
apiVersion: cert-manager.io/v1
kind: ClusterIssuer
metadata:
  name: letsencrypt-nginx
spec:
  acme:
    server: https://acme-v02.api.letsencrypt.org/directory
    email: $email
    privateKeySecretRef:
      name: letsencrypt
    solvers:
    - http01:
        ingress:
          class: nginx
          podTemplate:
            spec:
              nodeSelector:
                "kubernetes.io/os": linux
EOF

  # Create workload namespace
  kubectl create namespace $namespace

  # Create service account
  cat <<EOF | kubectl apply -f -
apiVersion: v1
kind: ServiceAccount
metadata:
  annotations:
    azure.workload.identity/client-id: $workloadManagedIdentityClientId
    azure.workload.identity/tenant-id: $tenantId
  labels:
    azure.workload.identity/use: "true"
  name: $serviceAccountName
  namespace: $namespace
EOF

fi

# Create output as JSON file
echo '{}' |
  jq --arg x $namespace '.namespace=$x' |
  jq --arg x $serviceAccountName '.serviceAccountName=$x' |
  jq --arg x 'prometheus' '.prometheus=$x' |
  jq --arg x 'cert-manager' '.certManager=$x' |
  jq --arg x 'ingress-basic' '.nginxIngressController=$x' >$AZ_SCRIPTS_OUTPUT_PATH
The install-nginx-via-helm-and-create-sa.sh Bash script can run on a public AKS cluster or on a private AKS cluster using the az aks command invoke. For more information, see Use command invoke to access a private Azure Kubernetes Service (AKS) cluster.
The install-nginx-via-helm-and-create-sa.sh Bash script returns the following outputs to the deployment script:
- Namespace hosting the chatbot sample. You can change the default
magic8ballnamespace by assigning a different value to thenamespacevariable in theterraform.tfvarsfile. - Service account name
- Prometheus namespace
- Cert-manager namespace
- NGINX ingress controller namespace
You can find the install-nginx-via-helm-and-create-sa.sh file under the terraform folder.
The chatbot is a Python application inspired by the sample code in the It’s Time To Create A Private ChatGPT For Yourself Today arctiel. The application is contained in a single file called app.py.
This application makes use of the following libraries:
-
OpenAPI: The OpenAI Python library provides convenient access to the OpenAI API from applications written in the Python language. It includes a pre-defined set of classes for API resources that initialize themselves dynamically from API responses which makes it compatible with a wide range of versions of the OpenAI API. You can find usage examples for the OpenAI Python library in our API reference and the OpenAI Cookbook.
-
Azure Identity: The Azure Identity library provides Azure Active Directory (Entra) token authentication support across the Azure SDK. It provides a set of TokenCredential implementations, which can be used to construct Azure SDK clients that support Entra token authentication.
-
Streamlit: Streamlit is an open-source Python library that makes it easy to create and share beautiful, custom web apps for machine learning and data science. In just a few minutes you can build and deploy powerful data apps. For more information, see Streamlit documentation
-
Streamlit-chat: a Streamlit component that provides a configurable user interface for chatbot applications.
-
Dotenv: Python-dotenv reads key-value pairs from a .env file and can set them as environment variables. It helps in the development of applications following the 12-factor principles.
The requirements.txt file under the scripts folder contains the list of packages used by the app.py application that you can restore using the following command:
pip install -r requirements.txt --upgrade-
VIEW: .env - the fle
AZURE_OPENAI_TYPE=azure_ad
<a name="app.py"></a>

### app.py

1. <a target="_blank" href="https://github.com/bomonike/azure-chatgbt/tree/main/scripts/app.py">VIEW: app.py</a> - Python code for the `app.py` chatbot:

```python
# Import packages
import os
import sys
import time
import openai
import logging
import streamlit as st
from streamlit_chat import message
from azure.identity import DefaultAzureCredential
from dotenv import load_dotenv
from dotenv import dotenv_values

# Load environment variables from .env file
if os.path.exists(".env"):
load_dotenv(override=True)
config = dotenv_values(".env")

# Read environment variables
assistan_profile = """
You are the infamous Magic 8 Ball. You need to randomly reply to any question with one of the following answers:

- It is certain.
- It is decidedly so.
- Without a doubt.
- Yes definitely.
- You may rely on it.
- As I see it, yes.
- Most likely.
- Outlook good.
- Yes.
- Signs point to yes.
- Reply hazy, try again.
- Ask again later.
- Better not tell you now.
- Cannot predict now.
- Concentrate and ask again.
- Don't count on it.
- My reply is no.
- My sources say no.
- Outlook not so good.
- Very doubtful.

Add a short comment in a pirate style at the end! Follow your heart and be creative!
For mor information, see https://en.wikipedia.org/wiki/Magic_8_Ball
"""
title = os.environ.get("TITLE", "Magic 8 Ball")
text_input_label = os.environ.get("TEXT_INPUT_LABEL", "Pose your question and cross your fingers!")
image_file_name = os.environ.get("IMAGE_FILE_NAME", "magic8ball.png")
image_width = int(os.environ.get("IMAGE_WIDTH", 80))
temperature = float(os.environ.get("TEMPERATURE", 0.9))
system = os.environ.get("SYSTEM", assistan_profile)
api_base = os.getenv("AZURE_OPENAI_BASE")
api_key = os.getenv("AZURE_OPENAI_KEY")
api_type = os.environ.get("AZURE_OPENAI_TYPE", "azure")
api_version = os.environ.get("AZURE_OPENAI_VERSION", "2023-05-15")
engine = os.getenv("AZURE_OPENAI_DEPLOYMENT")
model = os.getenv("AZURE_OPENAI_MODEL")

# Configure OpenAI
openai.api_type = api_type
openai.api_version = api_version
openai.api_base = api_base

# Set default Azure credential
default_credential = DefaultAzureCredential() if openai.api_type == "azure_ad" else None

# Configure a logger
logging.basicConfig(stream = sys.stdout,
                 format = '[%(asctime)s] {%(filename)s:%(lineno)d} %(levelname)s - %(message)s',
                 level = logging.INFO)
logger = logging.getLogger(__name__)

# Log variables
logger.info(f"title: {title}")
logger.info(f"text_input_label: {text_input_label}")
logger.info(f"image_file_name: {image_file_name}")
logger.info(f"image_width: {image_width}")
logger.info(f"temperature: {temperature}")
logger.info(f"system: {system}")
logger.info(f"api_base: {api_base}")
logger.info(f"api_key: {api_key}")
logger.info(f"api_type: {api_type}")
logger.info(f"api_version: {api_version}")
logger.info(f"engine: {engine}")
logger.info(f"model: {model}")

# Authenticate to Azure OpenAI
if openai.api_type == "azure":
openai.api_key = api_key
elif openai.api_type == "azure_ad":
openai_token = default_credential.get_token("https://cognitiveservices.azure.com/.default")
openai.api_key = openai_token.token
if 'openai_token' not in st.session_state:
 st.session_state['openai_token'] = openai_token
else:
logger.error("Invalid API type. Please set the AZURE_OPENAI_TYPE environment variable to azure or azure_ad.")
raise ValueError("Invalid API type. Please set the AZURE_OPENAI_TYPE environment variable to azure or azure_ad.")

# Customize Streamlit UI using CSS
st.markdown("""
<style>

div.stButton > button:first-child {
 background-color: #eb5424;
 color: white;
 font-size: 20px;
 font-weight: bold;
 border-radius: 0.5rem;
 padding: 0.5rem 1rem;
 border: none;
 box-shadow: 0 0.5rem 1rem rgba(0,0,0,0.15);
 width: 300 px;
 height: 42px;
 transition: all 0.2s ease-in-out;
}

div.stButton > button:first-child:hover {
 transform: translateY(-3px);
 box-shadow: 0 1rem 2rem rgba(0,0,0,0.15);
}

div.stButton > button:first-child:active {
 transform: translateY(-1px);
 box-shadow: 0 0.5rem 1rem rgba(0,0,0,0.15);
}

div.stButton > button:focus:not(:focus-visible) {
 color: #FFFFFF;
}

@media only screen and (min-width: 768px) {
/* For desktop: */
div {
   font-family: 'Roboto', sans-serif;
}

div.stButton > button:first-child {
   background-color: #eb5424;
   color: white;
   font-size: 20px;
   font-weight: bold;
   border-radius: 0.5rem;
   padding: 0.5rem 1rem;
   border: none;
   box-shadow: 0 0.5rem 1rem rgba(0,0,0,0.15);
   width: 300 px;
   height: 42px;
   transition: all 0.2s ease-in-out;
   position: relative;
   bottom: -32px;
   right: 0px;
}

div.stButton > button:first-child:hover {
   transform: translateY(-3px);
   box-shadow: 0 1rem 2rem rgba(0,0,0,0.15);
}

div.stButton > button:first-child:active {
   transform: translateY(-1px);
   box-shadow: 0 0.5rem 1rem rgba(0,0,0,0.15);
}

div.stButton > button:focus:not(:focus-visible) {
   color: #FFFFFF;
}

input {
   border-radius: 0.5rem;
   padding: 0.5rem 1rem;
   border: none;
   box-shadow: 0 0.5rem 1rem rgba(0,0,0,0.15);
   transition: all 0.2s ease-in-out;
   height: 40px;
}
}
</style>
""", unsafe_allow_html=True)

# Initialize Streamlit session state
if 'prompts' not in st.session_state:
st.session_state['prompts'] = [{"role": "system", "content": system}]

if 'generated' not in st.session_state:
st.session_state['generated'] = []

if 'past' not in st.session_state:
st.session_state['past'] = []

# Refresh the OpenAI security token every 45 minutes
def refresh_openai_token():
if st.session_state['openai_token'].expires_on < int(time.time()) - 45 * 60:
   st.session_state['openai_token'] = default_credential.get_token("https://cognitiveservices.azure.com/.default")
   openai.api_key = st.session_state['openai_token'].token

# Send user prompt to Azure OpenAI
def generate_response(prompt):
try:
 st.session_state['prompts'].append({"role": "user", "content": prompt})

 if openai.api_type == "azure_ad":
   refresh_openai_token()

 completion = openai.ChatCompletion.create(
   engine = engine,
   model = model,
   messages = st.session_state['prompts'],
   temperature = temperature,
 )

 message = completion.choices[0].message.content
 return message
except Exception as e:
 logging.exception(f"Exception in generate_response: {e}")

# Reset Streamlit session state to start a new chat from scratch
def new_click():
st.session_state['prompts'] = [{"role": "system", "content": system}]
st.session_state['past'] = []
st.session_state['generated'] = []
st.session_state['user'] = ""

# Handle on_change event for user input
def user_change():
# Avoid handling the event twice when clicking the Send button
chat_input = st.session_state['user']
st.session_state['user'] = ""
if (chat_input == '' or
   (len(st.session_state['past']) > 0 and chat_input == st.session_state['past'][-1])):
 return

# Generate response invoking Azure OpenAI LLM
if chat_input !=  '':
 output = generate_response(chat_input)

 # store the output
 st.session_state['past'].append(chat_input)
 st.session_state['generated'].append(output)
 st.session_state['prompts'].append({"role": "assistant", "content": output})

# Create a 2-column layout. Note: Streamlit columns do not properly render on mobile devices.
# For more information, see https://github.com/streamlit/streamlit/issues/5003
col1, col2 = st.columns([1, 7])

# Display the robot image
with col1:
st.image(image = os.path.join("images", image_file_name), width = image_width)

# Display the title
with col2:
st.title(title)

# Create a 3-column layout. Note: Streamlit columns do not properly render on mobile devices.
# For more information, see https://github.com/streamlit/streamlit/issues/5003
col3, col4, col5 = st.columns([7, 1, 1])

# Create text input in column 1
with col3:
user_input = st.text_input(text_input_label, key = "user", on_change = user_change)

# Create send button in column 2
with col4:
st.button(label = "Send")

# Create new button in column 3
with col5:
st.button(label = "New", on_click = new_click)

# Display the chat history in two separate tabs
# - normal: display the chat history as a list of messages using the streamlit_chat message() function
# - rich: display the chat history as a list of messages using the Streamlit markdown() function
if st.session_state['generated']:
tab1, tab2 = st.tabs(["normal", "rich"])
with tab1:
 for i in range(len(st.session_state['generated']) - 1, -1, -1):
   message(st.session_state['past'][i], is_user = True, key = str(i) + '_user', avatar_style = "fun-emoji", seed = "Nala")
   message(st.session_state['generated'][i], key = str(i), avatar_style = "bottts", seed = "Fluffy")
with tab2:
 for i in range(len(st.session_state['generated']) - 1, -1, -1):
   st.markdown(st.session_state['past'][i])
   st.markdown(st.session_state['generated'][i])
The application makes use of an internal cascading style sheet (CSS) inside an st.markdown element to add a unique style to the Streamlit chatbot for mobile and desktop devices. For more information on how to tweak the user interface of a Streamlit application, see 3 Tips to Customize your Streamlit App.
streamlit run app.pyThe generate_response function creates and sends the prompt to the Chat Completion API of the ChatGPT model.
def generate_response(prompt):
  try:
    st.session_state['prompts'].append({"role": "user", "content": prompt})

    if openai.api_type == "azure_ad":
      refresh_openai_token()

    completion = openai.ChatCompletion.create(
      engine = engine,
      model = model,
      messages = st.session_state['prompts'],
      temperature = temperature,
    )

    message = completion.choices[0].message.content
    return message
  except Exception as e:
    logging.exception(f"Exception in generate_response: {e}")
OpenAI trained the ChatGPT and GPT-4 models to accept input formatted as a conversation. The messages parameter takes an array of dictionaries with a conversation organized by role or message: system, user, and assistant. The format of a basic Chat Completion is as follows:
{"role": "system", "content": "Provide some context and/or instructions to the model"},
{"role": "user", "content": "The users messages goes here"},
{"role": "assistant", "content": "The response message goes here."}
The system role also known as the system message is included at the beginning of the array. This message provides the initial instructions to the model. You can provide various information in the system role including:
- A brief description of the assistant
- Personality traits of the assistant
- Instructions or rules you would like the assistant to follow
- Data or information needed for the model, such as relevant questions from an FAQ
- You can customize the system role for your use case or just include basic instructions.
The system role or message is optional, but it's recommended to at least include a basic one to get the best results. The user role or message represents an input or inquiry from the user, while the assistant message corresponds to the response generated by the GPT API. This dialog exchange aims to simulate a human-like conversation, where the user message initiates the interaction and the assistant message provides a relevant and informative answer. This context helps the chat model generate a more appropriate response later on. The last user message refers to the prompt currently requested. For more information, see Learn how to work with the ChatGPT and GPT-4 models.
Make sure to provide a value for the following environment variables when testing the app.py Python app locally, for example in Visual Studio Code. You can eventually define environment variables in a .env file in the same folder as the app.py file.
-
AZURE_OPENAI_TYPE: specifyazureif you want to let the application use the API key to authenticate against OpenAI. In this case, make sure to provide the Key in theAZURE_OPENAI_KEYenvironment variable. If you want to authenticate using an Entra security token, you need to specifyazure_adas a value. In this case, don't need to provide any value in theAZURE_OPENAI_KEYenvironment variable. -
AZURE_OPENAI_BASE: the URL of your Azure OpenAI resource. If you use the API key to authenticate against OpenAI, you can specify the regional endpoint of your Azure OpenAI Service (e.g., https://eastus.api.cognitive.microsoft.com/). If you instead plan to use Entra security tokens for authentication, you need to deploy your Azure OpenAI Service with a subdomain and specify the resource-specific endpoint url (e.g., https://myopenai.openai.azure.com/). -
AZURE_OPENAI_KEY: the key of your Azure OpenAI resource. -
AZURE_OPENAI_DEPLOYMENT: the name of the ChatGPT deployment used by your Azure OpenAI resource, for examplegpt-35-turbo. -
AZURE_OPENAI_MODEL: the name of the ChatGPT model used by your Azure OpenAI resource, for examplegpt-35-turbo. -
TITLE: the title of the Streamlit app. -
TEMPERATURE: controls the "creativity" or "randomness" of the text generated. A high temperature of 0.9 results in more diverse output. A temperature of zero would make the model completely deterministic, always choosing the most likely token from all possible tokens in the model. -
top-p-samplingis an alternative to temperature. A top_p set to 0.1 would cause the selection of only the top 10% of the probability mass of the next token, to allow for dynamic vocabulary selection based on context. -
SYSTEM: gives the model instructions about how it should behave and any context it should reference when generating a response. Used to describe the assistant's personality.
When deploying the application to Azure Kubernetes Service (AKS) these values are provided in a Kubernetes ConfigMap. For more information, see the next section.
In order to use the openai library with Microsoft Azure endpoints, you need to set the api_type, api_base and api_version in addition to the api_key. The api_type must be set to 'azure' and the others correspond to the properties of your endpoint. In addition, the deployment name must be passed as the engine parameter. In order to use OpenAI Key to authenticate to your Azure endpoint, you need to set the api_type to azure and pass the OpenAI Key to api_key.
import openai
openai.api_type = "azure"
openai.api_key = "..."
openai.api_base = "https://example-endpoint.openai.azure.com"
openai.api_version = "2023-05-15"

# create a chat completion
chat_completion = openai.ChatCompletion.create(deployment_id="gpt-3.5-turbo", model="gpt-3.5-turbo", messages=[{"role": "user", "content": "Hello world"}])

# print the completion
print(completion.choices[0].message.content)
For a detailed example of how to use fine-tuning and other operations using Azure endpoints, please check out the following Jupyter notebooks:
In order to use Microsoft Active Directory to authenticate to your Azure endpoint, you need to set the api_type to azure_ad and pass the acquired credential token to api_key. The rest of the parameters need to be set as specified in the previous section.
from azure.identity import DefaultAzureCredential
import openai

# Request credential
default_credential = DefaultAzureCredential()
token = default_credential.get_token("https://cognitiveservices.azure.com/.default")

# Setup parameters
openai.api_type = "azure_ad"
openai.api_key = token.token
openai.api_base = "https://example-endpoint.openai.azure.com/"
openai.api_version = "2023-05-15"

# ...Two different authentication methods in the magic8ball chatbot application:
-
API key: set theAZURE_OPENAI_TYPEenvironment variable toazureand theAZURE_OPENAI_KEYenvironment variable to the key of your Azure OpenAI resource. You can use the regional endpoint, such as https://eastus.api.cognitive.microsoft.com/, in theAZURE_OPENAI_BASEenvironment variable, to connect to the Azure OpenAI resource. -
Azure Active Directory: set theAZURE_OPENAI_TYPEenvironment variable toazure_adand use a service principal or managed identity with the DefaultAzureCredential object to acquire a security token from Azure Active Directory. For more information on the DefaultAzureCredential in Python, see Authenticate Python apps to Azure services by using the Azure SDK for Python. Make sure to assign theCognitive Services Userrole to the service principal or managed identity used to authenticate to your Azure OpenAI Service. For more information, see How to configure Azure OpenAI Service with managed identities. If you want to use Entra integrated security, you need to create a custom subdomain for your Azure OpenAI resource and use the specific endpoint containing the custom domain, such as https://myopenai.openai.azure.com/ where myopenai is the custom subdomain. If you specify the regional endpoint, you get an error like the following:Subdomain does not map to a resource. Hence, pass the custom domain endpoint in theAZURE_OPENAI_BASEenvironment variable. In this case, you also need to refresh the security token periodically.
There are two
- Terraform
- AKS
If you deployed the Azure infrastructure using the Terraform modules provided with this sample, you only need to deploy the application using the following scripts and YAML templates in the scripts folder.
YAML manifests
configMap.ymldeployment.ymlingress.ymlservice.yml
Scripts
09-deploy-app.sh10-create-ingress.sh11-configure-dns.sh
Alternately, to deploy the application in your AKS cluster, you can use the following scripts to configure your environment.
This script installs the NGINX Ingress Controller using Helm.
#!/bin/bash

# Variables
source ./00-variables.sh

# Use Helm to deploy an NGINX ingress controller
result=$(helm list -n $nginxNamespace | grep $nginxReleaseName | awk '{print $1}')

if [[ -n $result ]]; then
  echo "[$nginxReleaseName] ingress controller already exists in the [$nginxNamespace] namespace"
else
  # Check if the ingress-nginx repository is not already added
  result=$(helm repo list | grep $nginxRepoName | awk '{print $1}')

  if [[ -n $result ]]; then
    echo "[$nginxRepoName] Helm repo already exists"
  else
    # Add the ingress-nginx repository
    echo "Adding [$nginxRepoName] Helm repo..."
    helm repo add $nginxRepoName $nginxRepoUrl
  fi

  # Update your local Helm chart repository cache
  echo 'Updating Helm repos...'
  helm repo update

  # Deploy NGINX ingress controller
  echo "Deploying [$nginxReleaseName] NGINX ingress controller to the [$nginxNamespace] namespace..."
  helm install $nginxReleaseName $nginxRepoName/$nginxChartName \
    --create-namespace \
    --namespace $nginxNamespace \
    --set controller.config.enable-modsecurity=true \
    --set controller.config.enable-owasp-modsecurity-crs=true \
    --set controller.config.modsecurity-snippet=\
'SecRuleEngine On
SecRequestBodyAccess On
SecAuditLog /dev/stdout
SecAuditLogFormat JSON
SecAuditEngine RelevantOnly
SecRule REMOTE_ADDR "@ipMatch 127.0.0.1" "id:87,phase:1,pass,nolog,ctl:ruleEngine=Off"' \
    --set controller.metrics.enabled=true \
    --set controller.metrics.serviceMonitor.enabled=true \
    --set controller.metrics.serviceMonitor.additionalLabels.release="prometheus" \
    --set controller.nodeSelector."kubernetes\.io/os"=linux \
    --set controller.replicaCount=$replicaCount \
    --set defaultBackend.nodeSelector."kubernetes\.io/os"=linux \
    --set controller.service.annotations."service\.beta\.kubernetes\.io/azure-load-balancer-health-probe-request-path"=/healthz
fiThis script installs the cert-manager using Helm.
#/bin/bash

# Variables
source ./00-variables.sh

# Check if the ingress-nginx repository is not already added
result=$(helm repo list | grep $cmRepoName | awk '{print $1}')

if [[ -n $result ]]; then
  echo "[$cmRepoName] Helm repo already exists"
else
  # Add the Jetstack Helm repository
  echo "Adding [$cmRepoName] Helm repo..."
  helm repo add $cmRepoName $cmRepoUrl
fi

# Update your local Helm chart repository cache
echo 'Updating Helm repos...'
helm repo update

# Install cert-manager Helm chart
result=$(helm list -n $cmNamespace | grep $cmReleaseName | awk '{print $1}')

if [[ -n $result ]]; then
  echo "[$cmReleaseName] cert-manager already exists in the $cmNamespace namespace"
else
  # Install the cert-manager Helm chart
  echo "Deploying [$cmReleaseName] cert-manager to the $cmNamespace namespace..."
  helm install $cmReleaseName $cmRepoName/$cmChartName \
    --create-namespace \
    --namespace $cmNamespace \
    --set installCRDs=true \
    --set nodeSelector."kubernetes\.io/os"=linux
fiThis script creates a cluster issuer for the NGINX Ingress Controller based on the Let's Encrypt ACME certificate issuer.
#/bin/bash

# Variables
source ./00-variables.sh

# Check if the cluster issuer already exists
result=$(kubectl get ClusterIssuer -o json | jq -r '.items[].metadata.name | select(. == "'$clusterIssuerName'")')

if [[ -n $result ]]; then
  echo "[$clusterIssuerName] cluster issuer already exists"
  exit
else
  # Create the cluster issuer
  echo "[$clusterIssuerName] cluster issuer does not exist"
  echo "Creating [$clusterIssuerName] cluster issuer..."
  cat $clusterIssuerTemplate |
    yq "(.spec.acme.email)|="\""$email"\" |
    kubectl apply -f -
fiThis script creates the managed identity used by the magic8ballchatbot and assigns it the Cognitive Services User role on the Azure OpenAI Service.
- $aksResourceGroupName
#!/bin/bash

# Variables
source ./00-variables.sh

# Check if the user-assigned managed identity already exists
echo "Checking if [$managedIdentityName] user-assigned managed identity actually exists in the [$aksResourceGroupName] resource group..."

az identity show \
  --name $managedIdentityName \
  --resource-group $aksResourceGroupName &>/dev/null

if [[ $? != 0 ]]; then
  echo "No [$managedIdentityName] user-assigned managed identity actually exists in the [$aksResourceGroupName] resource group"
  echo "Creating [$managedIdentityName] user-assigned managed identity in the [$aksResourceGroupName] resource group..."

  # Create the user-assigned managed identity
  az identity create \
    --name $managedIdentityName \
    --resource-group $aksResourceGroupName \
    --location $location \
    --subscription $subscriptionId 1>/dev/null

  if [[ $? == 0 ]]; then
    echo "[$managedIdentityName] user-assigned managed identity successfully created in the [$aksResourceGroupName] resource group"
  else
    echo "Failed to create [$managedIdentityName] user-assigned managed identity in the [$aksResourceGroupName] resource group"
    exit
  fi
else
  echo "[$managedIdentityName] user-assigned managed identity already exists in the [$aksResourceGroupName] resource group"
fi

# Retrieve the clientId of the user-assigned managed identity
echo "Retrieving clientId for [$managedIdentityName] managed identity..."
clientId=$(az identity show \
  --name $managedIdentityName \
  --resource-group $aksResourceGroupName \
  --query clientId \
  --output tsv)

if [[ -n $clientId ]]; then
  echo "[$clientId] clientId  for the [$managedIdentityName] managed identity successfully retrieved"
else
  echo "Failed to retrieve clientId for the [$managedIdentityName] managed identity"
  exit
fi

# Retrieve the principalId of the user-assigned managed identity
echo "Retrieving principalId for [$managedIdentityName] managed identity..."
principalId=$(az identity show \
  --name $managedIdentityName \
  --resource-group $aksResourceGroupName \
  --query principalId \
  --output tsv)

if [[ -n $principalId ]]; then
  echo "[$principalId] principalId  for the [$managedIdentityName] managed identity successfully retrieved"
else
  echo "Failed to retrieve principalId for the [$managedIdentityName] managed identity"
  exit
fi

# Get the resource id of the Azure OpenAI resource
openAiId=$(az cognitiveservices account show \
  --name $openAiName \
  --resource-group $openAiResourceGroupName \
  --query id \
  --output tsv)

if [[ -n $openAiId ]]; then
  echo "Resource id for the [$openAiName] Azure OpenAI resource successfully retrieved"
else
  echo "Failed to the resource id for the [$openAiName] Azure OpenAI resource"
  exit -1
fi

# Assign the Cognitive Services User role on the Azure OpenAI resource to the managed identity
role="Cognitive Services User"
echo "Checking if the [$managedIdentityName] managed identity has been assigned to [$role] role with [$openAiName] Azure OpenAI resource as a scope..."
current=$(az role assignment list \
  --assignee $principalId \
  --scope $openAiId \
  --query "[?roleDefinitionName=='$role'].roleDefinitionName" \
  --output tsv 2>/dev/null)

if [[ $current == $role ]]; then
  echo "[$managedIdentityName] managed identity is already assigned to the ["$current"] role with [$openAiName] Azure OpenAI resource as a scope"
else
  echo "[$managedIdentityName] managed identity is not assigned to the [$role] role with [$openAiName] Azure OpenAI resource as a scope"
  echo "Assigning the [$role] role to the [$managedIdentityName] managed identity with [$openAiName] Azure OpenAI resource as a scope..."

  az role assignment create \
    --assignee $principalId \
    --role "$role" \
    --scope $openAiId 1>/dev/null

  if [[ $? == 0 ]]; then
    echo "[$managedIdentityName] managed identity successfully assigned to the [$role] role with [$openAiName] Azure OpenAI resource as a scope"
  else
    echo "Failed to assign the [$managedIdentityName] managed identity to the [$role] role with [$openAiName] Azure OpenAI resource as a scope"
    exit
  fi
fiThis script creates the namespace and service account for the magic8ball chatbot and federate the service account with the user-defined managed identity created in the previous step.
#!/bin/bash

# Variables for the user-assigned managed identity
source ./00-variables.sh

# Check if the namespace already exists
result=$(kubectl get namespace -o 'jsonpath={.items[?(@.metadata.name=="'$namespace'")].metadata.name'})

if [[ -n $result ]]; then
  echo "[$namespace] namespace already exists"
else
  # Create the namespace for your ingress resources
  echo "[$namespace] namespace does not exist"
  echo "Creating [$namespace] namespace..."
  kubectl create namespace $namespace
fi

# Check if the service account already exists
result=$(kubectl get sa -n $namespace -o 'jsonpath={.items[?(@.metadata.name=="'$serviceAccountName'")].metadata.name'})

if [[ -n $result ]]; then
  echo "[$serviceAccountName] service account already exists"
else
  # Retrieve the resource id of the user-assigned managed identity
  echo "Retrieving clientId for [$managedIdentityName] managed identity..."
  managedIdentityClientId=$(az identity show \
    --name $managedIdentityName \
    --resource-group $aksResourceGroupName \
    --query clientId \
    --output tsv)

  if [[ -n $managedIdentityClientId ]]; then
    echo "[$managedIdentityClientId] clientId  for the [$managedIdentityName] managed identity successfully retrieved"
  else
    echo "Failed to retrieve clientId for the [$managedIdentityName] managed identity"
    exit
  fi

  # Create the service account
  echo "[$serviceAccountName] service account does not exist"
  echo "Creating [$serviceAccountName] service account..."
  cat <<EOF | kubectl apply -f -
apiVersion: v1
kind: ServiceAccount
metadata:
  annotations:
    azure.workload.identity/client-id: $managedIdentityClientId
    azure.workload.identity/tenant-id: $tenantId
  labels:
    azure.workload.identity/use: "true"
  name: $serviceAccountName
  namespace: $namespace
EOF
fi

# Show service account YAML manifest
echo "Service Account YAML manifest"
echo "-----------------------------"
kubectl get sa $serviceAccountName -n $namespace -o yaml

# Check if the federated identity credential already exists
echo "Checking if [$federatedIdentityName] federated identity credential actually exists in the [$aksResourceGroupName] resource group..."

az identity federated-credential show \
  --name $federatedIdentityName \
  --resource-group $aksResourceGroupName \
  --identity-name $managedIdentityName &>/dev/null

if [[ $? != 0 ]]; then
  echo "No [$federatedIdentityName] federated identity credential actually exists in the [$aksResourceGroupName] resource group"

  # Get the OIDC Issuer URL
  aksOidcIssuerUrl="$(az aks show \
    --only-show-errors \
    --name $aksClusterName \
    --resource-group $aksResourceGroupName \
    --query oidcIssuerProfile.issuerUrl \
    --output tsv)"

  # Show OIDC Issuer URL
  if [[ -n $aksOidcIssuerUrl ]]; then
    echo "The OIDC Issuer URL of the $aksClusterName cluster is $aksOidcIssuerUrl"
  fi

  echo "Creating [$federatedIdentityName] federated identity credential in the [$aksResourceGroupName] resource group..."

  # Establish the federated identity credential between the managed identity, the service account issuer, and the subject.
  az identity federated-credential create \
    --name $federatedIdentityName \
    --identity-name $managedIdentityName \
    --resource-group $aksResourceGroupName \
    --issuer $aksOidcIssuerUrl \
    --subject system:serviceaccount:$namespace:$serviceAccountName

  if [[ $? == 0 ]]; then
    echo "[$federatedIdentityName] federated identity credential successfully created in the [$aksResourceGroupName] resource group"
  else
    echo "Failed to create [$federatedIdentityName] federated identity credential in the [$aksResourceGroupName] resource group"
    exit
  fi
else
  echo "[$federatedIdentityName] federated identity credential already exists in the [$aksResourceGroupName] resource group"
fiThis script creates the Kubernetes config map, deployment, and service used by the magic8ball chatbot.
#!/bin/bash

# Variables
source ./00-variables.sh

# Attach ACR to AKS cluster
if [[ $attachAcr == true ]]; then
  echo "Attaching ACR $acrName to AKS cluster $aksClusterName..."
  az aks update \
    --name $aksClusterName \
    --resource-group $aksResourceGroupName \
    --attach-acr $acrName
fi

# Check if namespace exists in the cluster
result=$(kubectl get namespace -o jsonpath="{.items[?(@.metadata.name=='$namespace')].metadata.name}")

if [[ -n $result ]]; then
  echo "$namespace namespace already exists in the cluster"
else
  echo "$namespace namespace does not exist in the cluster"
  echo "creating $namespace namespace in the cluster..."
  kubectl create namespace $namespace
fi

# Create config map
cat $configMapTemplate |
    yq "(.data.TITLE)|="\""$title"\" |
    yq "(.data.LABEL)|="\""$label"\" |
    yq "(.data.TEMPERATURE)|="\""$temperature"\" |
    yq "(.data.IMAGE_WIDTH)|="\""$imageWidth"\" |
    yq "(.data.AZURE_OPENAI_TYPE)|="\""$openAiType"\" |
    yq "(.data.AZURE_OPENAI_BASE)|="\""$openAiBase"\" |
    yq "(.data.AZURE_OPENAI_MODEL)|="\""$openAiModel"\" |
    yq "(.data.AZURE_OPENAI_DEPLOYMENT)|="\""$openAiDeployment"\" |
    kubectl apply -n $namespace -f -

# Create deployment
cat $deploymentTemplate |
    yq "(.spec.template.spec.containers[0].image)|="\""$image"\" |
    yq "(.spec.template.spec.containers[0].imagePullPolicy)|="\""$imagePullPolicy"\" |
    yq "(.spec.template.spec.serviceAccountName)|="\""$serviceAccountName"\" |
    kubectl apply -n $namespace -f -

# Create deployment
kubectl apply -f $serviceTemplate -n $namespaceThis script creates the ingress object to expose the service via the NGINX Ingress Controller
#/bin/bash

# Variables
source ./00-variables.sh

# Create the ingress
echo "[$ingressName] ingress does not exist"
echo "Creating [$ingressName] ingress..."
cat $ingressTemplate |
  yq "(.spec.tls[0].hosts[0])|="\""$host"\" |
  yq "(.spec.rules[0].host)|="\""$host"\" |
kubectl apply -n $namespace -f -This script creates an A record in the Azure DNS Zone to expose the application via a given subdomain (e.g., https://magic8ball.example.com)
# Variables
source ./00-variables.sh

# Retrieve the public IP address from the ingress
echo "Retrieving the external IP address from the [$ingressName] ingress..."
publicIpAddress=$(kubectl get ingress $ingressName -n $namespace -o jsonpath='{.status.loadBalancer.ingress[0].ip}')

if [ -n $publicIpAddress ]; then
  echo "[$publicIpAddress] external IP address of the application gateway ingress controller successfully retrieved from the [$ingressName] ingress"
else
  echo "Failed to retrieve the external IP address of the application gateway ingress controller from the [$ingressName] ingress"
  exit
fi

# Check if an A record for todolist subdomain exists in the DNS Zone
echo "Retrieving the A record for the [$subdomain] subdomain from the [$dnsZoneName] DNS zone..."
ipv4Address=$(az network dns record-set a list \
  --zone-name $dnsZoneName \
  --resource-group $dnsZoneResourceGroupName \
  --query "[?name=='$subdomain'].arecords[].ipv4Address" \
  --output tsv)

if [[ -n $ipv4Address ]]; then
  echo "An A record already exists in [$dnsZoneName] DNS zone for the [$subdomain] subdomain with [$ipv4Address] IP address"

  if [[ $ipv4Address == $publicIpAddress ]]; then
    echo "The [$ipv4Address] ip address of the existing A record is equal to the ip address of the [$ingressName] ingress"
    echo "No additional step is required"
    exit
  else
    echo "The [$ipv4Address] ip address of the existing A record is different than the ip address of the [$ingressName] ingress"
  fi

  # Retrieving name of the record set relative to the zone
  echo "Retrieving the name of the record set relative to the [$dnsZoneName] zone..."

  recordSetName=$(az network dns record-set a list \
    --zone-name $dnsZoneName \
    --resource-group $dnsZoneResourceGroupName \
    --query "[?name=='$subdomain'].name" \
    --output name 2>/dev/null)

  if [[ -n $recordSetName ]]; then
    "[$recordSetName] record set name successfully retrieved"
  else
    "Failed to retrieve the name of the record set relative to the [$dnsZoneName] zone"
    exit
  fi

  # Remove the a record
  echo "Removing the A record from the record set relative to the [$dnsZoneName] zone..."

  az network dns record-set a remove-record \
    --ipv4-address $ipv4Address \
    --record-set-name $recordSetName \
    --zone-name $dnsZoneName \
    --resource-group $dnsZoneResourceGroupName

  if [[ $? == 0 ]]; then
    echo "[$ipv4Address] ip address successfully removed from the [$recordSetName] record set"
  else
    echo "Failed to remove the [$ipv4Address] ip address from the [$recordSetName] record set"
    exit
  fi
fi

# Create the a record
echo "Creating an A record in [$dnsZoneName] DNS zone for the [$subdomain] subdomain with [$publicIpAddress] IP address..."
az network dns record-set a add-record \
  --zone-name $dnsZoneName \
  --resource-group $dnsZoneResourceGroupName \
  --record-set-name $subdomain \
  --ipv4-address $publicIpAddress 1>/dev/null

if [[ $? == 0 ]]; then
  echo "A record for the [$subdomain] subdomain with [$publicIpAddress] IP address successfully created in [$dnsZoneName] DNS zone"
else
  echo "Failed to create an A record for the $subdomain subdomain with [$publicIpAddress] IP address in [$dnsZoneName] DNS zone"
fi
The scripts used to deploy the YAML template use the yq tool to customize the manifests with the value of the variables defined in the 00-variables.sh file. This tool is a lightweight and portable command-line YAML, JSON and XML processor that uses jq like syntax but works with YAML files as well as json, xml, properties, csv and tsv. It doesn't yet support everything jq does - but it does support the most common operations and functions, and more is being added continuously.
Below you can read the YAML manifests used to deploy the magic8ball chatbot to AKS.
The configmap.yml defines a value for the environment variables passed to the application container. The configmap does not define any environment variable for the OpenAI key as the container.
apiVersion: v1
kind: ConfigMap
metadata:
  name: magic8ball-configmap
data:
  TITLE: "Magic 8 Ball"
  LABEL: "Pose your question and cross your fingers!"
  TEMPERATURE: "0.9"
  IMAGE_WIDTH: "80"
  AZURE_OPENAI_TYPE: azure_ad
  AZURE_OPENAI_BASE: https://myopenai.openai.azure.com/
  AZURE_OPENAI_KEY: ""
  AZURE_OPENAI_MODEL: gpt-35-turbo
  AZURE_OPENAI_DEPLOYMENT: magic8ballGPT
These are the parameters defined by the configmap:
-
AZURE_OPENAI_TYPE: specifyazureif you want to let the application use the API key to authenticate against OpenAI. In this case, make sure to provide the Key in theAZURE_OPENAI_KEYenvironment variable. If you want to authenticate using an Entra security token, you need to specifyazure_adas a value. In this case, don't need to provide any value in theAZURE_OPENAI_KEYenvironment variable. -
AZURE_OPENAI_BASE: the URL of your Azure OpenAI resource. If you use the API key to authenticate against OpenAI, you can specify the regional endpoint of your Azure OpenAI Service (e.g., https://eastus.api.cognitive.microsoft.com/). If you instead plan to use Entra security tokens for authentication, you need to deploy your Azure OpenAI Service with a subdomain and specify the resource-specific endpoint url (e.g., https://myopenai.openai.azure.com/). -
AZURE_OPENAI_KEY: the key of your Azure OpenAI resource. If you setAZURE_OPENAI_TYPEtoazure_adyou can leave this parameter empty. -
AZURE_OPENAI_DEPLOYMENT: the name of the ChatGPT deployment used by your Azure OpenAI resource, for examplegpt-35-turbo. -
AZURE_OPENAI_MODEL: the name of the ChatGPT model used by your Azure OpenAI resource, for examplegpt-35-turbo. -
TITLE: the title of the Streamlit app. -
TEMPERATURE: the temperature used by the OpenAI API to generate the response. -
SYSTEM: give the model instructions about how it should behave and any context it should reference when generating a response. Used to describe the assistant's personality.
The deployment.yml manifest is used create a Kubernetes deployment that defines the application pods to create. azure.workload.identity/use label is required in the pod template spec. Only pods with this label will be mutated by the azure-workload-identity mutating admission webhook to inject the Azure specific environment variables and the projected service account token volume.
apiVersion: apps/v1
kind: Deployment
metadata:
  name: magic8ball
  labels:
    app: magic8ball
spec:
  replicas: 3
  selector:
    matchLabels:
      app: magic8ball
      azure.workload.identity/use: "true"
  strategy:
    rollingUpdate:
      maxSurge: 1
      maxUnavailable: 1
  minReadySeconds: 5
  template:
    metadata:
      labels:
        app: magic8ball
        azure.workload.identity/use: "true"
        prometheus.io/scrape: "true"
    spec:
      serviceAccountName: magic8ball-sa
      topologySpreadConstraints:
      - maxSkew: 1
        topologyKey: topology.kubernetes.io/zone
        whenUnsatisfiable: DoNotSchedule
        labelSelector:
          matchLabels:
            app: magic8ball
      - maxSkew: 1
        topologyKey: kubernetes.io/hostname
        whenUnsatisfiable: DoNotSchedule
        labelSelector:
          matchLabels:
            app: magic8ball
      nodeSelector:
        "kubernetes.io/os": linux
      containers:
      - name: magic8ball
        image: paolosalvatori.azurecr.io/magic8ball:v1
        imagePullPolicy: Always
        resources:
          requests:
            memory: "128Mi"
            cpu: "250m"
          limits:
            memory: "256Mi"
            cpu: "500m"
        ports:
        - containerPort: 8501
        livenessProbe:
          httpGet:
            path: /
            port: 8501
          failureThreshold: 1
          initialDelaySeconds: 60
          periodSeconds: 30
          timeoutSeconds: 5
        readinessProbe:
          httpGet:
            path: /
            port: 8501
          failureThreshold: 1
          initialDelaySeconds: 60
          periodSeconds: 30
          timeoutSeconds: 5
        startupProbe:
          httpGet:
            path: /
            port: 8501
          failureThreshold: 1
          initialDelaySeconds: 60
          periodSeconds: 30
          timeoutSeconds: 5
        env:
        - name: TITLE
          valueFrom:
            configMapKeyRef:
                name: magic8ball-configmap
                key: TITLE
        - name: IMAGE_WIDTH
          valueFrom:
            configMapKeyRef:
                name: magic8ball-configmap
                key: IMAGE_WIDTH
        - name: LABEL
          valueFrom:
            configMapKeyRef:
                name: magic8ball-configmap
                key: LABEL
        - name: TEMPERATURE
          valueFrom:
            configMapKeyRef:
                name: magic8ball-configmap
                key: TEMPERATURE
        - name: AZURE_OPENAI_TYPE
          valueFrom:
            configMapKeyRef:
                name: magic8ball-configmap
                key: AZURE_OPENAI_TYPE
        - name: AZURE_OPENAI_BASE
          valueFrom:
            configMapKeyRef:
                name: magic8ball-configmap
                key: AZURE_OPENAI_BASE
        - name: AZURE_OPENAI_KEY
          valueFrom:
            configMapKeyRef:
                name: magic8ball-configmap
                key: AZURE_OPENAI_KEY
        - name: AZURE_OPENAI_MODEL
          valueFrom:
            configMapKeyRef:
                name: magic8ball-configmap
                key: AZURE_OPENAI_MODEL
        - name: AZURE_OPENAI_DEPLOYMENT
          valueFrom:
            configMapKeyRef:
                name: magic8ball-configmap
key: AZURE_OPENAI_DEPLOYMENTThe application is exposed using a ClusterIP Kubernetes service.
apiVersion: v1
kind: Service
metadata:
  name: magic8ball
  labels:
    app: magic8ball
spec:
  type: ClusterIP
  ports:
  - protocol: TCP
    port: 8501
  selector:
app: magic8ballThe ingress.yml manifest defines a Kubernetes ingress object used to expose the service via the NGINX Ingress Controller.
apiVersion: networking.k8s.io/v1
kind: Ingress
metadata:
  name: magic8ball-ingress
  annotations:
    cert-manager.io/cluster-issuer: letsencrypt-nginx
    cert-manager.io/acme-challenge-type: http01
    nginx.ingress.kubernetes.io/proxy-connect-timeout: "360"
    nginx.ingress.kubernetes.io/proxy-send-timeout: "360"
    nginx.ingress.kubernetes.io/proxy-read-timeout: "360"
    nginx.ingress.kubernetes.io/proxy-next-upstream-timeout: "360"
    nginx.ingress.kubernetes.io/configuration-snippet: |
      more_set_headers "X-Frame-Options: SAMEORIGIN";
spec:
  ingressClassName: nginx
  tls:
  - hosts:
    - magic8ball.contoso.com
    secretName: tls-secret
  rules:
  - host: magic8ball.contoso.com
    http:
      paths:
      - path: /
        pathType: Prefix
        backend:
          service:
            name: magic8ball
            port:
              number: 8501
The ingress object defines the following annotations:
-
cert-manager.io/cluster-issuer: specifies the name of a cert-manager.io ClusterIssuer to acquire the certificate required for this Ingress. It does not matter which namespace your Ingress resides, as ClusterIssuers are non-namespaced resources. In this sample, the cert-manager is instructed to use the
letsencrypt-nginxClusterIssuer that you can create using the06-create-cluster-issuer.shscript. -
cert-manager.io/acme-challenge-type: specifies the challend type.
-
nginx.ingress.kubernetes.io/proxy-connect-timeout: specifies the connection timeout in seconds.
-
nginx.ingress.kubernetes.io/proxy-send-timeout: specifies the send timeout in seconds.
-
nginx.ingress.kubernetes.io/proxy-read-timeout: specifies the read timeout in seconds.
-
nginx.ingress.kubernetes.io/proxy-next-upstream-timeout: specifies the next upstream timeout in seconds.
-
nginx.ingress.kubernetes.io/configuration-snippet: allows additional configuration to the NGINX location.
When you no longer need the resources you created, delete Azure's resource group.
-
Since Terraform was used to create the resources, also use terraform to destroy them:
# Destroy Resources and update .terraform state files:
terraform destroy -auto-approve
rm -rf .terraform* rm -rf terraform.tfstate*
The Terraform provider will issue these Azure CLI commands so you don't have to:
az group delete --name "${aksResourceGroupName}"
Alternately,
Remove-AzResourceGroup -Name "${aksResourceGroupName}"
-
terraform/register-preview-features.sh -> needs --allow-preview true
az extension update --name aks-preview --allow-preview true
-
install-nginx-via-helm-and-create-sa.sh mentioned in README - does file exist?
-
GitHub Actions ?
-
Diagram gradual reveal in PowerPoint
-
To run in macOS, use brew as well as apt for Linux within 10-configure-dns.sh
-
minicube3 & conda commands instead of pip env ?
-
dev, test, stg, prod env. to initiate run
-
customized chats on the licensed Open.ai App store
WARNING: These are files in the script folder not yet documented in this article:
VIEW: 02-run-docker-container.sh
VIEW: 03-push-docker-image.sh
VIEW: 06-create-cluster-issuers.sh
https://github.com/stacksimplify/azure-aks-kubernetes-masterclass explained in the Udemy class "Azure Kubernetes Service with Azure DevOps and Terraform" by Kalyan Reddy Daida
Deep-Dive Terraform on Azure: Automated Delivery and Deployment of Azure Solutions Apress September 2021 By Ritesh ModiBy Ashley Davis
-
Bootstrapping Microservices with Docker, Kubernetes, and Terraform from Manning Publications February 2021
-
Infrastructure as Code: Using Terraform to Deploy Kubernetes and Microservices from Manning Publications October 2020
https://learning.oreilly.com/videos/-/9780138230258/ Automating Kubernetes with GitOps By Sander van Vugt from Pearson April 2023 7h 40m
https://learning.oreilly.com/library/view/-/9781098142155/ Kubernetes Best Practices, 2nd Edition By Brendan Burns, Eddie Villalba, Dave Strebel and 1 more from O'Reilly Media, Inc. October 2023 322 pages
https://learning.oreilly.com/library/view/-/9781803248004/ Observability with Grafana By Rob Chapman and Peter Holmes from Packt Publishing January 2024 356 pages
https://www.youtube.com/watch?v=mE7IDf2SmJg Stanford CS25: V3 I Retrieval Augmented Language Models
END