- Abstract
- Remarks
2.1 Format
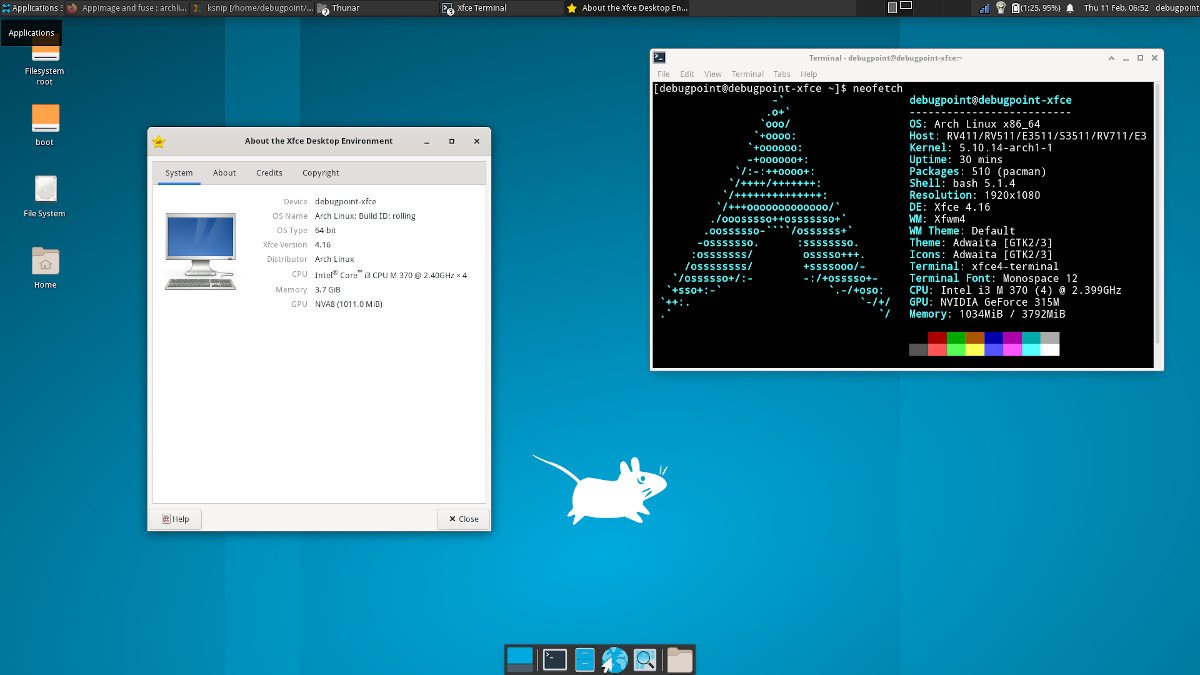
2.2 Activity Logging - Why Linux?
3.1 Operating Systems
3.2 Windows
3.3 Mac OS
3.4 Linux - Which Linux?
4.1 Linux Distributions
4.2 Everyday VS Specialised Use
4.3 Beginner Friendly VS Advanced
4.4 Desktop Environment VS Window Manager
4.5 GUI VS CLI
4.6 Stable VS Rolling Release - My Linux
5.1 Distribution
5.2 Core Setup
5.2.1 Security
5.2.2 Graphical Environment
5.3 Command Line
5.3.1 Terminal Emulator
5.3.2 Shell
5.3.3 Text Editor
5.4 Backup System
5.4.1 Partial Backup
5.4.2 Full System Backup
5.5 Future Improvements
This project investigates the customization potential of Linux as an operating system, contrasting it with proprietary platforms such as Windows and Mac OS. It focuses on exploring various Linux distributions, desktop environments, and window managers to assess their flexibility, security features, and efficiency in different use cases. Arch Linux was chosen as the primary subject due to its minimalistic design and extensive configuration capabilities, allowing for full control over system elements. Through hands-on implementation, including system encryption, backup strategies, and command-line environment optimization, the project demonstrates the feasibility and advantages of building a personalized OS. The findings suggest that Linux offers significant benefits in terms of customization and system control, making it a robust choice for advanced users. This work was awarded an A.
The following project will be made entirely in a Markdown format. From the official website:
Markdown is a lightweight markup language that you can use to add formatting elements to plaintext text documents.1
Markdown is mostly used for simple tasks where minimal formatting is needed, e.g. emails, technical documentations or notes. Consequently, it might be argued that such a format is inappropriate for an extensive academic project, such as this one.
However, every issue that may be encountered has been carefully considered and accounted for. Moreover, this format brings some substantial benefits over standard solutions (PDF, DOCX, etc.) to both the author and the readers, namely:
- Interactivity
- Video demonstrations are necessary for showcasing the OS at work
- External links make it easier to link sources of information
- Internal links make traversing the document effortless
- Minimalistic design
- Easier editing
- Better readability
- Accessibility
- This document is hosted on GitHub where Markdown is neatly integrated for viewing and accessing such projects
Thorough logging of every undertaken action is both a requirement and a big part of the project. The initial solution was to write a custom Python program called the Activity Logger to provide an all-in-one file with activities as plain text entries:
    _        _   _       _ _            _
   / \   ___| |_(_)_   _(_) |_ _   _   | | ___   __ _  __ _  ___ _ __
  / _ \ / __| __| \ \ / / | __| | | |  | |/ _ \ / _` |/ _` |/ _ \ __|
 / ___ \ (__| |_| |\ V /| | |_| |_| |  | | (_) | (_| | (_| |  __/ |
/_/   \_\___|\__|_| \_/ |_|\__|\__, |  |_|\___/ \__, |\__, |\___|_|
                               |___/            |___/ |___/
Creator: Akim
Source code: https://github.com/akim/epq

Tags:
( A ) - Activity
( D ) - Description
( F ) - Fixed
(I__) - Issue
(W__) - Warning

=====================================================================

[10-12-2021 19:12] ( A ) Downloaded the Arch Linux ISO file
[10-12-2021 19:25] ( A ) Verfied the image signature using gpg
[10-12-2021 19:33] ( A ) `dd`-ed the image to a usb drive
[10-12-2021 19:51] (I01) Cannot boot into the live environment
  [11-12-2021 18:08] ( F ) Reformatted the usb and reinstalled the iso
[11-12-2021 18:08] ( A ) Fixed I01
  [11-12-2021 18:08] ( D ) The iso might have been corrupted
[11-12-2021 18:08] ( A ) Added a description to A24
[11-12-2021 18:13] ( A ) Connected to wifi using iwctl
[11-12-2021 18:21] ( A ) Created a LUKS encrypted container
[11-12-2021 18:50] ( A ) Made and formatted the logical volumes (LVM)
[11-12-2021 19:04] ( A ) Mounted the file systems
...
Nevertheless, this solution has proved to be unsustainable in the long run, as the program needed to be improved and maintained, which put a significant, but more importantly an unnecessary, extra load.
A better solution turned out to be the use of an already existing and utilised system — GitHub. At its core, GitHub is a website and cloud-based service for sharing code, which incorporates a Version Control System (VCS) called git.
This system provides an extremely detailed breakdown of every little change in the system, right down to a side-to-side comparison of every altered line of code (fig. 1). Yet understandability remains unharmed, as all the changes can be presented with a short description on a simple timeline (fig. 2), thus each aspect of this solution has been proven to be superior to the previous one.

Figure 1

Figure 2
An Operating System (OS) is an interface between a computer user and computer hardware (fig. 3). It is a software which performs all the basic tasks like file management, memory management, process management, handling input and output, and controlling peripheral devices such as disk drives and printers.2

Figure 3
There are three major OSs in the current market (fig. 4):
- Windows
- Mac OS
- Linux
The most popular one OS by far is Windows, accounting for roughly 70% of global market share. It is aimed to be compatible with as many devices as possible, hence it is a go-to choice of all major PC/laptop manufacturers.
In second place is Mac OS at around 15% market share. Although it is only available for laptops produced by Apple, with over 20 million units sold annually, big market share is not a surprise.
However, Linux, being free and compatible with almost all of the devices running Windows or Mac OS, comprises only 2-3% of the current market. To understand why that is, a deeper understanding of each OS is needed.

Figure 4
The first version of Windows, released in 1985, was simply a GUI offered as an extension of Microsoft’s existing disk operating system, or MS-DOS. Based in part on licensed concepts that Apple Inc. had used for its Macintosh System Software, Windows for the first time allowed DOS users to visually navigate a virtual desktop, opening graphical “windows” displaying the contents of electronic folders and files with the click of a mouse button, rather than typing commands and directory paths at a text prompt.3
In subsequent years the functionality of the OS gradually expanded, whilst most of the complexity behind it remained unseen by an average user. This approach appealed to many people around the World, and soon Windows became the most widely used desktop OS in the market.
Nonetheless, the convenience of being pre-installed on most of the devices, pre-configured and relatively straightforward GUI and just the fact of being an off-the-shelf software, comes at a price. Both figuratively and literally.
At the time of writing, the price of the full and latest Windows version for an individual is $199.99. Although it is possible to use a newly bought Windows laptop without explicitly paying such a high price, the functionality of the OS will be severely constrained (e.g. unable to set a custom wallpaper). Consequently, the cost of the OS is usually paid indirectly, because it is included in the price of a device, or directly through Microsoft store in order to activate the product.
Furthermore, to appeal to almost 1.5 billion people, a multitude of immutable decisions must be made for them by the system developers, which might not be in the best interest of the people themselves. For instance, the general look of the GUI, the core services used or even the kernel. Allowing to alter something that has been permanently set by the developers would most likely harm the compatibility, stability and security of the system, and increase the configuration complexity for an end-user. None of the above seem to be beneficial for such a huge business, therefore the amount of available customisation is substantially limited.
However, a far dangerous, albeit less noticeable in the short term, price is one's privacy. Microsoft is known to collect hundreds upon hundreds of data entries, such as installed applications, hardware/device information, browsing, search and query data, details about the voice and typing input features. If you ever wondered how the internet ads match exactly the topic of conversation that you recently had with your friend, relative or college, this is one of the reasons. The main motivation behind collecting such sensitive personal information is to:
- Personalise our products and make recommendations.
- Advertise and market to you, which includes sending promotional communications, targeting advertising, and presenting you with relevant offers.4
This also serves as a big source of system diagnostics, which is used for development and improvement. Nonetheless, if the consumers were actually aware that in order to use the OS every little action they take would have to be under constant surveillance, such shady business model would have been very unlikely to succeed on the global market.
Mac OS was developed by the American computer company Apple Inc. The OS was introduced in 1984 to run the company’s Macintosh line of personal computers. The Macintosh heralded the era of graphical user interface (GUI) systems, and it inspired Microsoft Corporation to develop its own GUI, the Windows OS.
In 1996 Apple acquired rival NeXT Computers, which was founded by Steve Jobs after his departure from Apple, and in 2001 the company rolled out Mac OS X, a major redesign based on both the NextStep system and Apple’s most recent OS release. OS X ran on a UNIX kernel (core software code) and offered technical advances such as memory protection and preemptive multitasking, along with a more versatile Finder, an elegant-looking interface called Aqua, and a convenient graphical “Dock” bar for launching frequently used applications.5
Although Mac OS may be considered open source (the kernel, BSD subsystems, browser rendering engine WebKit, etc.) it has a proprietary application programming interface (API), which is much larger than in both Linux and Windows. Consequently, it raises the same privacy concern as discussed in the Windows section, i.e. collecting personal data.
Although the software side customization is more promising on Mac OS, there is a major disadvantage to using this operating system due to the hardware limitations. Officially Mac OS is only available for Apple devices (MacBooks, iMacs and such), therefore in order to use it, one must be willing to use one of the hardware configurations provided by the company. The minimum price that has to be paid for the OS is equivalent to the price of the cheapest official MacBook — $999.
In 1969, a team of developers of Bell Labs started a project to make a common software for all the computers and named it as "Unix". It was simple and elegant, used "C" language instead of assembly language and its code was recyclable. As it was recyclable, a part of its code now commonly called "kernel" was used to develop the operating system and other functions and could be used on different systems. Also its source code was open source.
In 1983, Richard Stallman developed GNU project with the goal to make it freely available Unix like operating system and to be used by everyone. But his project failed in gaining popularity. In 1991, Linus Torvalds a student at the university of Helsinki, Finland, thought to have a freely available academic version of Unix started writing its own code. Later this project became the Linux kernel. He started it just for fun but ended up with such a large project. He published the Linux kernel under his own license and was restricted to use it commercially. Linux uses most of its tools from GNU software and are under GNU copyright. In 1992, he released the kernel under GNU General Public License.6
Because Linux was developed as FOSS (Free and Open Source Software) it abides by the four essential freedoms of free software, defined by Richard M. Stallman in his book "Free Software, Free Society" and later adopted by the FSF (Free Software Foundation):
- The freedom to run the program as you wish, for any purpose (freedom 0).
- The freedom to study how the program works, and change it so it does your computing as you wish (freedom 1). Access to the source code is a precondition for this.
- The freedom to redistribute copies so you can help others (freedom 2).
- The freedom to distribute copies of your modified versions to others (freedom 3). By doing this you can give the whole community a chance to benefit from your changes. Access to the source code is a precondition for this.7
These four simple principals allow Linux to resolve major issues present in Windows and Mac OS. Firstly, there are no privacy, surveillance or data selling concerns with Linux, due to the first freedom. Every changed setting, ran command or any other undertaken action can be freely traced and analyzed to ensure that it does what it is supposed to do, instead of sending user data to a big corporation for instance.
Secondly, Linux is free and widely available. The Kernel itself is 100% free and open source, as are most of the distributions. Some of them are paid (e.g. RHEL), however with over 600 active distributions the proportion of the proprietary ones is negligible.
There are no special limiting hardware requirements either. In fact, it runs 90% of the public cloud workload, has 62% market share of embedded operating systems (from smart fridges to cars and airplanes), 99% of the supercomputer market share and 82% of all smartphones run on Linux.8 This allows for maximum hardware customizability, i.e. almost any laptop or even a self-assembled PC, no matter how cheap, expensive, old or new, can run this OS absolutely for free.
Finally, one of the most significant "selling" points of Linux is its endless software customization capabilities. There is not a single thing that cannot be modified in this OS. Because the source code is open source, even the most fundamental parts, such as the Kernel, can be altered, recompiled and freely put into production. This allows for a maximum degree of flexibility both in terms of technical details (e.g. system security) and general aesthetics (e.g. the overall look and feel). Figure 5 shows examples of how Linux users customized their OS.
 |
 |
|---|---|
 |
 |
Figure 5
However, whilst unlimited customization and a myriad of options is a major advantage for some, others may find it overwhelming. Nevertheless, this issue comes down to personal choice as it can be resolved by choosing a ready-to-go distribution like Ubuntu, Linux Mint or other.
Another problem that may arise is software compatibility. Most of the proprietary software and especially video games are developed for Mac/Windows platforms, therefore some programs are not natively available on Linux. Whilst there is at least one great/better FOSS alternative available for almost any proprietary application, if it is strictly required to use a specific program, it may be inconvenient for the user. Of course there are workarounds to this, e.g. using a Windows VM (Virtual Machine) but it adds a level of complexity and requires some time and effort from the user.
A Linux distribution is an operating system made from a software collection that includes the Linux kernel and, often, a package management system.9
There are a lot of Linux distributions (fig. 6) freely available for anybody to download for all kinds of purposes, therefore it is important to know at least a general categorisation in order to not get overwhelmed by choice and pick the right one.

Figure 6
Linux is very flexible in terms of usage purposes. As a matter of fact, at the moment Linux is being run on tens of thousands of household PCs, as well as on some of the most advanced technological devices available to man, like the SpaceX's Falcon 9 rocket.
In case you are not considering going to space at the moment, an everyday distribution might be the best choice. It is suitable for anybody who needs a computer to perform usual tasks, for example internet browsing, file management, note taking, creating and editing text documents, presentations, spreadsheets, etc. It is usually the case for people who want to move from Windows/Mac OS to Linux and are looking for something familiar and easy to use. The most suitable, and closest to the aforementioned OSs, option would be a beginner friendly distribution with a desktop environment (see the Beginner Friendly VS Advanced and Desktop Environment VS Window Manager sections below).
Gaming on Linux can be tricky as most of the game developers write software only with Windows and Mac OS in mind. However, every year compatibility is ceasing to be a major issue with new and improved compatibility layers (e.g. WINE), sets of supporting tools like Proton and highly optimised gaming distributions. In fact, the combination of these facts along with Valve recently releasing the Steam Deck — a handheld console running Linux — has made releasing games for Linux require less effort in terms of coding, making it more profitable for game developers, consequently incentivising them to write high quality optimised code as they do for other major OSs. This has led to drastically improved performance, in some cases even surpassing Windows. Although the environment for any game can be set up yourself on most of the distributions, there are great off-the-shelf solutions like Fedora Games spin or Ubuntu GamePack, which guarantees the launch of more than 85000 games.
Those who want to use the OS for more technical purposes might find a minimal advanced distribution more appealing. For instance, distributions such as Kali Linux and BackBox are perfect for reverse engineering, computer forensics and penetration testing, i.e. ethical hacking, as they include hundreds of built-in tools and utilities for such purpose. To set up a web server, Debian or Ubuntu Server might be a good choice. Both distros have an LTS (Long Term Support) version and mainly focus on stability in order to allow maximum uptime for any given website or service. Tails, a portable operating system that protects against surveillance and censorship, might be a life saver for people whose profession require that extra security, e.g. political journalists.
Finally, if none of the distributions seem to be fit for purpose, or more likely, you want to learn more about Linux, create a system that perfectly suits you and are up for the challenge, there is a panacea. Linux From Scratch (LFS) is a project that gives a step-by-step instructions on how to build a Linux system from source, allowing for absolute control over each element of the system. Although the end result is a "perfect" OS and a huge amount of experience, the installation process is so complex and time consuming that not a lot of people dare to even attempt it.
Most of the distribution can be put on a spectrum ranging from beginner friendly to advanced. It is not an official or objective classification, however there are certain factors that make the "level" of a distribution quite evident.
How can an operating system be beginner friendly or advanced? It might seem like a strange concept, because the only available alternatives for comparison (for general public) are Windows and Mac OS. Although they might still require some time to understand and get used to, it is usually a matter of days, even for a total beginner. This makes sense, as these OSs were originally designed for a large audience, therefore a lot of usage simplification measures have taken place.
This however is not the case for all Linux distributions. Generally, the more beginner friendly a distribution is, the more similar it is to systems such as Mac OS and Windows, as "beginner friendly" implies the intuitiveness of use. In order to start using such a distribution, first it has to be installed. The "hardest" part of the installation process is downloading an ISO image off of an official distribution website and writing it to a USB device. After plugging it in the desired PC/laptop, a user will be greeted with a GUI installer (fig 7), similar to what Windows uses, where a simple list of questions will be asked and the system will be ready for use in the matter of minutes. Figure 7 is an example of a GUI installer for the Ubuntu distribution.
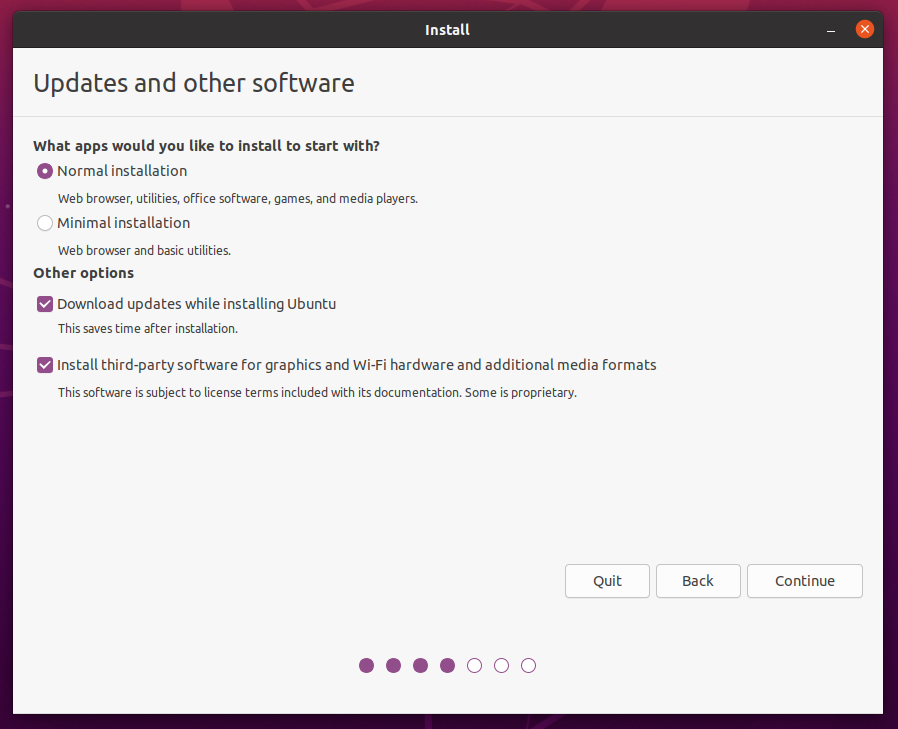
Figure 7
After the initial setup is complete, no further configuration is required in order to start using the system. All the essential pieces of software will be pre-installed and active, so the user will not have to worry about setting up a graphical environment (usually a DE is a default option) or, for that matter, even installing a web browser or a file manager.
Nonetheless, the opposite is true for advanced distribution: the more advanced a distribution is, the more different it is intially from the mainstream OSs. This is usually the case because advanced distros tend to be very minimalistic — they allow the user to have complete freedom over what software is installed, how it is configured and how it is utilised in the future. Consequently, the installation process is considerably more complex, as it requires the user to make a lot of choices related to even the most basic components of the system. For instance, Arch Linux only has a command line by default (fig 8), meaning things like a display server, compositor, DE/WM must be installed manually in order to have any sort of GUI. Whereas distributions such as Gentoo are so minimal that to get a working system the user must first install, configure and compile a kernel, which is the core element of any OS. Figure 8 shows how the first step of an Arch Linux installation process looks like.
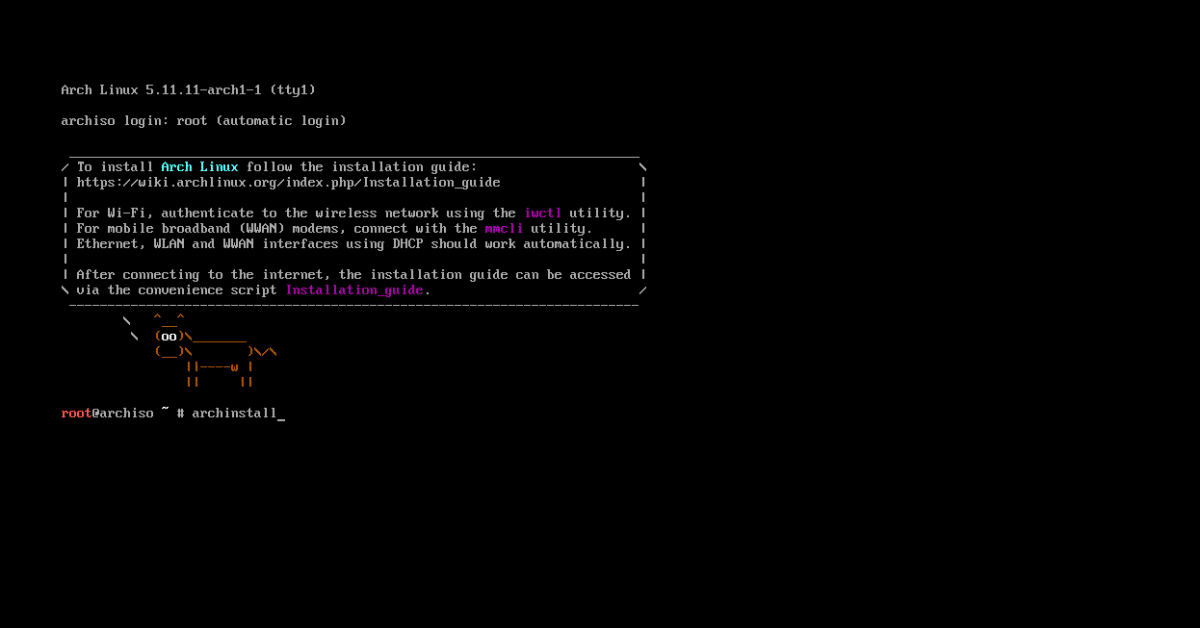
Figure 8
The table below subjectively ranks how beginner friendly or advanced some of the popular distributions are:
| Beginner Friendly | Intermediate | Advanced | |
|---|---|---|---|
| 1. | Ubuntu | Manjaro | LFS |
| 2. | Linux Mint | Fedora | Arch Linux |
| 3. | Pop!_OS | OpenSUSE | Slackware |
| 4. | Elementary OS | EndeavourOS | Gentoo |
| 5. | Debian | Garuda Linux | NixOS |
Figure 9
A Desktop Environment (DE) is a collection of software running on top of an operating system that makes up the desktop Graphical User Interface. It usually includes everything from how the windows look and feel, to the style of the icons, files, folders, and the mouse pointers. A desktop environment also dictates what file manager to use, default text editor, image viewer, wallpapers, and the interface used to log in and log out of the local system.10
In the systems such as Windows and Mac OS desktop environment is a core part of the OS itself. Although it is possible to change separate design elements (icons, window borders, etc.) or default programs (like a text editor or a file manager) of these DEs, it is not possible to fully replace it with another. For instance, a Windows user cannot simply download a Mac OS DE and enjoy all of its features, however it is feasible to make Windows look similar to Mac OS by manually configuring each desired element.
As DEs are used by the major OSs and come with a lot of pre-installed software a new user might need, they are very popular among beginner friendly distros. In fact, all of the "Beginner Friendly" and most of the "Intermediate" distributions from figure 9 come with a DE installed by default. Nonetheless, on Linux DE is separate from the OS and therefore can be freely changed to either another DE or a window manager. Some of the most popular DEs amongst Linux users include: KDE Plasma, Gnome, XFCE and Cinnamon (fig. 10).
 |
 |
|---|---|
 |
 |
Figure 10
A Window Manager (WM) is a software utility hat manages the overall alignment and layout of graphical windows.11
In contrast to DEs, WMs are usually used in more advanced distros. The reason for it is because they are more minimalistic, light weight and efficient. As a matter of fact, a WM is a part of every DE. For example, when a Windows user closes, minimises, moves windows or utilises a snap assist (fig. 11) it is all done by the built-in WM.
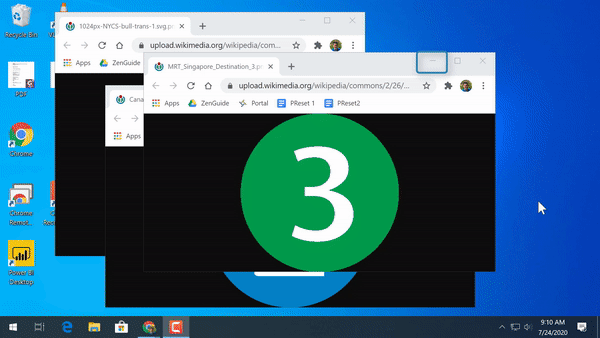
Figure 11
There are 3 main types of WMs:
- Stacking (a.k.a floating)
- Tiling
- Dynamic
Stacking WMs are the ones used in Windows/Mac OS. If several windows are opened at a time, by default they are in what is called a "floating" layout, meaning the windows are not maximised, not aligned and can overlap (see the beginning of fig. 11). This is not a very efficient approach, as a lot of space is being unused in the process and the user has not manually rearrange the windows, spending more time organising the space instead of doing the actual work.
Tiling WMs "tile" the windows (surprisingly) so that none are overlapping. When the first window is opened it takes up 100% of the workspace. The following opened windows will behave differently depending on a layout, however the main idea is that 100% of the workspace is utilised at all times, e.g. for two windows each will take up 50% of the screen, for three — 50%, 25% and 25%, etc. Due to such automatic window management the use of mouse/touchpad becomes unnecessary. Most of the users' hands usually rest on a keyboard, so making it possible to perform any operation with windows without touching a mouse/touchpad, i.e. only utilising shortcuts and key combinations, significantly increases productivity in the long run by improving the overall speed and workflow. Moreover, usually windows cannot be minimised (hidden) because WMs heavily utilise the idea of separate workspaces (also called tags or tabs). This allows for multitasking as all the windows related to one activity can be on one tag, another activity on the other tag, and none of the windows from different activities/tags mix up and interfer with each other. Figure 12 is an example of a tiling WM in action.

Figure 12
A Dynamic window manager is a hybrid between a stacking and tiling WMs. They have all the properties of a tiling WM, however they also allow to dynamically switch between tiling and floating window layouts, basically the best of both worlds.
The main disadvantage to using a tiling/dynamic WM is a steep learning curve. Both types make very extensive use of key-bindings and have less (or no) reliance on the mouse, so the user must remember, get used to and also configure a number of key combinations. Furthermore, configuration usually does not involve a GUI and is done directly inside a config file making it necessary to be able to edit text and in some cases requires some knowledge of programming.
The following website provides a table that extensively compares the most popular WMs such as DWM, bspwm, Xmonad and others.
There are two main ways a user can interact with an OS:
- By using a Graphical User Interface (GUI)
- By entering commands in the terminal, i.e. by using a Command Line Interface (CLI)
GUI is used by the commercial OSs and it is the most popular and straightforward way to interact with the system. It involves menus, buttons and everything else that requires to be interacted with a cursor. This is great for new users, as anything they might want to do is displayed on the screen. A proper UI and UX make everything very intuitive, therefore in most cases minimal learning time and experience are needed to get started.
In the early days, when the notion of a PC did not exist, there were computer terminals — the predecessors of modern computers. The only way no interact with such machines was to type out the commands. This did not appeal to the general public, as a lot of commands had to be memorised, however this was, and still is, the most efficient way of interacting with an OS. A GUI cannot account for every action a user might want to take, whereas commands are much more versatile and can tell the computer precisely what to do. A case in point, renaming files in bulk is a common issue that even a regular user might encounter. Suppose a time stamp is needed to be appended to each of the 100 files. It is unlikely that a graphical file manager would have such an option, therefore the only way to do it through a GUI is manually. Although quite unreasonable and time consuming, it is possible to do with 100 files. Nevertheless, this method would quickly become unsustainable as the number of files grows, whereas with a use of basic commands this issue can be solved much faster and with a lot less effort. This holds true not only for such specific use cases, but for everyday system management as well, e.g. moving, renaming, deleting files, changing system settings, configuring applications, etc.
GUIs have their use cases. For example, it would be unreasonable or even impossible to Photoshop pictures or edit videos using commands. However, for everyday system administration using commands is a more time and space efficient solution (CLI applications take up less storage space). Although the obvious drawback is the time and effort that have to be invested in order to use the commands efficiently.
A software release life cycle is the sum of the stages of development and maturity for a piece of computer software ranging from its initial development to its eventual release, and including updated versions of the released version to help improve software or fix software bugs still present in the software.12
There are many different types of software release life cycles, however two of the most common ones when it comes to Linux distributions are stable and rolling releases. It is important to distinguish between the two because they both have prons and cons, and can affect the way a user interacts with the system, e.g. the frequency of updates and ease of troubleshooting.
The Stable release (also known as fixed, static or versioned release) distributions are the ones that hold back the updates and new software packages for a fixed period until a new version of an OS is relesed. The only exception is the essential security updates that come out more frequently in order to ensure the overall security of the system. The main idea behind this model is that all applications are thorougly tested at first for software bugs and compatibility issues and only then released to the public. This is advantageuos to new users, as they usually do not have to deal with the aforementioned issues themselves and more often than not everything works out of the box. In theory this results in a more stable system with an excellent inter-package compatibility. With that said, if the developers fail to properly test an essential package, for example a web browser, the user might need to wait for a fix for several months until a new version is released. Furthermore, eventully a version of an OS the user runs will stop being actively supported by the developers and would have to be reinstalled. For instance, this happened with Windows 8 in 2016, so in order to keep getting all the essential updates the users had to upgrade to Windows 10. The most popular stable release distributions are listed in figure 9 under the "beginner friendly" column.
The Rolling release distributions on the other hand do not have a single version. Instead the packages may be updated as soon as a new version of a package comes out, allowing the users to be on the bleeding edge and have "the latest and greatest software". Such software release cycle requires the system to be updated on a weekly basis in order to not encounter conflicting packages when too many of them are updated at once. This does not guarantee that there will not be any issues with applications, and in fact on average more issues related to updates will have to be resolved compared to stable release. Troubleshooting might also be a bit trickier, as it is easier to find a solution on the internet for a specific version of a package and distribution. From personal experience, this happens quite infrequently and usually does not require a lot of time to fix. However when it does, it might be hard for a new user to quickly find a working solution, therefore most of the distros listed under the "intermediate" and "advanced" columns in figure 9 are rolling release.
The distribution I picked for this project is Arch Linux. From the official website:
[...] Arch Linux, a lightweight and flexible Linux® distribution that tries to Keep It Simple.13
As the quote suggests, this is a multi-purpose "bare-bones" distribution that allows for a very high degree of control over each element of the system. Prior to doing the project I already had some experience with beginner friendly distros like Linux Mint and KDE neon but wanting to learn more about the OS, this time I picked a more advanced distribution. This has challenged me to step out of the comfort zone, see how everything works on the inside and consequently apply the knowledge in order to fully personalise the system.
One of the major reasons I picked this particular distribution is the amount of high quality information and support available on the internet. Arch has a very extensive official documentation called the ArchWiki that provides a lot of essential information on anything related to the system: available software and its purposes, how the system is structured, how different elements of the system interact with each other, and importantly how to install the system using a large range of available options. This is an excellent community-driven source of information, which is helpful both for new and experienced users. Moreover, Arch is one of the most popular advanced distributions, meaning there is a lot of support available online from the community in various forms: YouTube videos, blog posts, forums, etc. The combination of these factors has been a life saver throughout the entire project and especially during the installation process, which is done fully through the use of commands. The first thing a user is greeted with is a Linux console (figure 8), i.e. there is no graphical environment. Since I have never dealt with something like that before, I had to fully erase the hard drive and restart the installation for quite a few times. However, eventually I got a basic functioning system and could start the configuration process.
To install new software on a Linux system a user does not have to go on the Internet and search for applications like on Windows for instance. Instead there is a much more convenient way — a package manager.
A package manager or package-management system is a collection of software tools that automates the process of installing, upgrading, configuring, and removing computer programs for a computer in a consistent manner.14
Every Linux distro has its own package manager. For Arch it is pacman. It allows the user to deal with all the packages installed (or to be installed) on the system in a very efficient manner and offers some advantageous features over the other package managers. A case in point, is parallel downloads. It accelerates the process of downloading software from the official repositories by downloading multiple packages simultaneously instead of sequentially. Moreover, Arch has one of the largest community-driven repositories called the Arch User Repository (AUR), which currently has over 81000 packages available. Furthermore, Arch has all the benefits of a rolling release distro, along with all the downsides of course. However, as the main disadvantage of such release life cycle is more frequent package conflicts and potential system breakages, it gives me another opportunity to learn how to resolve these issues and get more knowledge and experience as a result.
There are multiple officially supported kernels available, including the hardened, security-focused one. Moreover, there is an option of a custom kernel that a user can compile themselves for a better performance, enhanced security and other reasons. However, this is not an easy process and it is out of scope of this project, so I went along with the vanilla Linux kernel.
By default the system does not have any encryption, so in order to protect the
files I decided to encrypt an entire system using LVM on
LUKS.
An example disk layout from the guide is presented in figure 13 and it is
very similar to my actual disk layout with two encrypted logical volumes (SWAP
and root) and a separate boot partition, see figure 14 (the $ denotes the
command prompt for an unprivileged user and everything below it is the output
of a ran command).
+-----------------------------------------------------------------------+ +----------------+
| Logical volume 1      | Logical volume 2      | Logical volume 3      | | Boot partition |
|                       |                       |                       | |                |
| [SWAP]                | /                     | /home                 | | /boot          |
|                       |                       |                       | |                |
| /dev/MyVolGroup/swap  | /dev/MyVolGroup/root  | /dev/MyVolGroup/home  | |                |
|_ _ _ _ _ _ _ _ _ _ _ _|_ _ _ _ _ _ _ _ _ _ _ _|_ _ _ _ _ _ _ _ _ _ _ _| | (may be on     |
|                                                                       | | other device)  |
|                         LUKS2 encrypted partition                     | |                |
|                           /dev/sda1                                   | | /dev/sdb1      |
+-----------------------------------------------------------------------+ +----------------+
Figure 13
$ lsblk

NAME             MAJ:MIN RM   SIZE RO TYPE  MOUNTPOINTS
nvme0n1          259:0    0 953.9G  0 disk
├─nvme0n1p1      259:1    0   256M  0 part  /boot
└─nvme0n1p2      259:2    0 953.6G  0 part
  └─cryptlvm     254:0    0 953.6G  0 crypt
    ├─crypt-swap 254:1    0    16G  0 lvm   [SWAP]
    └─crypt-root 254:2    0 937.6G  0 lvm   /
Figure 14
There are two user account set up on the system:
- Normal (unprivileged) user
- Root (full privilege) user a.k.a. the superuser
It is a standard setup for most of the personal-use Linux systems, which is done mainly for security purposes. The everyday system use is done on a normal account, however when there is a need to alter system configuration either by running commands or editing system files, install and remove software or perform any other action that requires elevated privilege, it is done on a root account. In order to run commands as root, there are CLI utilities available such as sudo or doas, both of which are installed on the system. The accounts have separate passwords, which are usually required for logging in to the system. However, I skipped this step entirely by setting up an automatic login system with getty because there is already a password protection from the encryption method described above.
The display server is a software layer responsible for capturing interactions from the user’s mouse and keyboard as well as communicating with the kernel to render graphics on the screen. (Adaptation) 15

Figure 15
There are currently two major competing display servers on Linux, namely Xorg and Wayland. The latter was founded in 2008 as Kristian Hogsberg's personal project dedicated to replace Xorg. It is free and open source and is "marketed" as a "a modern, secure, and more straightforward windowing system". Although Xorg is a relatively older project and has a fair bit of legacy code, it is the most popular display server to date. Consequently, it is well documented, currently supports more software and has less issues, therefore I chose it over Wayland. In order to have features such as window transparency, transition animations, drop shadows around windows and Vsync, I use a standalone compositor called picom, a fork of compton.
My window manager of choice is a fork DWM called DWM Felxipatch. Vanilla DWM is a very minimal Dynamic Window Manager that follows the suckless philoshopy. It is written in C programming language and relies on the mechanism of applying different patches by semi-manually changing the source code. These are small chunks of code written by other users that extend the functionality of the WM. For instance, there are patches that add window layouts, allow for status bar customization, introduce new window behaviours, etc. Although it is relatively straightforward to apply a small number of patches yourself (as I did in the past), the more patches there are, the more time consuming and problematic the process of applying becomes. I found Flexipatch to be a great solution for this issue, as it already has all the patches applied to the source code and allows to just switch them on and off simply by putting either 1 or 0 for each patch in the header file. The source code for my configuration can be found on my GitHub page here. Some of the current functionality and key sequences are presented in figure 16. As can be seen from the number of shortcuts, my configuration heavily relies on the keyboard usage, mainly for efficiency purposes.
Usage: SUPER a.k.a. WINDOWS key + <key sequence>
| Key sequence | Description |
|---|---|
j |
Focus next window |
k |
Focus previous window |
J |
Move focused window down the stack |
K |
Move focused window up the stack |
ENTER |
Make focused window master |
h |
Decrease master size |
l |
Increase master size |
q |
Close focused window |
<NUM> |
Toggle between previously selected tags and <NUM> |
<NUM1> + <NUM2> |
Select multiple tags |
CTRL + <NUM> |
Add tag <NUM> to focus (select multiple tags) |
SHIFT + <NUM> |
Move focused window to tag <NUM> |
CTRL + SHIFT + <NUM> |
Show selected window on both current and <NUM> tags (toggle) |
TAB |
Cycle forwards through layouts |
SHIFT + TAB |
Cycle backwards through layouts |
SHIFT + BACKSPACE |
Shutdown |
Q |
Restart DWM |
R |
Restart |
CTRL + f |
Fullscreen |
CTRL + t |
Tile layout |
CTRL + m |
Monocle layout |
CTRL + b |
Bottom Stack layout |
CTRL + c |
Centered Master layout |
CTRL + d |
Deck layout |
CTRL + s |
Fibonacci (Spiral) layout |
CTRL + g |
Grid layout |
CTRL + a |
Float layout |
m |
Increment the number of masters |
M |
Decrement the number of masters |
= |
Increase gap size |
- |
Decrease gap size |
SHIFT + = |
Default gap size |
SHIFT + - |
Toggle gaps |
w |
Increase window weight (size) in the stack |
W |
Decrease window weight (size) in the stack |
CTRL + w |
Set window weight (size) to default |
t |
Transfer focused window in the stack to master and vice versa |
Figure 16

Figure 17
Figure 17 shows how the default working environment looks without any windows
open. Notice the absence of icons and application shortcuts on the "desktop"
area. The application are launched either by using a shortcut set up with a
hotkey daemon sxhkd or a text-based
application launcher, in my case rofi.
The configurations for these and following programs can be found in my
dotfiles repository, which is a jargon
for configuration files on Linux located in the .config directory.
At the bottom of figure 17 is a status bar, which is also a part of DWM. It uses a fork of dwmblocks in order to easily add and updated the information modules or "blocks" (labeled 3 -- 12). Each block is a shell script adopted or coded by myself. The elements of the status bar are as follows:
- Tags (working spaces)
- Current window layout
- Connected Wi-Fi network
- Internet download speed
- Uptime
- The average of CPU and GPU temperatures
- Brightness level
- Volume level
- Charging indicator and battery level
- Keyboard layout
- Date
- Time
Figure 18 is a showcase of some of the operations that can be performed with windows and figure 19 shows 6 different layouts. (Visual artifacts appear only on the recordings and are not present on the actual system)
dwm-showcase.mp4
Figure 18
layouts.mp4
Figure 19
A terminal emulator (sometimes also referred to as a tty) emulates a video terminal within another display architecture (e.g. in X). This usually takes the form of a window in which the user can enter commands and view output, or of a fullscreen virtual console.16
A terminal emulator is a crucial part of the system. All of the manipulations with files, system configuration, software installation, running CLI applications and many more actions are done by using commands. However in order to use them, they first have to be entered somewhere. That is where a terminal emulator comes in. A user types out a command in the command prompt, then it gets processed and executed by the shell and the output is displayed afterwards. All of it is done inside a terminal emulator window.
There are around 20 popular terminal
emulators for
Linux and most of them are pretty similar in terms of functionality. However
some of them have unique features such as GPU
acceleration for better
performance or the ability to click on URL links and open them in a browser.
The one I chose is Alacritty, it is
written in Rust (very modern and efficient
programming language), has a convenient
YAML configuration file and all of the
aforementioned features. Figure 19 shows two Alacritty windows opened: the
first one only has the command prompt and no output of ran commands, and the second
one shows the output of the last five commands (epq, mv, cd, o and
ls).

Figure 19
A Unix shell is a command-line interpreter that provides a command line user interface for Unix-like operating systems. The shell is both an interactive command language and a scripting language, and is used by the operating system to control the execution of the system using shell scripts.17
Some of the most popular shells are Bash, fish and Zsh, however there are also other shells available. I picked the latter due to fish not being POSIX compliant and bash not having as much functionality, whereas Zsh has some additional features such as advanced command completion and many frameworks that provide customization.
In order to customize the look and feel of the shell and extend its
functionality I used different
plugins, e.g. for syntax
highlighting and a completion menu with fuzzy
search support. I
also use the Starship prompt to get a three-line
command prompt with additional information such as the name of the current user
and machine, current directory, icons indicating the status of a git repository
and others. A major change is the replacement of the standard ls command,
which lists files, with lsd that provides a colorful output and shows the
total size of files and directories. Figure 20 shows the comparison between
ls and lsd and a newly opened terminal window where an automatic startup
script is run
every time to output:
- System information (uses Paleofetch)
- Number of files in the
$HOMEdirectory in order for me to keep track of how clean it is - A random colorscript
- Command prompt

Figure 20
Another notable feature is the use of
Bpytop instead of the default top
command that shows the current running processes. Although it is done mainly
for aesthetic purposes, bpytop provides more information, like the graph of
CPU usage or network speed, which can be very helpful. The comparison of two
can be seen in figure 21.

Figure 21
Text editor is one of the most important elements of the system because the vast majority of both CLI and GUI applications use configuration files that have to be edited manually. Moreover, I like coding, so having a good text editor accelerates the process and makes it more enjoyable.
I did not consider any GUI text editors, as most of the work is done in the terminal, so a CLI solution works the best. There are a lot of CLI text editors, however the ones that people usually pick from are:
Nano is very simplistic. It neither has a lot of functionality, nor customizability, however it gets the job done. If a new user has to edit a configuration file through a terminal, Nano is a good pick -- the controls are quite simple and every action a user might want is documented at the bottom along with shortcuts. It might be a great starting point when looking for a CLI text editor, however I do not think it is a worthy solution in the long run. Figure 22 shows a text file opened in Nano.

Figure 22
Emacs on the other hand is way more extensive in terms of functionality. As a matter of fact, it has so much functionality that some people joke about it almost being a separate OS. All the actions in Emacs are performed with key combinations, however due to the sheer number of them it may become complicated to press all of the keys at once. Furthermore, I was searching for a lightweight text editor with more minimalistic approach, therefore Emacs did not end up being my final choice. An example can be seen in figure 23.
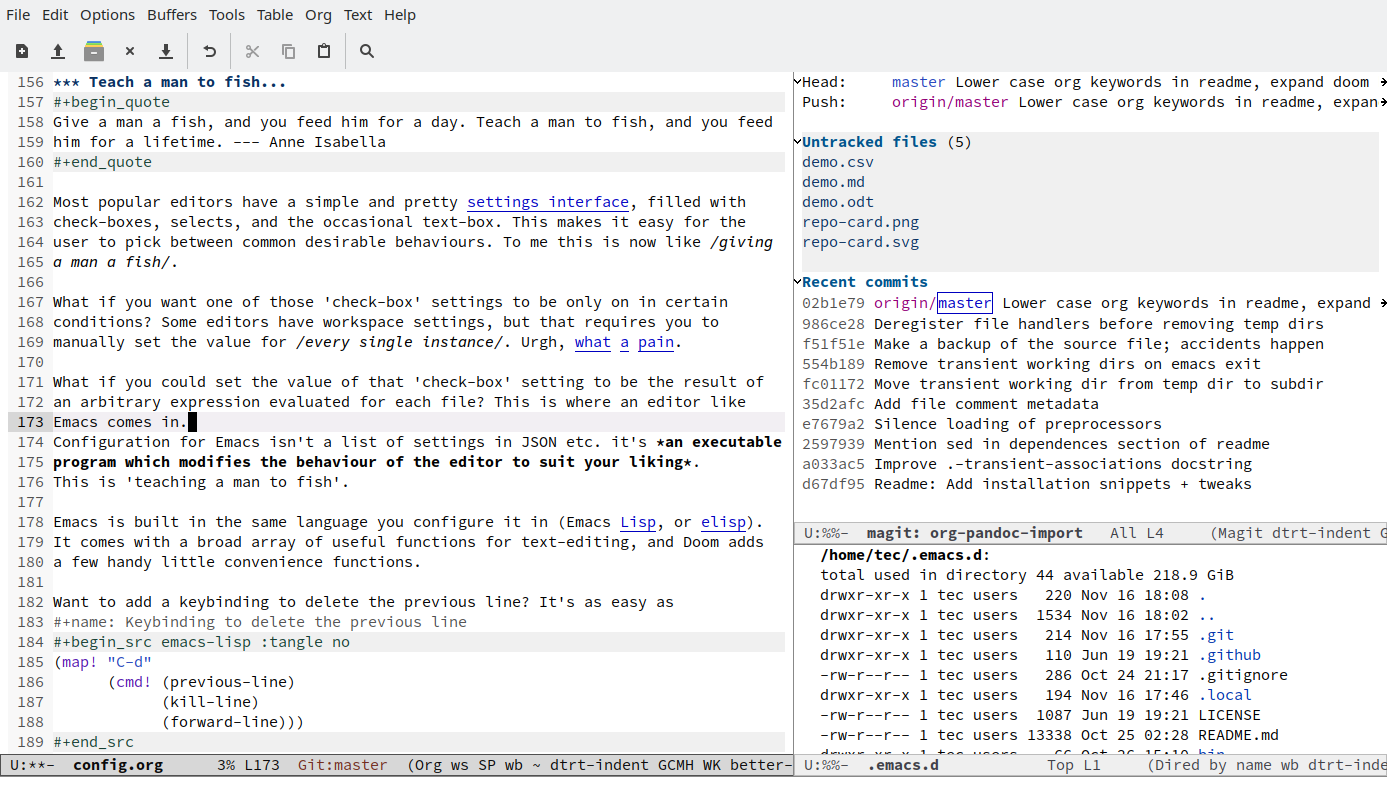
Figure 23
Vim however is much more light weight, and more closely follows the UNIX
philosophy that "favors
composability as opposed to monolithic design". The main idea behind this text
editor is having different modes for different purposes. For instance, in
NORMAL mode each key is a shortcut to some operation, so in order to perform
complicated text manipulation there is no need to use long key sequences that
require multiple keys pressed simultaneously. If the user presses i in the
NORMAL mode, they switch to the INSERT mode and can start entering text.
Although Vim is very lightweight it has unimaginable amount of functionality that can be extended even further through the use of plugins and custom scripts. Nevertheless, these scripts have to be written in Vimscript — a custom scripting language built into the editor. Unfortunately, it is quite outdated and has complex and unintuitive syntax, so to simplify the configuration process I went with Neovim. It is a fork of vim that aims "to improve the codebase, allowing for easier implementation of APIs, improved user experience and plugin implementation." The configuration can be done in lua a much more modern and easier to learn language.
My configuration is available in a separate GitHub repository. This editor deserves a separate EPQ in and of itself, however for the purposes of this project I highlighted and described some of the elements of an example working space in figure 24:
- A file tree that allows to navigate the current working directory and perform manipulations with files, such as opening, deleting, moving, renaming, etc.
- Tabs displaying opened windows
- First visible window or a "split" that displays the
dwm.cfile - Second split displays the
util.cfile - Third split displays the
patches.def.hfile - Current mode is set to
INSERTbecause I am entering text in the second split - Status bar with additional information such as the filename and current line number
- Automatic completion menu that shows suggestions based on the text that is being entered
- A snippet preview window that shows a short description of the currently selected entry in the completion menu

Figure 24
Partial backup implies creating a copy of essential data. It is absolutely crucial for safety reasons to backup at least user files in case something goes wrong. For instance, a backup would be very useful if an important file gets accidentally deleted and cannot be recovered, or, more generally, in case a user needs to access something that is not present on the current system but may be found in the backed-up data.
There is a wide range backup software, and fortunately ArchWiki has comprehensive comparison tables that can help to choose the right one. When choosing such software the following aspects should be considered:
- The type of backup medium that is going to store the data, e.g. CD, DVD, remote server, external hard drive, etc.
- The planned frequency of backups, e.g. daily, weekly, monthly, etc.
- The features expected from the backup solution, e.g. compression, encryption, handles renames, etc.
- The planned method to restore backups if needed.18
I planned to perform weekly backups on a regular USB drive that can be accessed
directly from the OS. Moreover, I would like to safely keep multiple snapshots,
so the space should be used efficiently. The program which fits the description
the closest is Borg. It uses a secure encryption
standard
(AES256),
efficient compression methods (22 level of
zstd in my case) and
deduplication that
eliminates duplicate copies of repeating data, saving even more space as a
result. Figure 25 shows an alias set up for Zsh. When it is typed into the
command prompt (fig. 26) and executed, the word bup is substituted with the
value specified in double quotes in figure 25. $MY_MNT/bups shows the path
to where the backup named backup_name will be saved, and ~ is a shortcut
for a user's home directory
(/home/username) that contains all the user files and documents.
alias bup="borg create --stats --progress --compression=zstd,22"
Figure 25
$ bup $MY_MNT/bups::backup_name ~
Figure 26
A full system backup is done in order to restore the state of the OS in case something goes extremely wrong. For example, if user's SSD/HDD is older than roughly 5 years there is a chance of disk failure that will result in data being corrupted and there is no guarantee that it would be possible to retrieve it afterwards. It is also probable that the user themselves could break the system to the point where, worst case scenario, it would be easier to re-install rather than trying to fix it. In cases like that full system backup would save a lot of time and effort for the user, as they would just need to deploy the backup and everything would be as if nothing happened.
There are a lot of solution for performing a full system
backup, however I decided to
go along with the most reliable and straightforward one — disk
cloning. It allows to create a
1-to-1 copy of the SSD that my systems is stored on, consequently saving the
hassle of deploying the backup in case it is needed, just by swapping the two
SSDs. The main disadvantage of this method is that the exact model of the
computer's SSD has to be purchased, which can be expensive. However it makes
the process of making a backup very trivial, e.g. by using the pre-installed
core utilities, such as
dd in my
case. Figure 27 shows an example of a command that can be used to clone an
entire drive named /dev/sda (input file) to a drive /dev/sdb
(output file). The bs=64K argument sets the block size to 64
Kilobytes, i.e. the size of chunks that will be used to read/write data, and in
case a read error is encountered, conv=noerror,sync will instruct dd to
continue operation, ignoring all read errors and filling up input blocks with
zeroes in order for data offsets to stay in sync.
# dd if=/dev/sda of=/dev/sdb bs=64K conv=noerror,sync status=progress
Figure 27
Although configuration for comfortable everyday use and purposes of this project is complete, it will continue to be maintained and improved in the future. There is no limit to how much each element of the system can be made better. Faster performance, more aesthetic design, broader functionality — all of this can and will be achieved over time. The purpose of this chapter is to outline the main areas of subsequent improvements.
Firstly, I will begin to work on some of the missing functionality that is not essential for system's operation but is nice to have. A pop-up notification system is one of them. In order to set it up, a standalone notification server first has to be implemented. There are many solutions available but one of the most popular is Dunst. After that the display messages can be automized and customized using the programming language of choice. Figure 28 shows how a simple Bash script that send a 'Hello world!' notification may look like.
hello_world.sh
---------------------------------------------------------------------------------------
#!/bin/bash
notify-send 'Hello world!' 'This is an example notification.' --icon=dialog-information
Figure 28
Another missing feature is a sleep mode. When the lid is closed or the user is inactive there could be three different scenarios, the laptop is either suspended to:
- RAM
- Disk
- Both
Each method has pros and cons. For example, when the machine's state is recorded to RAM it can then be resumed very quickly (withing seconds), however the battery may still be depleted. On the other hand, disk suspension has zero power consumption as the machine is completely powered off. The downside is that it is much slower because generally even the fastest SSD is slower than the slowest RAM. The hybrid method suspends the machine to RAM but does not power it off unless the battery is depleting. In that case, it is suspended and then resumed from disk. I believe this method is the most versatile, therefore I tried setting it up in the past. However, upon encountering some complications due to encrypted swap space (see Security chapter) this feature was postponed to be implemented in the future.
Secondly, the performance can always be better. The laptop I use has a discrete GPU, which is currently not utilised in the most efficient manner. For instance, hardware video acceleration can allow for the video card to decode/encode video, thus making it smoother, offloading the CPU and saving power. To increase the lifespan of the disk it is possible to reduce the number of reads/writes to it, for example, by relocating files to a tmpfs file system. Furthermore, both the CPU and GPU can be overclocked, i.e. their computational performance can be improved by increasing the peak clock frequency. Although this practice must be used with caution, as exceeding the clock rate certified by the manufacturer may result in permanent hardware damage.
Lastly, there are limitless possibilities to improve the overall look and design of the system. A case in point, there are various patches that can be applied to DWM to customise the appearance of the windows and status bar. A different fork of Picom (e.g. by Jon Burga) can be installed in order to introduce features such as window transparency, shadows, animations, etc. The appearance of the terminal and everything within it (command prompt, text editor, other CLI applications) can be improved with corresponding plugins, and to make use of the currently empty desktop area, an application for monitoring system's performance, such as Conky, can also be installed.
Footnotes
-
https://www.tutorialspoint.com/operating_system/os_overview.htm ↩
-
https://www.gnu.org/philosophy/free-sw.en.html#four-freedoms ↩
-
https://www.rackspace.com/en-gb/blog/realising-the-value-of-cloud-computing-with-linux ↩
-
https://www.computerhope.com/jargon/d/desktop-environment.htm ↩
-
https://www.techopedia.com/definition/10043/window-manager ↩
-
https://sgfault.com/post/2016/8/2016-08-22-display-server-primer/ ↩
-
https://wiki.archlinux.org/title/Synchronization_and_backup_programs#Important_considerations ↩