文字生成卡片(图片)以及图片处理的 API 工具
本项目属于 “生产者” ,接收参数,提供内容,支持上层建立图片相关的App。
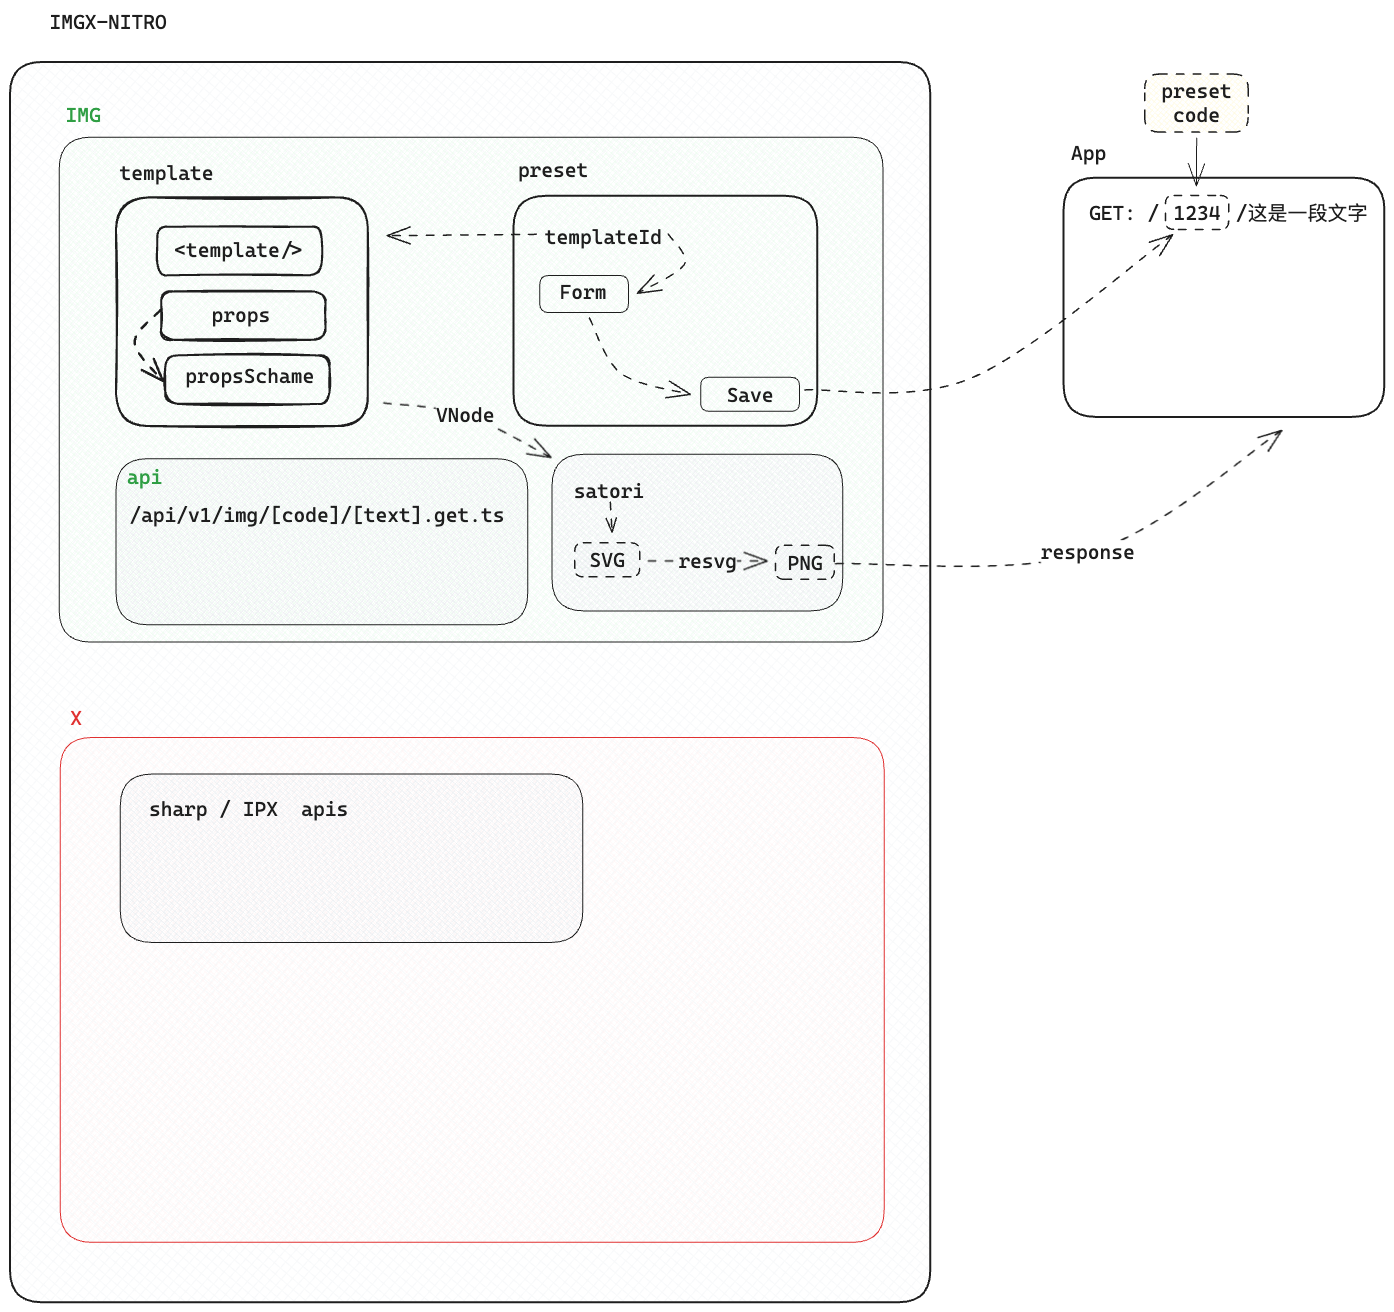
API分为两条主线:
IMG生成图片- 如:
POST /api/img/xxxx - 如:
GET imgx.zzao.club/[预设码]/内容文字文字内容
- 如:
X裁剪、拼接、压缩图片
API格式: GET https://imgx.zzao.club/[预设码]/[文字内容]?[样式参数]=xxx
如: https://imgx.zzao.club/008/吾身所立,即是幽都/幽都/秦凤青?titleSize=60
template:
<div class="flex w-full h-full" :style="{ backgroundColor: bgColor }">
  <div class="flex flex-col w-full h-full items-center justify-center" :style="{ padding: padding + 'px' }">
    <div class="flex w-full justify-center items-center mb-4">
      <div class="flex text-center font-bold" :style="{ color: titleColor, fontSize: titleSize + 'px' }">
        <span v-if="title.includes(highlightText)">
          {{ title.split(highlightText)[0] }}
          <span :style="{ color: highlightColor }">{{ highlightText }}</span>
          {{ title.split(highlightText)[1] }}
        </span>
        <span v-else>{{ title }}</span>
      </div>
    </div>
    <div class="flex w-full justify-center items-center mb-6">
      <div class="flex text-center" :style="{ color: subtitleColor, fontSize: subtitleSize + 'px' }">{{ subtitle }}</div>
    </div>
    <div class="flex w-full justify-end items-center">
      <div class="flex" :style="{ color: authorColor, fontSize: authorSize + 'px' }">{{ author }}</div>
    </div>
  </div>
</div>
props
{
  "title": "深入理解Vue3组合式API及其最佳实践",
  "highlightText": "Vue3",
  "highlightColor": "#42b883",
  "subtitle": "探索现代前端开发的新范式",
  "author": "@前端技术专家",
  "bgColor": "#1e40af",
  "titleColor": "#ffffff",
  "subtitleColor": "#e5e7eb",
  "authorColor": "#e5e7eb",
  "titleSize": 36,
  "subtitleSize": 24,
  "authorSize": 18,
  "padding": 40
}
然后在预设中 props 会分成三部分存储:
contenProps: {
    "title": "深入理解Vue3组合式API及其最佳实践",
    "highlightText": "Vue3",
    "subtitle": "探索现代前端开发的新范式",
    "author": "@前端技术专家",
}

styleProps: {
   "highlightColor": "#42b883",
   "bgColor": "#1e40af",
   "titleColor": "#ffffff",
   "subtitleColor": "#e5e7eb",
   "authorColor": "#e5e7eb",
   "titleSize": 36,
   "subtitleSize": 24,
   "authorSize": 18,
   "padding": 40
}

contentKeys: "title,highlightText,subtitle,author"
所以 GET 请求的格式为 https://imgx.zzao.club/008/{title}/{highlightText}/{subtitle}/{author}?bgColor=xxx&titleColor=xxx
传入的 /{title}/{highlightText}/{subtitle}/{author} 部分会按 / 分割出来,然后按 contentKeys 的顺序映射到 customContentProps 上,query 部分则是直接解析出来 customStyleProps。
然后 customContentProps 和 customStyleProps 会分别与默认的 contentProps 和 styleProps 合并,没有传入的值就会使用预设的值
当然!正常实际使用是有一串的参数的,预设的目的就是把样式固定下来,只传内容进去。
所以只需要自己上传一个模板,或是使用别的人的模板,再修改尺寸和样式,就能变成自己的预设了!
- node >= 18.18.0
- pnpm
- mysql
- redis
redis 配置在 nitro.config.ts
docker.compose 配置文件见 docker.compose.example.yml
npx prisma migrate devpnpm devpnpm build打包后的 .output 即全部依赖文件,无需再 install node_modules
将 .output 上传到服务器指定目录
在服务器安装 pm2
pm2 start pm2.config.yml注意:pm2 配置文件 pm2.config.yml 中的 imgx-ipx 和此项目的定时任务有关,可以查看此文件。
用于单独处理预设图片,图片转换格式、压缩图片等。
如果不需要,可以注释掉: nitro.config.ts 中的这部分
scheduledTasks: {
    "0 0,12 * * *": ['img:gen']
}发邮件给我:gnakzz@qq.com
添加微信好友 (请备注 IMGX):