Krypton is a cluster made of 8 nodes in total. Each node has 28 cores (cpus). This emans that we have 224 cores available in total (for comparison, the MacPros have 24 cores each). This cluster is shared with all the groups in the LMS. However at the moment very few people are using it, so most of the times all the cores are available.
You can find some more information on the system here. You should read it if you plan to use Krypton.
You can interact with Krypton with a ssh shell.
You cannot connect to Krypton directly from outside the LMS network, even if you're on the VPN.
You'll need to contact the LMS IT and ask them to give you access to the Terminal Server. They will configure that for you, and help you set up PuTTY so you can connect to Krypton, following the instructions below, via the Terminal Server.
Open a terminal in your local machine and login to krypton, using the command:
ssh krypton.cscdom.csc.mrc.ac.ukIf you login from a machine other that your own computer (for example from one of the MacPros), use:
ssh $user@krypton.cscdom.csc.mrc.ac.ukwhere $user is your username. You will be asked to give your password.
You are now in your personal home directory in Krypton /mnt/storage/home/$user$/
To analyse data on Krypton, first you'll need to copy your data to your home directory on it. There are a few commands and method that you can use. Below we'll see some examples for the most common cases. \
Open a terminal in your local machine. To copy a file pathlocal/file.ext from your local machine to a folder pathkrypton in your home directory in Krypton use one of the following commands:
scp pathlocal/file.ext $user@krypton.cscdom.csc.mrc.ac.uk:pathkrypton/
rsync pathlocal/file.ext $user@krypton.cscdom.csc.mrc.ac.uk:pathkrypton/
There are many options you can use with any of these two commands (for example you can recursively copy entire folders), and you can read about them by typing in your terminal:
man scp
man rsync
You can copy things from krypton to your local machine in the same way:
scp $user@krypton.cscdom.csc.mrc.ac.uk:pathkrypton/file.ext pathlocal/
rsync $user@krypton.cscdom.csc.mrc.ac.uk:pathkrypton/file.ext pathlocal/First, make sure you have mounted the group share to your local machine (Finder -> Go -> Connect to Server -> connect to the group share).
Then run one of the following commands, using the appropriate paths:
scp /Volumes/behavgenom$/path/file.ext $user@krypton.cscdom.csc.mrc.ac.uk:pathkrypton/
rsync /Volumes/behavgenom$/path/file.ext $user@krypton.cscdom.csc.mrc.ac.uk:pathkrypton/You can contact IT and ask them to help you mount the group shares directly in your Krypton home.
This is not meant to be a way to copy large amount of data to and from the group share, and it comes with some risks about the integrity of behavgenom.
It is therefore important that IT is aware this is happening, and that they give you all the relevant advice.
Note that it is not possible to process data directly from the group share without copying it in the Krypton home first.
This is a summary of the steps one needs to take to run Tierpsy in Krypton.
Here we assume that you are logged into Krypton
You should install Tierpsy Tracker from source in a virtual environment.
The process is very similar to the one explained in Tierpsy's github repo, but with the instructions below you can use an environment .yml file that has been tested on Krypton before, and, crucially, installs cookiecutter for you.
On Krypton:
cd ~
module load Anaconda3  # this makes conda available
git clone https://github.com/Tierpsy/tierpsy-tracker
On your local machine, making sure behavgenom$ is mounted:
scp /Volumes/behavgenom$/Documentation/Krypton_Tierpsy/tierpsy_krypton.yml $user@krypton.cscdom.csc.mrc.ac.uk:tierpsy-tracker/Finally back on Krypton:
cd ~/tierpsy-tracker
conda env create -f=tierpsy_krypton.yml
source activate tierpsy
pip install -e .
Tierpsy is now installed.
Finally, you should create a temporary folder in your Krypton home that Tierpsy can use for processing:
mkdir ~/TmpHere we assume you're logged into Krypton, and that Tierpsy Tracker and cookiecutter are already installed on Krypton, in a conda env named tierpsy.
To create the project directory tree, on Krypton:
cd ~
module load Anaconda3  # whenever you log in
source activate tierpsy  # unless the prompt already shows (tierpsy)
cookiecutter https://github.com/Tierpsy/RemoteTierpsyKrypton.git
Then insert your github credentials, and the project name as prompted.
This will be appended to the word tierpsy_, e.g. if project_name is myproject,
the working folder will be made in ~/tierpsy_myproject/.
The project folder will also be automatically inserted in all the right places in the various scripts that are needed to run the analysis on Krypton (see the next section for more details).
The working folder created will contain 6 subfolders:
RawVideos: standard Tierpsy folder that will contain the microscope videosMaskedVideos: standard Tierpsy folder where the masked videos will be putResults: standard Tierpsy folder where the skeletons and features files will goAuxiliaryFiles: standard folder for metadata, pre-populated with a standard json file with Tierpsy parameters for Hydra videosworkspace: Krypton specific folder, contains scripts for batch processingsummarizer: Krypton specific folder, contains scripts for collecting the features' summaries
Once the directory tree has been created,
copy the raw videos from the network share to RawVideos.
You can do that from any computer that is physically on the LMS network,
with scp. E.g. (modify your username, and the project folder):
scp -r /Volumes/behavgenom$/myproject/RawVideos/20210504 $user@krypton.cscdom.csc.mrc.ac.uk:tierpsy_myproject/RawVideos/You also need to copy any json file that you want to use to the AuxiliaryFiles folder, if that is different from the "standard" Hydra analysis (96WP, with Neural Network, no background subtraction).
When we use the Batch Process Files option in Tierpsy on a desktop or laptop, Tierpsy will automatically find all the files to analyse, and handle how individual files are assigned to individual cores to be processed.
In Krypton we need to do something similar: we create what is called a Job Array, i.e. a collection of tasks each of which will be executed by a single core. Each task is the processing of a single file. We then submit the Job Array to a Queue, and Krypton will start executing the individual tasks as cores become available.
However, since we do not have a graphical user interface, we need to do this with a few scripts.
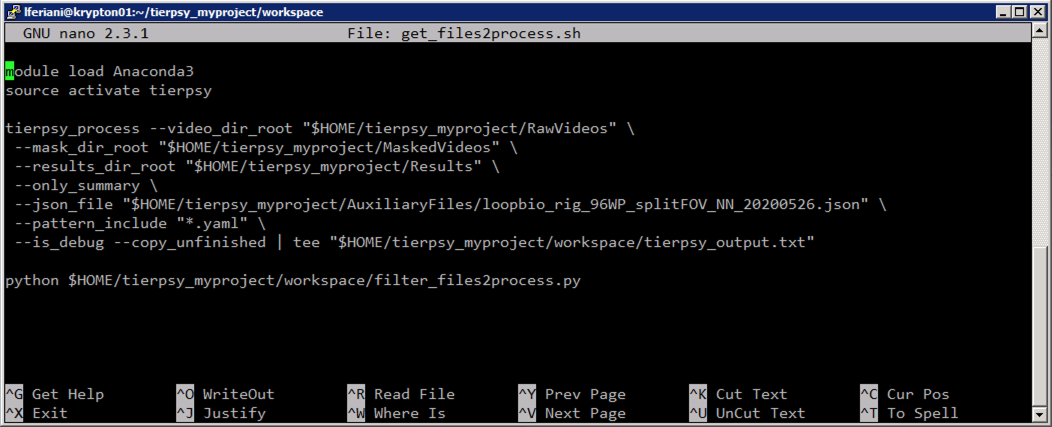
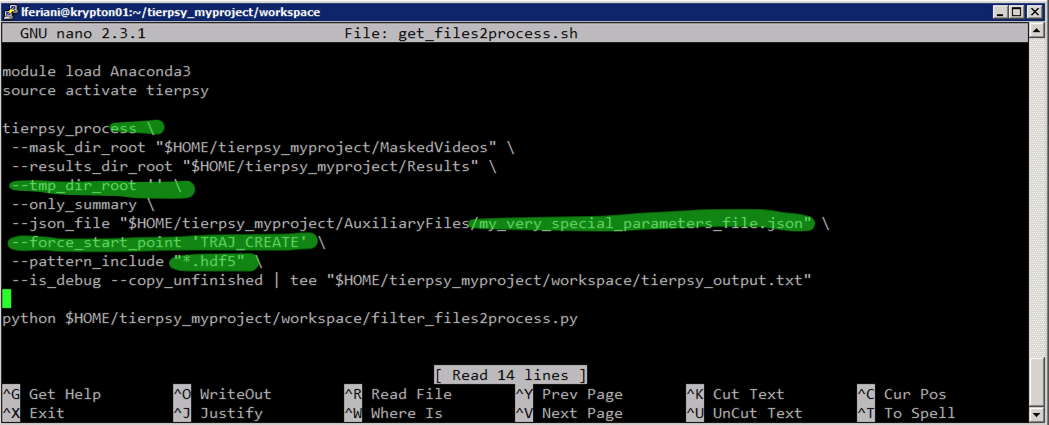
The first script to run is called get_files2process.sh. It will first scan the RawVideos folder looking for non-analysed videos, and save a very long output to the file tierpsy_output.txt. This file contains a list of individual commands that can be used to analyse the individual videos, and some summary information at the end. The script then parses the tierpsy_output.txt and saves the "cleaned up" list of individual commands into a different text file, files2process.txt.
Assuming our project folder is tierpsy_myproject:
cd ~/tierpsy_myproject/workspace
bash get_files2process.sh
This can take a few minutes.
You should not have to modify
get_files2process.sh, unless you either:
- want to analyse
MaskedVideosinstead ofRawVideos. In this case you need to:- erase the parameter
--video_dir_rootand its value- make Tierpsy look for
hdf5files:--pattern_include "*.hdf5"- add the parameter
--force_start_point 'TRAJ_CREATE'- want to use a different
jsonfile, in which case you'll need to change the path in the line that starts with--json-file- prefer not to use a temporary directory, in which case pass add this parameter:
--tmp_dir_root ''Remember you can alway access a full list of options for the command
tierpsy_processby typing:tierpsy_process --help
 |
 |
|---|
Now we need to know how many files need to be processed. You can read this with
tail tierpsy_output.txt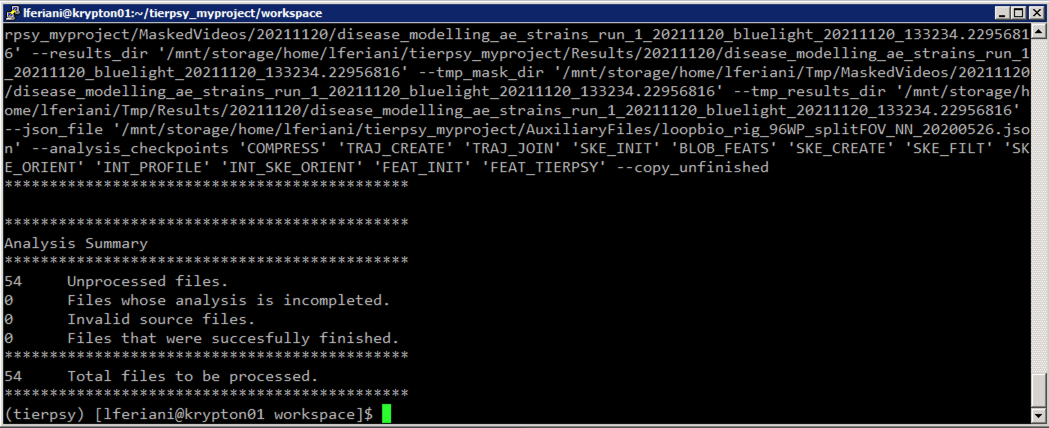
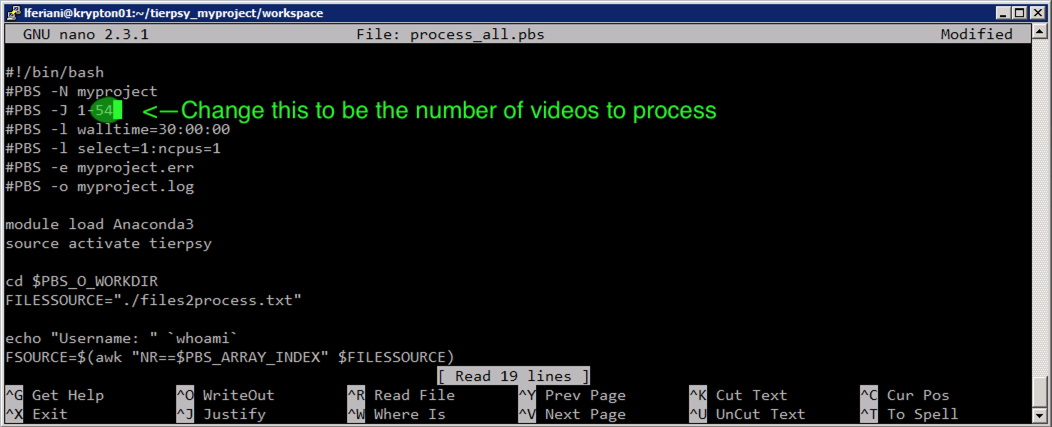
This value is the number of tasks Krypton needs to execute for us, and needs to be plugged into the process_all.pbs script. You can edit it with, e.g., nano:
nano process_all.pbsThen see the following screenshot for how to modify. Ctrl + X -> Y -> Enter to save the changes and exit.
At this point, we only need to send the Job Array to the cluster to run:
qsub process_all.pbs Your analysis is now running.
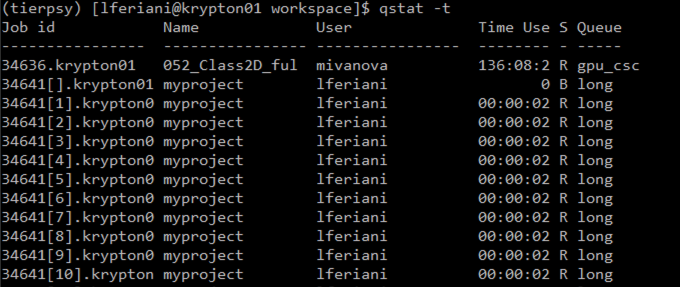
You can check the state of job array by running:
qstat
This checks the parent job

qstat -t
checks the individual jobs of the array. The number in the square bracked is the ID of the individual job inside the array. It ranges from 1 to the total number of files you are processing
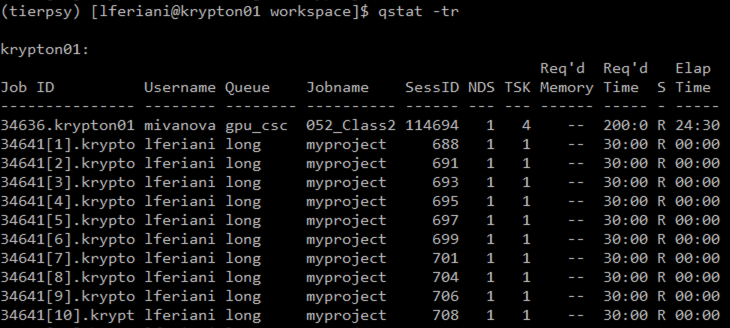
qstat -tr
lists only the running jobs
The progress of an individual job with array ID $N (i.e. the output that would be printed in the analysis window of the Tierpsy GUI) is printed in a text file output.$N in the folder pbs_output. Therefore to monitor the progress of individual tasks you can read the corresponding file, using for example
cat pbs_output/output.$Nor in alternativetail pbs_output/output.$N
from the workspace subfolder in the project folder.
When all jobs in the array have finished, it's a good idea to check that all videos have been processed properly. The easiest way is to re-run bash get_files2process.sh and checking that Tierpsy returns
***************************************
0   Total files to be processed.
***************************************
If the number is not 0, you can look inside the newly-modified tierpsy_output.txt which files still need to be analysed, and can try to investigate why their analysis failed by looking at the output.$n files.
Krypton is known to sometimes fail in the COMPRESS stage, with an error that I suspect is linked to a temporary drop in the connection between the cluster and the storage partition.
Simply restarting the analysis (after updating the number of tasks in process_all.pbs) usually works.
You can use Krypton to collect the feature summaries as well. By default the summarizer on Krypton creates summaries for each day of experiments, to speed up the calculations. You'll need to join these day-summaries using the appropriate functions from tierpsy-tools-python. You'll also have to change the paths so that they work on your local machine for downstream analysis.
Running the summarizer is very similar to processing the video files.
Briefly:
cd ~/tierpsy_myproject/summarizer: places you into the right directory- (Optional) Modify
calculate_feat_summaries.pyif you want to change the summariser parameters e.g. to add time windows and filters. bash get_cmd2process.shto create the list of commands for the queue. It will be one command per day of imaging.- In
process_all.pbs, modify the line that starts withPBS -Jso that the last number is the number of imaging days you're processing qsub process_all.pbs
When all files have been processed you should copy the MaskedVideos and/or the Results back to your local machine or the group share, with the commands seen in this section.
Make sure that both the input files you analysed AND the results are safely stored in your local machine or the group share and then delete them from Krypton.