This demo application shows radar-camera fusion by combining pointcloud with imagery to determine the distance to detected objects.
The system is composed of the AM62A74vision processor on its starter-kit EVM and the mmWave radar sensor IWR6843AOP. We use an off-the-shelf IMX219 module as the camera.
- Demo explanation
- Running the demo 2.1) Hardware setup 2.2) Software setup 2.3) Start the Demo
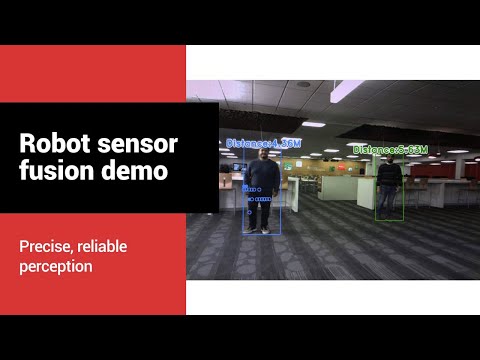
Detected objects are identified in the image with a deep learning object-detection model. The mmWave radar sensor is calibrated to project 3D points onto the image plane such that the distances to these points can be correlated to the image-coordinates of the detected object -- in this demo, we are detecting people and marking their distance. If a person is too close, a 'warning' is emitted by turning all visualized points and locations red.
For more detailed explanation, please see the Detailed Demo Explanation doc for how the demo works.
Please see the associated hardware setup guide. We used a 3D printed mount with threaded inserts to affix the EVMs and PCBs to a consistent location. This reduces the need for additional calibration between the mmWave radar and image sensor.
It is strongly recommended to flash the radar EVM prior to mounting.
At the end of this, the AM62A EVM should be connected to the camera with a 22-pin MIPI-CSI-2 ribbon cable and to the radar with a USB-A to micro-USB cable. View the hardware setup guide for images showing this.
Here we will describe the software setup process
We are using the IWR6843 AOP EVM running a people-tracking demo for better motion filtering and detection.
Please see the out-of-box user guide to understand how to configure and flash the EVM. For this demo, all that's needed is to flash a firmware binary to the device. See the quick-start steps for setting the EVM into flashing mode, flashing with Uniflash, and returning to functional mode. The demo visualizer is not necessary for the radar-vision fusion demo.
The binary under radar-firmware should be used to flash the EVM using UniFlash. Follow directions in the user's guide linked above. Ensure you power cycle / press the reset button before attempting to flash or after altering any physical switch.
- S3 switch on the back of the board should be flipped to the on (1) position
- Flashing with Windows -> Uniflash application was the most effective here. Flashing from linux/ubuntu encountered challenges.
- Use enhanced COM port / 1st enumerated port in Linux
- Once the firmware has been flashed, switch the S3 back to (0) and connect to the AM62A-EVM via USB
For more details on the IWR6843 firmware that runs 3D people tracking, please find more information TI resource explorer within the Radar Toolbox
Users are recommended to first view the quick-start guide for AM62A for general setup guidelines
This demo was developed and validated on the PROCESSOR-SDK-LINUX-AM62A for SDK version 10.00.00.08. It is strongly recommended to setup an SD card for the AM62A-SK EVM with 10.0 SDK version using the .wic.xz image.
Follow the quick-start guide to setup the SDK and login to the device as root. An ethernet connection is required
Connect cables:
- HDMI cable to 1920x1080 capable monitor
- CSI-2 cable to IMX219 camera -- see HW setup
- Connect USB-A to USB-micro for the radar IWR6483AOP EVM -- see HW setup
- Connect an ethernet cable with public internet access
- Connect USB-C power
- (optional) connect a USB-micro to the port nearest USB-c --> PC to establish serial/UART connection, but this can be replaced with ethernet->SSH connection. See quick-start guide for AM62A for details
- Clone this repository to the AM62A's SD card. This can be done from the EVM or from a host PC
- Connect to the EVM with a terminal over SSH, as described in the quick start guide for AM62A
- 'cd' in the the directory for this clone repository
- Run the setup_radar_vision_fusion_demo.sh script to install dependendencies and ensure the CNN AI model is installed (should be included in SDK by default)
- This only needs to be done once for a new SD card installation
Execute the script "run_radar_vision_fusion_demo.sh"
chmod +x ./run_radar_vision_fusion_demo.sh
./run_radar_vision_fusion_demo.sh
A systemd script is also useful for auto-starting this application upon boot. If so, make sure to call the init_script.sh before the actual demo runner script.
Alternatively, the demo can be run with the command:
python3 apps_python/app_edgeai.py ./configs/radar-vision-fusion-OD-demo_with_overlay.yaml -n -r
See the YAML config file to see how the input source is selected. IMX219 in 1640x1232 resolution is assumed.
- Please also note that the input will look mirrored (moving left in real world --> move right on the screen), unless the input configuration "mirror: lr" is included. However, this will increase latency