The crop recommendation software specified in this document is a self-contained product designed to address the evolving needs of modern agriculture. It serves as a standalone tool aimed at optimizing crop selection and cultivation practices based on environmental parameters. Developed as a response to the increasing demand for sustainable farming solutions, this software offers a holistic approach to crop management, leveraging data analytics and machine learning algorithms to provide tailored recommendations to farmers.
Product Perspective: This crop recommendation software operates within the broader context of precision agriculture, which encompasses various technologies and practices aimed at maximizing efficiency and productivity in farming. Additionally, it may integrate with existing farm management systems to streamline data exchange and enhance user experience. The software functions as an intelligent advisor, offering insights and recommendations to farmers, ultimately contributing to improved crop yields, resource conservation, and sustainable agricultural practices.
These instructions will get you a copy of the project up and running on your local machine for development and testing purposes.
Before you start, you need to have some basic software installed on your computer.
Python is a programming language used for the backend of our website. You can download and install Python for free from here. Python version 3.9 is recommended.
Node.js is a JavaScript runtime used for the frontend of our website. You can download and install Node.js from here. Just click on the "Recommended For Most Users" button to download the installer.
Docker is a tool used for running applications in containers. If you're not familiar with containers, don't worry! It just helps us run our website smoothly. You can download and install Docker from here.
Our website relies on some other software packages to work properly. We'll install these in the next section.
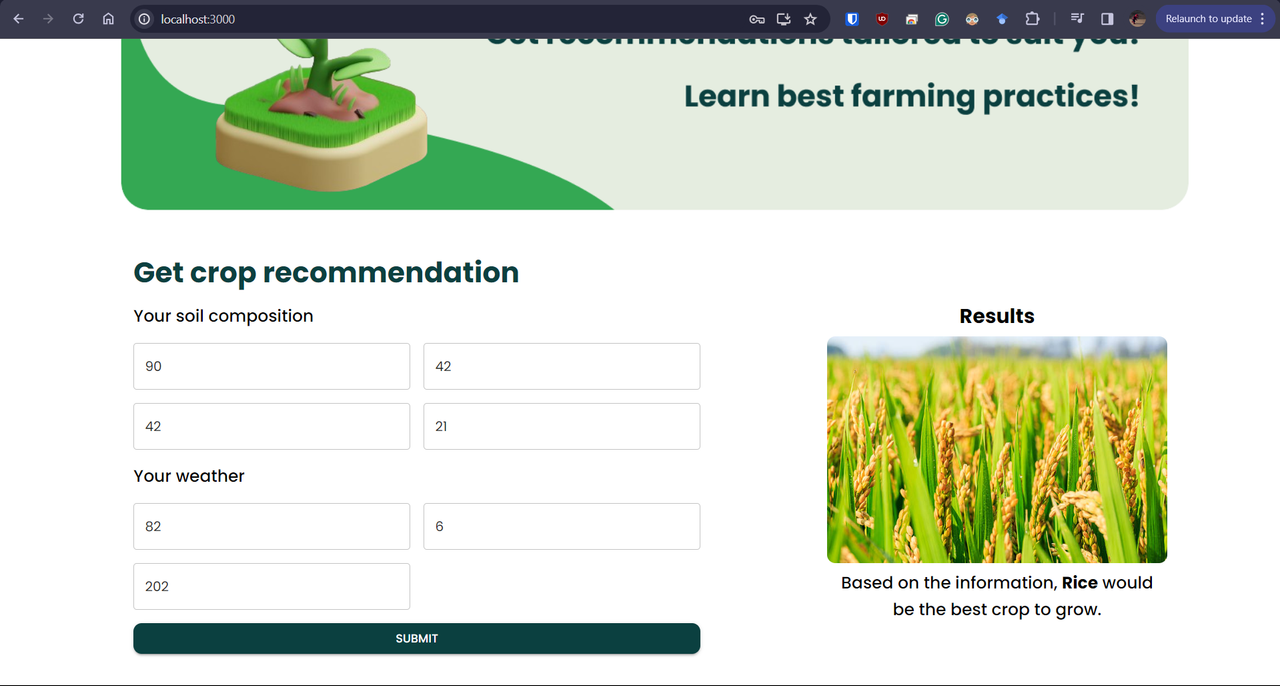
Our website helps farmers decide which crops to plant based on factors like Nitrogen level, Phosphorus level, Potassium level, Temperature, Humidity, pH level, and Rainfall. It's like having a virtual agricultural advisor at your fingertips!
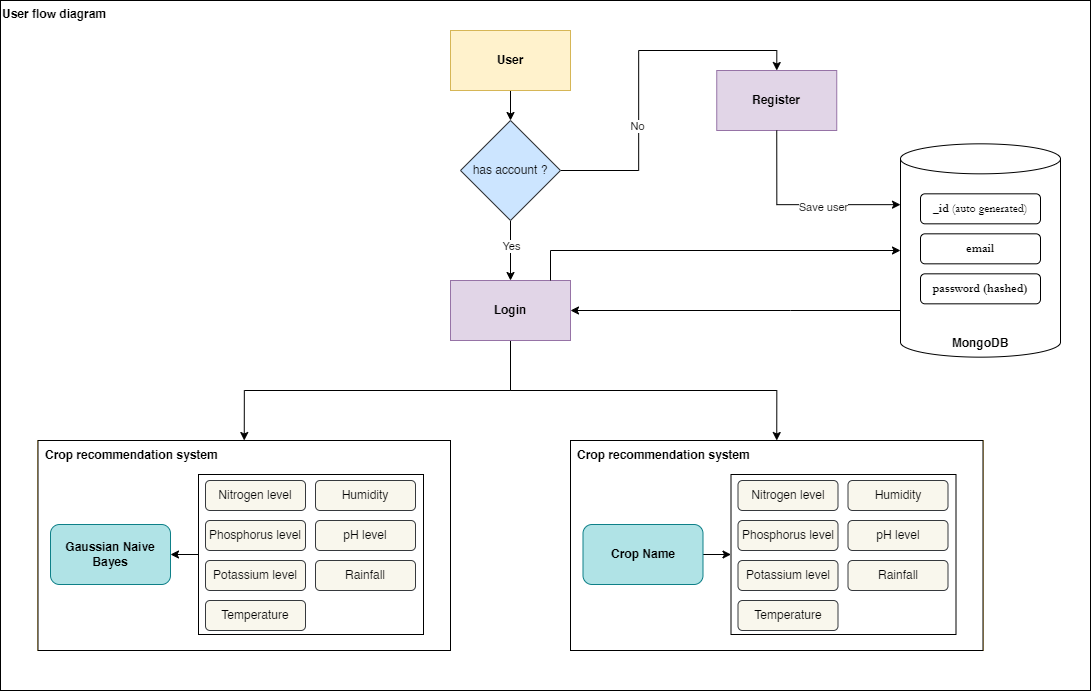
In the above user flow diagram, the user will first needs to log in to the website. If the user is not registered, then the user needs to create an account.
Once the account is created, the user will have access to the crop recommendation and ideal composition services. The user can choose any service and fill the respective form.
The algorithm is based on the Gaussian Naive Bayes algorithm. Gaussian Naive Bayes is a simple yet effective machine learning algorithm used for classification tasks. It's particularly useful when dealing with continuous features and assumes that the features follow a Gaussian distribution.
- React.Js - The web framework used for frontend
- Django Rest Framework - The web framework used for backend. It contains SimpleJWT token based authetication for maintaining sessions.
Note: Since the bacekend APIs use token authentication, it is important to pass bearer/access token in request header.
The URLs mentioned with the page title will work after the application is in hte running phase. To run the website, follow the steps in Running the appliation section.
-
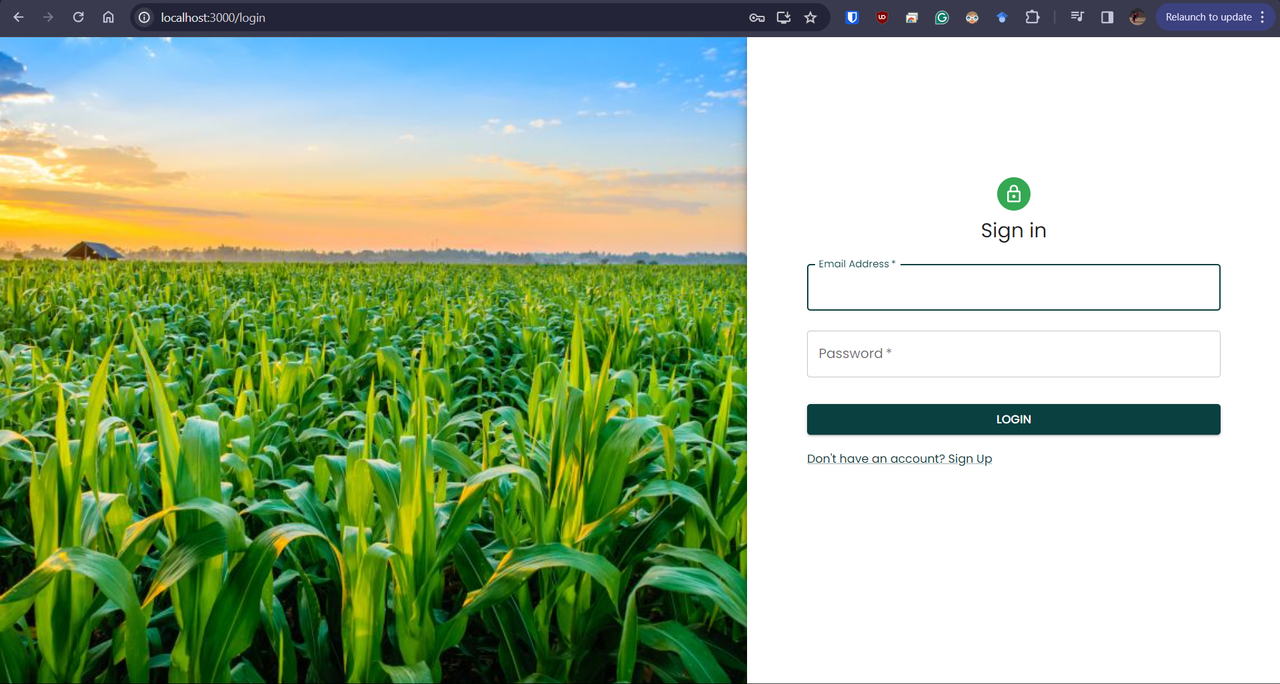
LogiIn Page (http://localhost:3000/login)
-
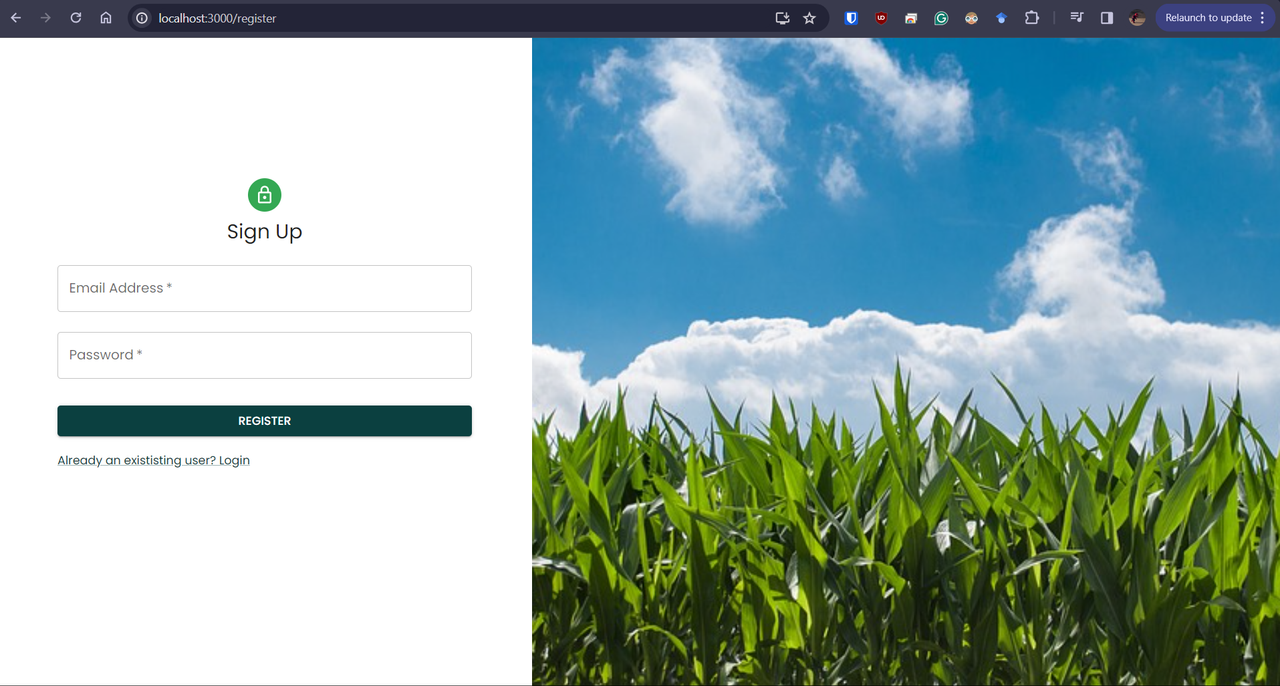
Signin Page (http://localhost:3000/register)
-
Home Page (http://localhost:3000/)
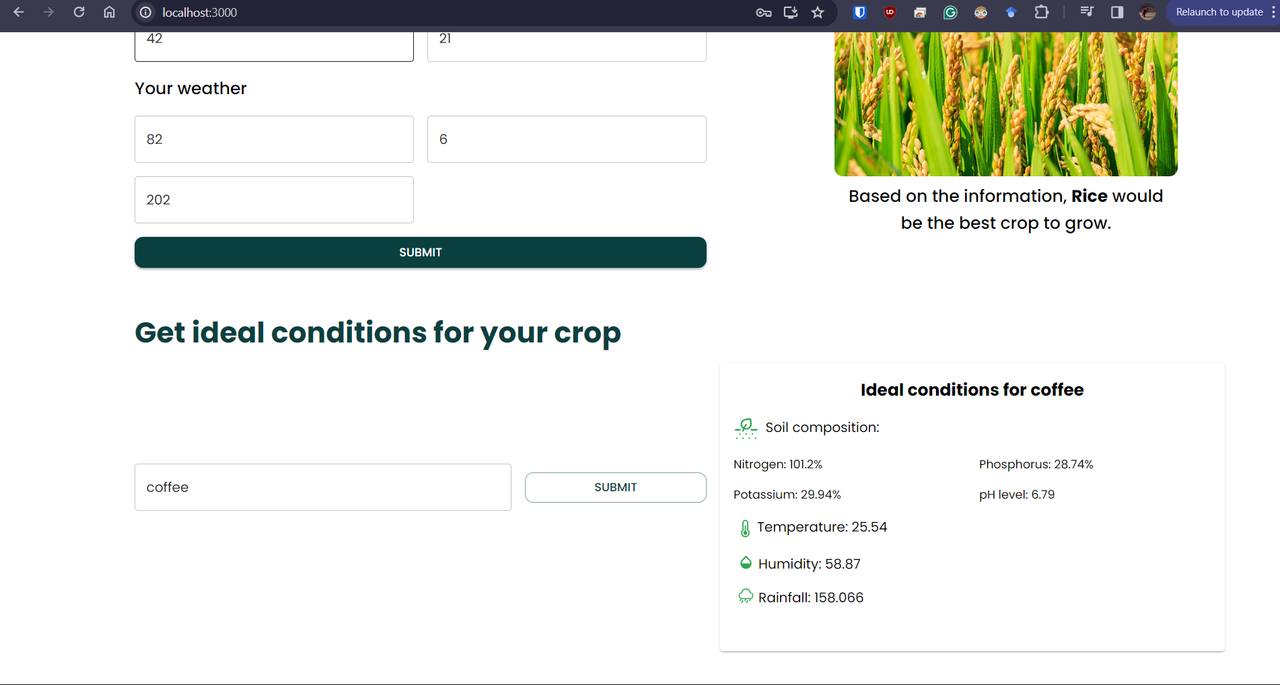
3.1. Crop recommendation
3.2 Ideal value of factors for a crop

You can visit the user manual and access the user manual. Or if you want a user manual pdf, you can download the manual from this link
Context This dataset was build by augmenting datasets of rainfall, climate and fertilizer data available for India.
Data fields
- N : ratio of Nitrogen content in soil
- P : ratio of Phosphorous content in soil
- K : ratio of Potassium content in soil
- temperature : temperature in degree Celsius
- humidity : relative humidity in %
- ph : ph value of the soil
- rainfall : rainfall in mm
| Label | Count |
|---|---|
| rice | 100 |
| maize | 100 |
| jute | 100 |
| cotton | 100 |
| coconut | 100 |
| papaya | 100 |
| orange | 100 |
| apple | 100 |
| muskmelon | 100 |
| watermelon | 100 |
| grapes | 100 |
| mango | 100 |
| banana | 100 |
| pomegranate | 100 |
| lentil | 100 |
| blackgram | 100 |
| mungbean | 100 |
| mothbeans | 100 |
| pigeonpeas | 100 |
| kidneybeans | 100 |
| chickpea | 100 |
| coffee | 100 |
Detailed API documentation can be found here: API Documentation
Now, let's get our website up and running!
- Clone the repository:
First, we need to download the files for our website onto our computer. You just need to open command prompt and type in some commands.
git clone <repository_url>
The backend of the website which is built on Django Rest Framework will require a .env file. This file will contain the "SECRET_KEY" of Django Rest Framework as well as MongoDB connection string.
You can either use an online mongodb cluster connection string or if you are usign docker, then you need to add mongodb://mongo_db:27017 to assign you mongodb connection string this value.
A sample Django Secret Key value is provided in the .env-example file. You can uncomment the line below "Example Secret Key" in your .env file.
An example of .env file can be found at: /backend/.env-example. You need to create a new file named .env name copy the content of .env-example to it. Then you need to add values for the fields.
NOTE: By default MongoDB connection string is "mongodb://mongo_db:27017" which will work if you are using Docker to deploy it.
If you want to know more about online MongoDB database, you can visit MongoDB Atlas.
- Build and run the Docker containers:
If you installed Docker earlier, this step will be super easy! Just type in one command, and Docker will take care of the rest.
docker-compose up --build
Now, you should be able to see our website by typing http://localhost:3000 into your web browser!
- Navigate to the project directory:
After cloning, we need to go to the folder where our website files are saved.
cd JTP-TechnicalProject
- Install backend dependencies:
Next, we'll install some additional modules that our website needs to work properly. To do this, run the following command in the command prompt.
-
cd backend -
pip install -r requirements.txt
NOTE: If the above command gives errors, try:
python -m pip install requirements.txt
- Install frontend dependencies:
To install frontend dependencies, either open a new terminal, or run command cd.. and then once you are in the root folder, run the following command in the command prompt.
-
cd frontend -
npm install
Open 2 terminals, one for backend and one for frontend. In one of the terminal, go to backend directory using the command cd backend.
- Start the backend server:
If you prefer not to use Docker, that's okay too! We can start the backend server and frontend server separately.
python manage.py runserver
In second terminal, go to frontend directory using the command cd frontend.
- Start the frontend server:
Open another command prompt window, and navigate to the frontend folder inside our project folder.
cd frontend
npm start
Now, you should be able to see our website by typing http://localhost:3000 into your web browser!
-
Error: Docker containers fail to build.
-
Solution: Make sure Docker is properly installed and running on your computer. If you're not sure, you can find more information here.
-
Error: Backend server fails to start due to missing dependencies.
-
Solution: Double-check that you followed all the installation steps correctly. If you're still having trouble, you can ask for help on our community forums.
-
Error: Frontend server fails to start due to missing or corrupted node modules.
-
Solution: Make sure you're inside the
frontendfolder when you run thenpm installcommand. If that doesn't work, try deleting thenode_modulesfolder and runningnpm installagain.