Author:
Department: 4-th year, Electrical Engineering Department, National Taiwan University
Advisor: Professor Sheng-De Wang
Github repo: https://github.com/NTUEE-ESLab/2019-AwesomeAlarm
Mbed repo: https://os.mbed.com/users/yungsung/code/AwesomeAlarm_BLE/
Slide: https://docs.google.com/presentation/d/1IQKsBf2jPfg-3wsu4O3Ukr4jt6mabXckDCMN17Xowb4
Report: https://github.com/NTUEE-ESLab/2019-AwesomeAlarm/raw/master/report.pdf
Demo video:
- video 1 (at our lab): https://www.youtube.com/watch?v=qOvSRf1jk_Y
- video 2 (at the classroom): https://www.youtube.com/watch?v=w6Upcsi6-Ec
Project date: January 2020
In this project, we have successfully developed a creative alarm called "Awesome Alarm". By using Awesome Alarm, the user can wake up easier and with more fun! We integrated several sensors for STM-32 to enable the user to be waked up by light, instead of disturbing ringing which may annoy your roommates. The alarm can be easily set by Android App. Awesome Alarm is made up by an STM32 Discovery IOT board.

To some of us, sleep is a luxury, a hobby or a favorite pastime. A common problem for almost everyone would probably be to wake up in time! Be it for work, class, meetings, or the day’s activities, the alarm clock is a must-have item in the bedroom. However, we are bored with the mundane ringing, hand-sized clocks that we can easily throw out the window to shut up, we decided to develope a innovative and effective alarm full of funs.
As the below figure shows, the Awesome Alarm can be highed above the bed and let the ultrasonic sensor point the region around the head. Set the alarm by the app, and it will wake you up then with light point emitting to your face. You can turn off the alarm by getting up and using the laser gun to shoot the light sensor at the center of the target circle pad.

The below shows the flowchart of Awesome Alarm. An ultrasonic sensor connected to the STM32L475 board (Discovery kit IoT node, called STM32 thereafter) are used to detect the position of the head. Then STM32 controls the steering engine (and the flashlight equipeed on it) to point to the head. STM32 is connected to the cellphone through BLE, and the user can set the alarm time. When the time is up, the alarm rings. Once the light sensor connected to STM32 receives the light emitted from the laser gun.

| Ultrasound Sensor HC-SR04 | Servo motors (MG996r) x2 | Digits Display (TM1637) |
|---|---|---|
 |
 |
 |
| Light Sensor (PhotoResistor) | Buzzer | Big LED x9 |
 |
 |
 |
We used 3D printer to make out the outer casing of the alarm, and fixed the steering engine to the case, as shown below.
| Front view | Side view |
|---|---|
 |
 |
We use the ultrasound distance sensor HC-SR04 to scan the distance to the bed in every angle before the user go to bed. When the user needs to wake up, it scans again to find the position where the distance decreases the most. The distance decreases means the user's head is there. A flashlight and buzzer sound appear directly to user's head. If the returned value is too short (sensor is not stable in sometimes), we detect the distance again.

In our program, the STM32 board needs to do many things at the same time, so we use threading to handle all the timing overlapping in differenct functions. For example, the BLE boardcast and timer are running in all time, which use two threads to run. The same situation happened among buzzer and light sensor and the ultrasound sensor. When the user sets a wake up time, the digits display, driven by a semaphore, will stop display time. And the countdown time (in seconds) will get the semaphore to display itself on the digits display.

We use a light sensor, which have a photoresister on it, to detect the laser emitted by the user's laser gun. Under normal light, the sensor would return values ranging from 200 to 500. When a powerful laser is emitted to it, the return value would drop to <100. We sets the threshold to 100 to distinguish whether the user successfully shots the target.

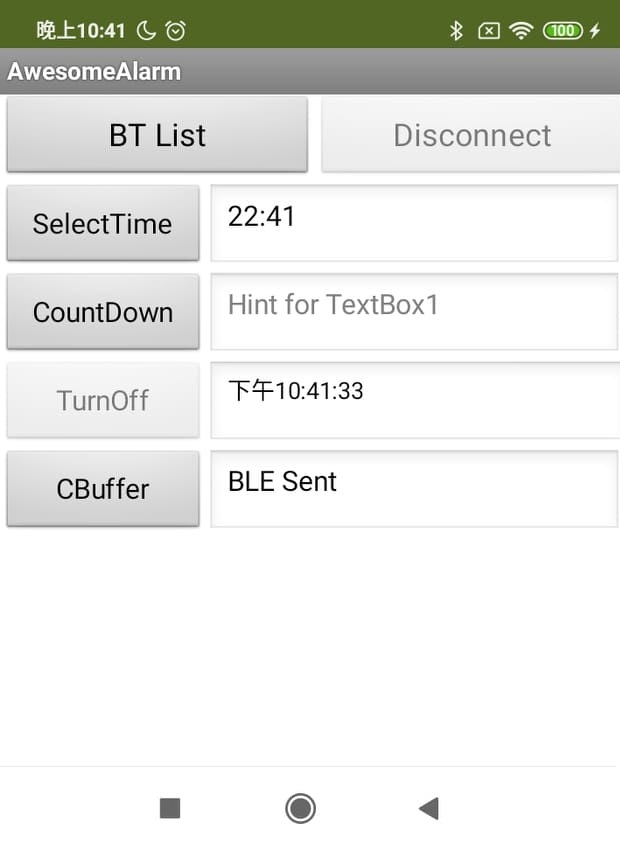
The below figure shows the designed app interface. The user can click "BT List" button to scan and connect the alarm. Click "Disconnect" to disconnect the alarm. Click "Select Time" to set the alarm time. Click "CountDown" to use countdown function. When the alarm rings, click "TurnOff" to turn off the alarm.
- Go to mbed online compiler https://os.mbed.com/ide/
- Import our code at https://os.mbed.com/users/yungsung/code/AwesomeAlarm_BLE/
- Compile! Burn the binary into STM32.
- install the Android app with the APK file
/android_app/ES_Final.apk
-
Difficulty of Integration of Several Sensor
- In this project, there are many sensors connected to STM32. We need to find suitable library for each sensor and optimize them respectively.
-
Difficulty of Detecting Head Position
- The head position detection is not a easy task. Firstly, We tried to use infrared sensor to detect the head by the Infrared Radiation (紅外線) emitted by human, but we encountered a big problem. Most off-the-shelf infrared sensors are designed to detect the motion by simply computer the difference value along time (while a absolute infrared radiation value is not stable in non-static environment). However, when people are static (e.g. sleep), the sensor can't send out positive value to indicate that. We find there is no sensor can achieve our goal.
- After that, we wanted to use a camera to detect the head by taking images and using face recognition (with OpenCV). We planned to achieve this by equipping a camera to STM32 and adopt real-time human-head detection algorithm. However, it is difficult to connect cheap camera module like ov7670 to STM32. Of course, we can use expensive module like Arducam, but it cost more than NTD 1000. The use of expensive materials contradicts the price advantage of STM32 board over RPi.
-
Difficulty of Control Steering Engine Precisely
- The steering engine we used is composed of two servo motors (MG996r). In experiments, we found that it is difficult to precisely control the degree of rotation. We noted the reason is that the voltage signal sent from STM32 to the motor is not quite suitable for the motor model we used. To address the issue, we addjusted the pulsewidth with an empirical offset and scaling. The result is satisfactory.
-
Difficulty of Bluetooth Connection
- We have implemented two version using classical bluetooth can BLE respectively, and we encountered problems for each version.
- For BLE version, we found that it is difficult to connect STM32 to the app developed by MIT App Inventor through BLE.
- Because we developed the apps with MIT App Inventor, and we noted that HC05/HC06 are most-frequently used bluetooth modules. Therefore, we decided to adopt HC05 for classicial bluetooth version. However, HC05 uses UART to communicate. But UART pins of STM32 is occupied when it is connected to the computer. That is, we can't connect HC05 and debug at the same time. We finally came up with the solution by connecting HC05 to another Arduino Uno board and then connecting STM32L475 with UNO through the use of I2C protocal.
To sum up, we solved lots of problems, including integrating several sensors and mortors, head position detection, and APP-STM32 communication. And we not only test developed the code theoretically but also made a prototype of Awesome Alarm.
- Demonstration video as link:
- https://www.arduino.cc/en/Reference/ArduinoBLE
- https://www.arduino.cc/en/reference/wire
- https://os.mbed.com/docs/mbed-os/v5.15/introduction/index.html
- https://appinventor.mit.edu/explore/ai2/tutorials
- Digits Display: https://os.mbed.com/users/wim/code/TM1637/
- Servo Motor MG996: https://os.mbed.com/users/simon/code/Servo/
- Ultrasound Sensor HC-SR04: https://os.mbed.com/users/Nestordp/code/HC-SR04/
- Buzzer: https://os.mbed.com/users/Reniboy/code/buzzer/