VisionTool: a toolbox for semantic features extraction
VisionTool is a python toolbox for pose estimation on videos containing actions. It is powered with a simple and intuititive Graphical User Interface (GUI) to allow a complete analysis from annotation to semantic features detection (e.g., joint position estimation).
To install VisionTool you can use
pip install -e git+https://github.com/Malga-Vision/VisionTool.git#egg=VisionTool
Alternatively, you can download the code folder, and install the requirements reported in file requirements.txt.
The toolbox compatibility is ensured and tested with python version 3.7.0
We suggest to create a virtual environment with such version of python and install VisionTool inside the created environment.
- if you are using anaconda, to create a virtual environment use:
conda create -n VisionTool python=3.7.0
VisionTool is a multi-platform toolbox, it is compatible and been tested on Ubuntu, Windows and MacOS.
However, if you are using Ubuntu, you may experience problems in the wxPython package installation. There are two possible fix:
- use anaconda. First, create a virtual environment:
conda create -n VisionTool python=3.7.0
and then install wxPython from conda with:
conda install -c conda-forge wxPython
Finally, run the installation command again for VisionTool
pip install -e git+https://github.com/Malga-Vision/VisionTool.git#egg=VisionTool
- otherwise, you can install the library Wx prior to VisionTool, following the instructions in https://wxpython.org/blog/2017-08-17-builds-for-linux-with-pip/index.html.
To open VisionTool main GUI, open python and use the following lines of code (you may need to cd in the correct folder before (~/src/visiontool)):
    from VisionTool import main
    main.main()
If you are using MacOS, open pythonw.
Alternatively, you can use a Python IDE and run the file main.py.
VisionTool is expected to be run using the main GUI (as described in section Visiontool running).
However, we uploaded a set of tests for VisionTool that can be run outside of the main GUI, as single code instructions.The aim of such tests is to provide an example of Visiontool's workflow on a sample video included in the repository and automatically downloaded after installation. The file test.py in test folder contains the line of codes necessary to perform the example test. For the analysis of the sample video, we uploaded a set of possible annotations so that training and prediction may be directly tested. You can run the test.py file for an example of working pipeline. Or you can run the single instructions within python. In the latter case, you first need to import the Test_lib module from VisionTool, so open python and then run:
from VisionTool.Test_lib import test
Then use the next lines of code to perform correspondent operations.
# initialize the test object

test = test()

# create a new project

test.new_project_routine()

# load the video provided, load the provided sample annotations, and perform frame extraction

test.Load_Videos()

'''
the next line will open the GUI. By selecting 'annot. only' and scrolling the frames
it is possible to see the annotated frames. Click 'Save' and close the window and continue
with the next line of code. If you wish, you can modify the existing annotations or
add more to improve precision in prediction).
'''

test.view_annotation()

'''
set the preferences for the neural network prediction (at the end press Ok)
for the included sample video, we suggest to try EfficientNet architectures with a
minimum batch size = 5 to obtain a better prediction

'''

test.preferences_annotation()

# perform training and prediction
test.check_and_train()

# view prediction as labels on top of predicted frames.

test.view_annotation()

'''
The regular VisionTool's output (i.e., the prediction folder with labels on top of frame, the '.csv' file
reporting prediction and confidence and the single labels folder,  if selected in preferences annotation
interface, will be created and saved into your project folder).
'''
As stated before, these tests are only to provide a fast example of VisionTool workflow and a practical example, however we recommend to run the toolbox using the main.py module, where all the toolbox designed feautures are available.
VisionTool’s main GUI shows two different interfaces. The first one “Features_Extraction” can be used to perform annotation, training and testing on an imported set of videos. The second one “Pose Estimation” includes the implementation of neural networks architectures to perform action recognition. In its first release, only features extraction is available. Future releases will be focus on the implementation of an actual action recognition submodule including the latest architectures used in the scientific community for the solution of recognition problems.
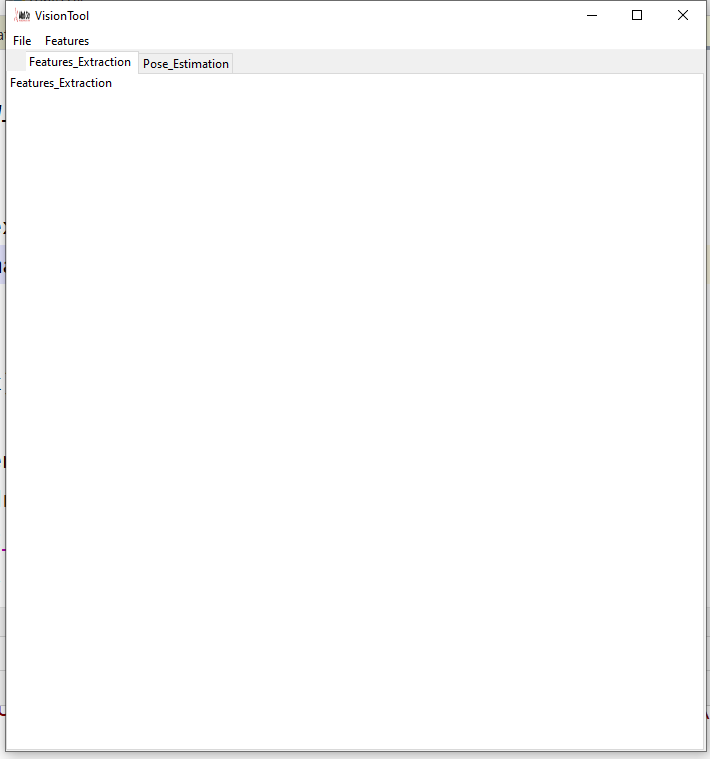
Figure 1. VisionTool main GUI
A description of the preliminary operations necessary to create a new project, import a set of videos and set the analysis parameters follows in the next paragraph.
VisionTool menu consists of two different submenus. The File Menu allows to perform a set of preliminary operations (see Figure 2). A set of keyboard shortcuts is implemented and reported in the menu for faster selections.
To create a new project, select the submenu File and click on the menu tab New Project, or press Ctrl+N. A browse directory win ow will pop-up asking where do you want to save the new project.
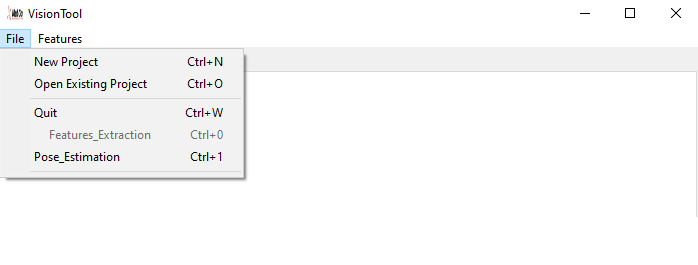
Figure 2. VisionTool’s File menu
To open an existing project, simply click on the menu tab Open Existing Project, or press Ctrl+O. A browse directory window will pop-up asking to select the folder containing a project.
To end VisionTool execution, just click on the closing icon in the GUI window, click on the menu tab quit or press Ctrl+Q.
VisionTool offers the possibility to perform pose estimation from action videos. Click on the menu tab Features to add new videos to the created project. If The project already contains videos, a message box will pop-up and ask if you wish to add new videos to the existing ones, or simply performing the analysis on the already imported ones (see Figure 3).
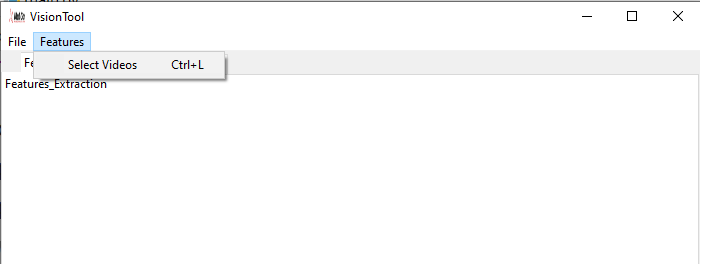
Figure 3. Adding new videos
Figure 4 shows VisionTool’s GUI for frames features extraction. The Annotations Options box allows the user to read the number of videos frames, and to select the start and end frame to be used for frame extraction. The Frames selection box allows to select the number of frames to annotate, as well as the number of frames to be automatically annotated within the annotation assistance tool (see section Annotations assistance).
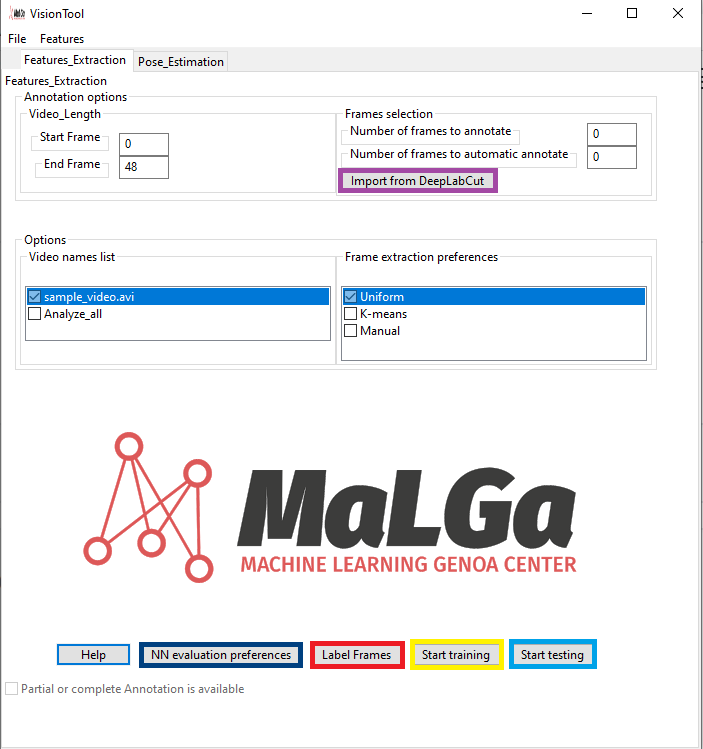
Figure 4. Features extraction GUI
VisionTool is completely compatible with DeepLabCut, from which it inherited the backbone for frames annotation. If the user performed his annotations with DeepLabCut, there is no need to annotate again the same frames in VisionTool. Using the button Import from DeepLabCut (purple square in Fig. 4), it is possible to select the csv file corresponding to the annotations saved with DeepLabCut, and the tool will automatically convert it in the format needed for training, testing or performing automatic annotation. The original csv file, is stored as filenameoriginal.csv, where filename is the name used for the csv file as outputted by DeepLabCut.
To open the neural network parameters setting interface, click on the NN evaluation preferences button (dark blue square in Fig. 4).
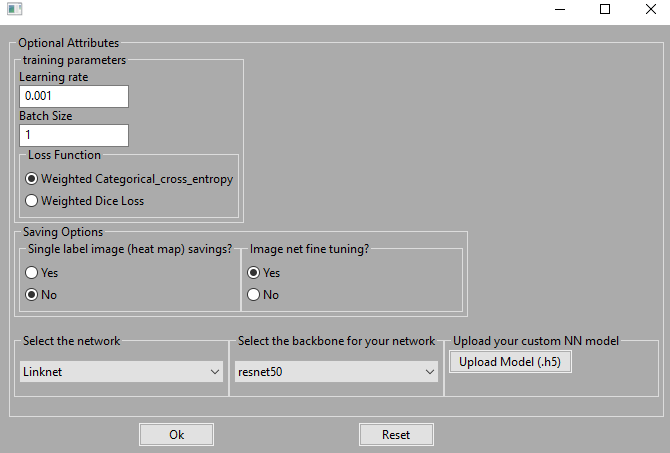
Figure 5. Neural network parameters setting GUI VisionTool allows to choose between 4 different neural networks to perform features extraction (i.e., UNet, LinkNet, Pyramid Scene Parsing Network (PSPNet) and Feature Pyramid Network (FPN)). These networks include an encoder module coupled to a decoder one. The toolbox offers 30 different neural networks models to be adopted as backbone for the encoding of the 4 segmentation networks. To set the neural network and the backbone, simply select the desired model from the dedicated menu. Moreover, from the same GUI, it is possible to upload a custom neural network model. Such model can be random initalized, or pre-trained on a custom dataset. In such way, VisionTool can be constantly updated with the state-of-the-art architecture for semantic features extraction, in the same time allowing the re-usage of models specifically designed to solve a certain custom task. The user can also set the learning rate value, the batch size and choose between two different loss functions for the training process:
- Weighted categorical cross-entropy;
- Weighted dice-loss. The user can adopt ImageNet pretrained neural networks or train from scratch, selecting the correspondent option in the dedicated radio-button. Finally, an option allows to save the single label images with the pixel intensity corresponding to the confidence of estimation for that specific pixel.
To proceed with frame annotation, click on the label frame button (red square in Fig. 4). A confirmation message will pop-up. After confirmation, the toolbox asks for annotation preferences through a dedicated interface. The help button provides a detailed support for all the possible designed operations in the annotation GUI. However, in the next lines we will provide few explanation on the offered annotation features.
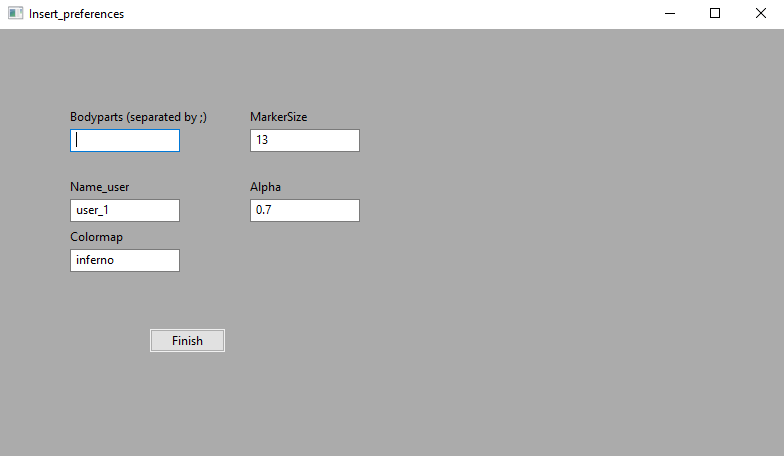
Figure 6. Annotation preferences input GUI
For each video of a project, the annotation preferences interface is showed only at initialization. However, the toolbox will ask if the user wants to change and update preferences at every time. This process includes adding new labels (i.e., interesting new points). Please, insert the bodyparts as a list, with a ‘;’ as delimiter character (e.g., ankle; hip; knee; shoulder). The MarkerSize will be used to plot the annotation points in the next interface, according to the indicated colormap and alpha value. Finally, the name_user will be used to name the output annotation file, so that different users can have separated annotation file. Click on finish, and the interface will automatically close. At this stage, the annotation interface will pop-up.
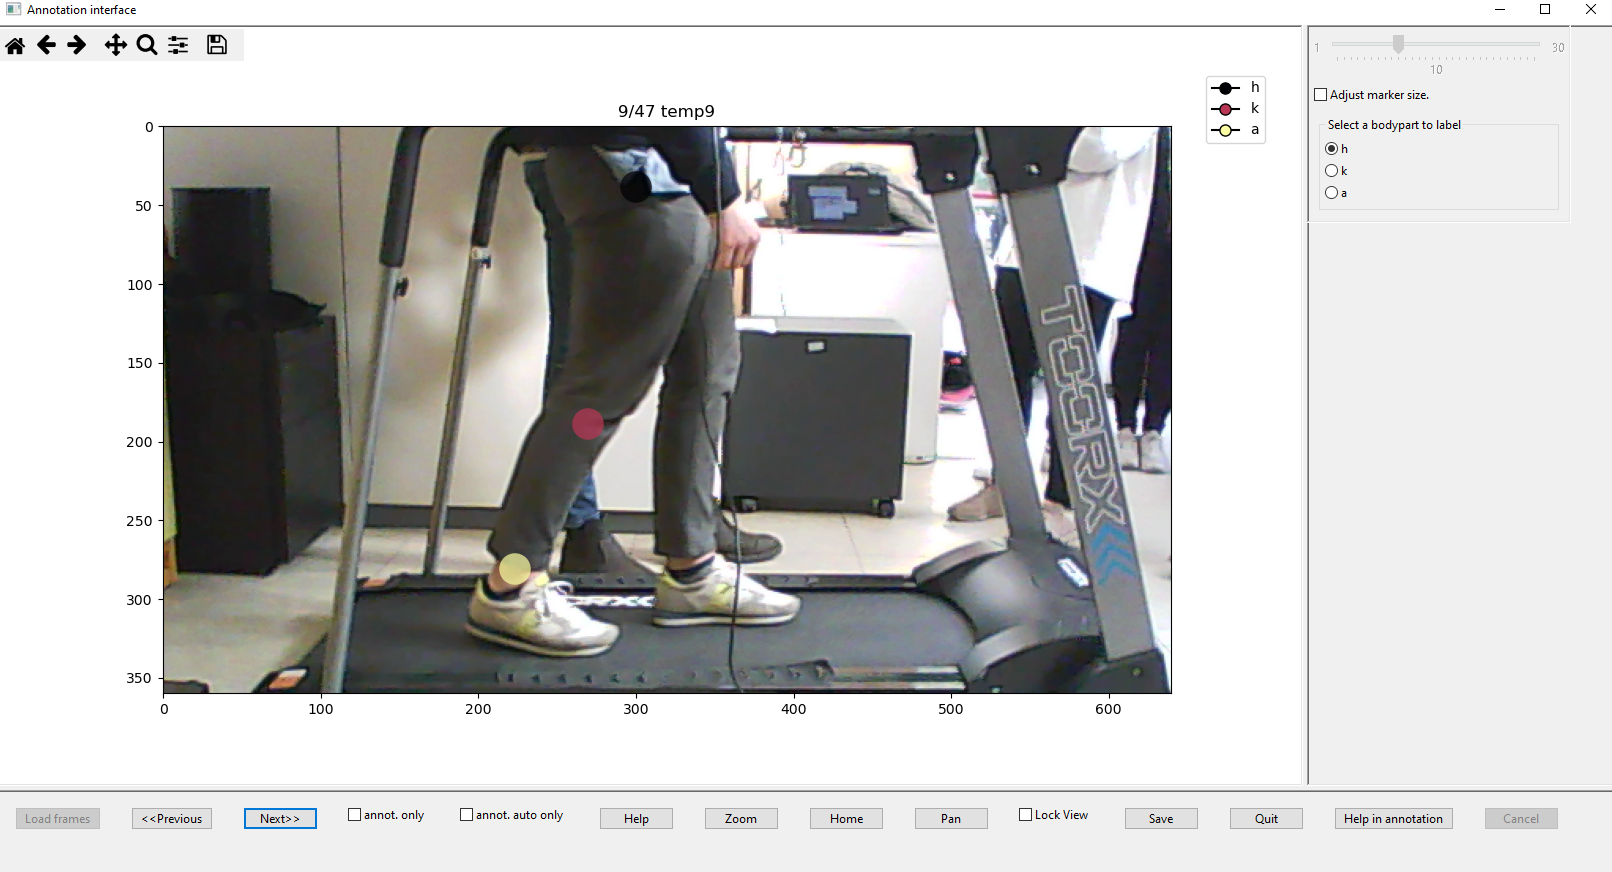
Figure 7. VisionTool annotation interface
Here the user can annotate the interesting points (previously indicated in the preferences interface) using the mouse. Each annotation point can be drag and moved if necessary. The checkbox annot. only can be used to only view the frames that were randomly extracted to be manually annotated (number indicated in interface of Fig.4). If such number has not been indicated, the option will not be enabled. The checkbox annot. auto only can be used to only view the frames that will be automatically labeled by a neural network (again, if the option has been selected in Fig.4 at the moment of frames extraction). If the user did not indicate the number of frames in the previous interface, simply closing the annotation interface and inputting the data in the main GUI with a new frame extraction will enable such options. If no checkbox is selected, all the sequence of frames can be viewed in the interface. Zoom button allows to increase or decrease view zooming. Save button is necessary to save the annotations in an excel file and to proceed with network training. Help opens a short explanation of the annotation process, while home cancel the results of zooming. Quit closes the annotation interface. Help in annotation invokes the automatic annotation assistance and will only be available if the number of frames to be automatically annotated has been set in the main GUI. When the help in annotation button is pressed, the interface will freeze until the training of the assistance neural network will be finished. At this stage, it is possible to view the results of such procedure with a different color map with respect to the one corresponding to manual annotation (see Fig. 8). The resulting labeled points can be moved (if the results were not correct), so that in the end, a complete set of annotated images is available. Press cancel to reset the results provided by the automatic annotation tool. Important After annotation assistance has been invoked, press the save button to save the automatic provided annotation and use them for further training. If you don't save them, they will be still available, but training of neural network will only consider the manual provided annotations.
After a set of frames has been annotated either manually or with the automatic procedure and a neural network and a backbone have been selected using the dedicated interface, it is finally possible to train the architecture for features extraction. Simply press the start training (yellow button in Fig.4) button on the main GUI. After training is completed, the toolbox will perform prediction on test data (i.e., the frames without any annotation either manually or automatically performed).
When dealing with pose estimation or semantic features extraction tasks, the availability and quality of annotations is fundamental. VisionTool offers the possibility to combine different videos to build a common prediction neural network model. In order to use the multiple video analysis, you first need to at least extract the frames for all the desired videos. So, select each video in the Video name list using the GUI, and press on label frames. You can then annotate a few of these frames for each of the videos, and finally save your annotations. Then, click on Analyze_all in the Video name list in the GUI, and press start training. All the annotations will be combined and will be used to train a neural network model (usually, with a better generalization).
If a model has already been trained, and the user wishes to predict frames, he can press the button start testing (light blue button in Fig.4). The toolbox will check the existence of a trained architecture. click on Analyze_all if you want to use the trained architecture to predict every video contained in the project to provide prediction of annotated labels.
VisionTool’s output is an excel file with the predicted 2d joints coordinates and the confidence of prediction. If the option Single Label Image Saving is checked in the neural network parameters setting interface (see Fig. 5), an image per each label will be saved. In such images, intensity pixel corresponds to the confidence of prediction for each specific label. You will obtain a number of total images equal to *(number_of_annotated_joints + 1)number_of_testing_frames. Of course, the prediction will be only performed on the frames that you did not either manually or automatically annotated.
Source file name: Frame_Extraction.py
Description: this file contains the code to extract frames to proceed with manual annotation
Source file name: interface_net.py
Description: this file contains the code to handle the GUI for setting the neural network preferences for svideo segmentation
Source file name: New_project_features.py
Description: this file contains the code to save the preferences for annotation (e.g., name of interesting points and annotator name)
Source file name: test_label_video.py
Description: this file contains the code to test VisionTool with a sample video included in the repository
Source file name: annotation.py
Description: this file contains the code to open the GUI to perform annotation
Source file name: architectures_segmentation.py
Description: this file contains the code to perform data augmentation, neural network training and testing, annotation assistance
Source file name: architectures_segmentation_multiple_videos.py
Description: this file contains the code to perform data augmentation, neural network training and testing, annotation assistance for the analysis of multiple videos
Source file name: auxfun_drag_label.py
Description: this file contains the code to handle the drag of annotated points
Source file name: create_new_project.py
Description: this file allows VisionTool to create a new project, creating the correspondent configuration file
Source file name: features_extractor.py
Description: this file contains the code to handle the GUI for the features extraction section of VisionTool
Source file name: Main.py
Description: this file contains the code to open the parent frame and VisionTool's GUI
Source file name: nb_panel.py
Description: this file contains the code to handle the GUI for selecting new videos and opening existing projects
Source file name: opening_toolbox.py
Description: this file contains the code to handle the GUI for actually performing the annotation of frames into VisionTool.
Source file name: pose_estimation.py
Description: this file contains the code to handle the GUI for the pose estimation section of VisionTool
Source file name: training.py
Description: this file contains the code to call the training module and perform neural network training and testing