Please cite this paper if you use this code : Accurate reconstruction of EBSD datasets by a multimodal data approach using an evolutionary algorithm, Marie-Agathe Charpagne, Florian Strub, Tresa M. Pollock, Materials Characterizations (2019) DOI: 10.1016/j.matchar.2019.01.033
@article{charpagne2019accurate,
  title={Accurate reconstruction of EBSD datasets by a multimodal data approach using an evolutionary algorithm},
  author={Charpagne, Marie-Agathe and Strub, Florian and Pollock, Tresa M},
  journal={Materials Characterization},
  volume={150},
  pages={184--198},
  year={2019},
  publisher={Elsevier}
}
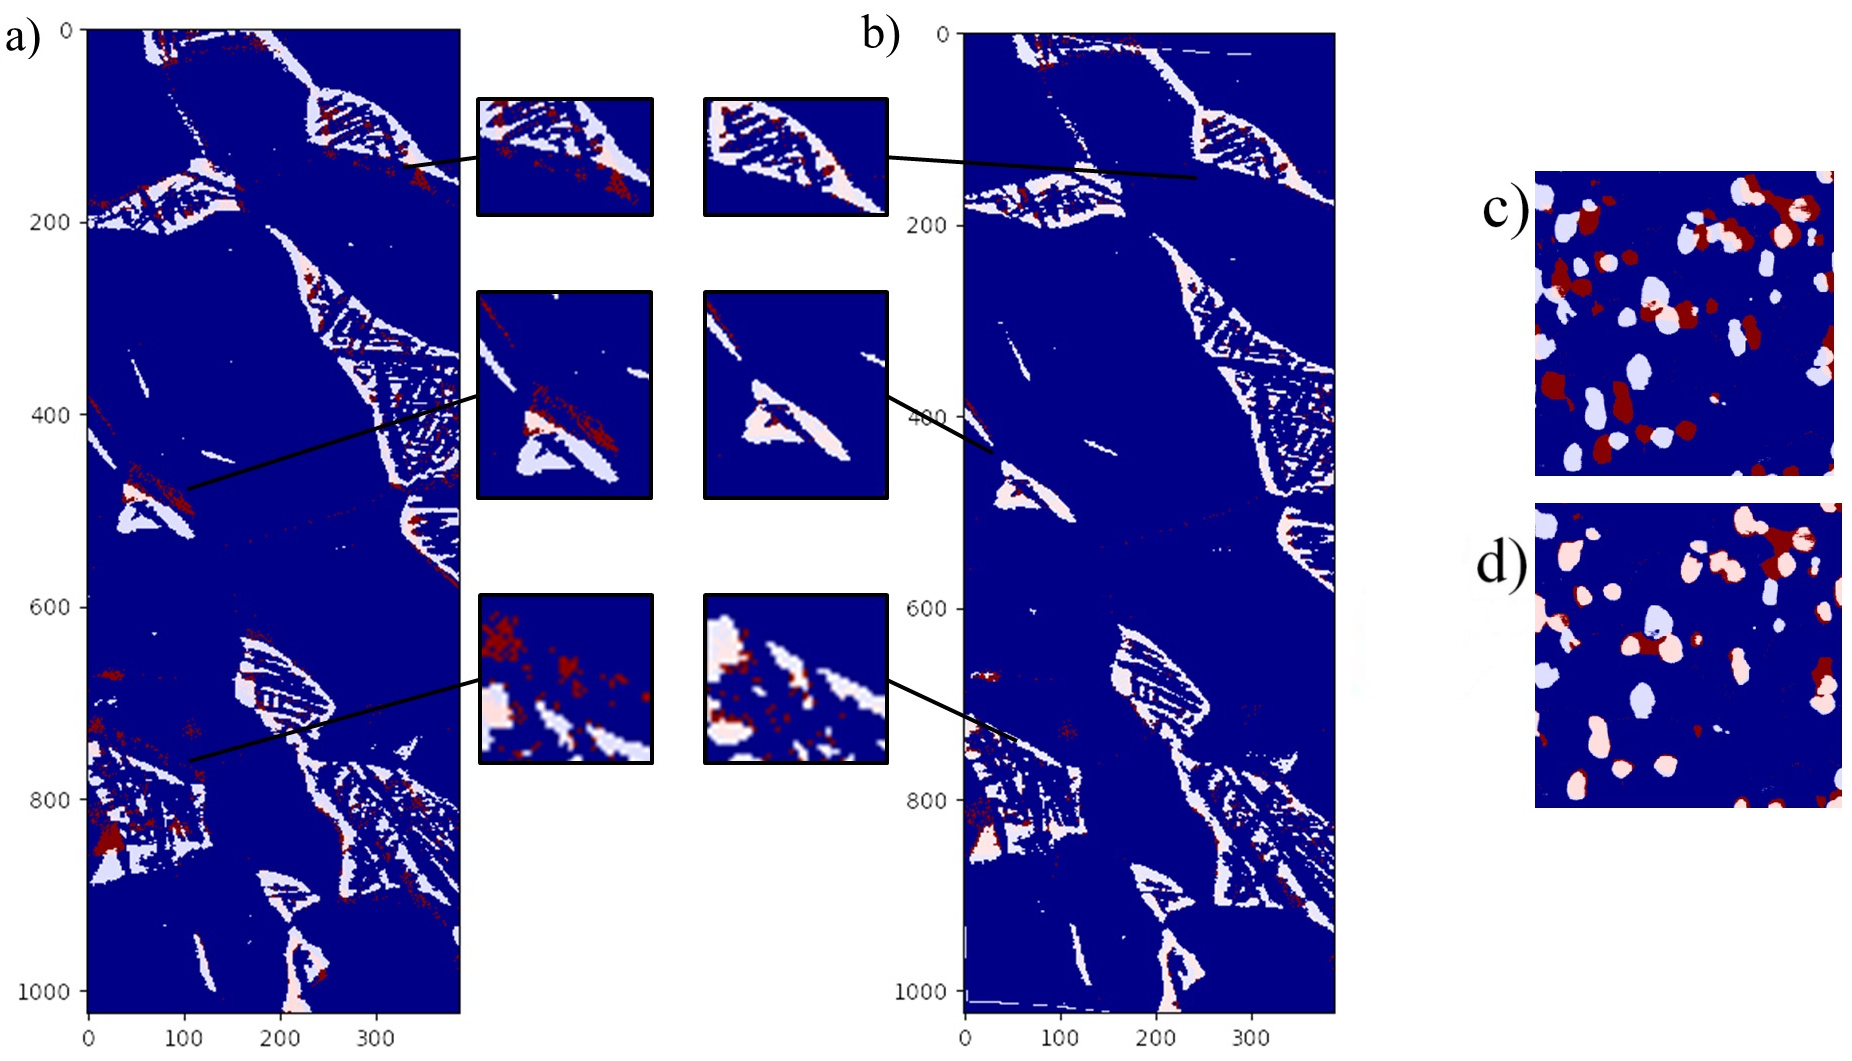
This repository provides the code to undistord EBSD data (.ang format) based on segmented electron images by using CMA-ES algorithms [1].
This works on python3 (not tested on python2). You need to install the following packages
- sklean
- skimage
- cma
- opencv (will be removed)
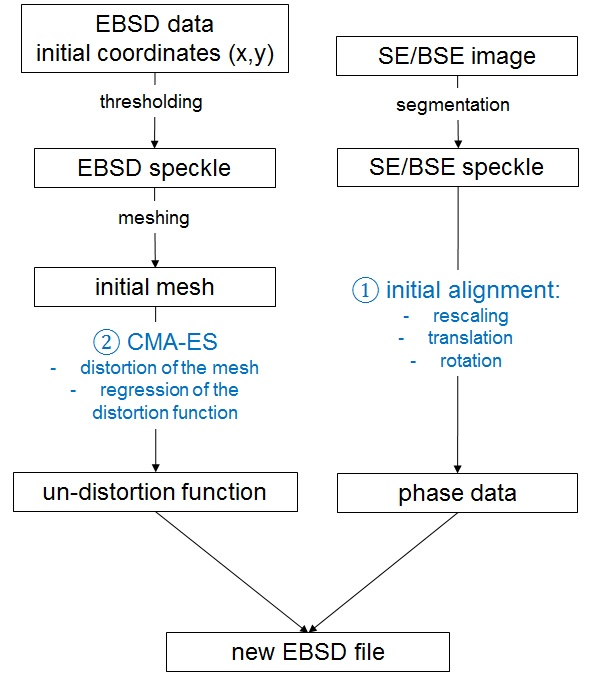
The process relies on two scripts:
- align.py
- distord.py
align.py computes a linear transformation (rescale/rotate/translate) of the segmented electron data and fit it to the ebsd size. In order to find the best linear alignment, it performs a grid search over 3 parameters: the angle (degree), tx (pixels), ty (pixels). Note that the rescale parameters must be pre-determined by the user. This script relies on a json config file (e..g conf/AM718.conf).
{
  "rescale": {        # Determine the rescale the segemented image to the ESDB scale (set 1 if no rescale is required)
    "x": 0.9,
    "y": 0.9
  },
  "grid_search": {    # The grid search will iterate over the range of parameters define by the user
    "rotate": {       # Rotation (degree)
      "start": -1.5,
      "end": 0.5,
      "step": 0.5
    },
    "translate_x": {  # horizontal translation (pixels)
      "start": -320,
      "end": -250,
      "step": 1
    },
    "translate_y": {  # vertical translation (pixels)
      "start": -150,
      "end": -90,
      "step": 1
    }
  }
}
As a rule of thumb, we recommend you to first use the script with a large range windows and step size.
Once you located the range of interest, refine the grid search within a smaller range and a small step size.
If you want to run align.py on our sample, use the following instruction:
$> python3 align.py \
        -seg_ref_path ../data/AM718/segment/AM718_segment.png
        -ebsd_ref_path ../data/AM718/ebsd/AM718_ebsd.jpg
        -align_dir ../data/AM718/segment.align/
        -out_dir ../data/AM718/out
        -conf_path ../conf/AM718.align.conf
        -xp_id 0
align.py dumps:
- ${align_dir}/segment.align.${xp_id}.png: segmented electron data that best fit the current EBSD speckle
- ${out_dir}/overlap.align.${xp_id}.png: the overlap between the re-align segmented electron image and the EBSD image before correction
- ${out_dir}/affine.${xp_id}.json: the parameters of the linear transformation (json file)
The next step is to find the undistord that will macth the EBSD speckles to the segmented electron data0. To do so, we use the CMA-ES algorithm that will compute intermediate distorted mesh, and use them to compute a polynomial distortion. For more details, please have a look to our paper.
distord.py dumps:
- ${out_dir}/ebsd_distord.${xp_id}.png: the EBSD after the polynomial distorsion
- ${out_dir}/mesh_distord.${xp_id}.png: the EBSD and the mesh used to compute the polynomial distortion
- ${out_dir}/overlap.distord.${xp_id}.png: the overlap between the re-align segmented electron image and the EBSD image after correction
- ${out_dir}/params.${xp_id}.png: the parameters of the polynomial transformation and the mesh (json file)
If you want to run distord.py on our sample, use the following instruction:
$> python3 distord.py \
        -seg_ref_path ../data/AM718/segment.align/segment.align.0.png
        -ebsd_ref_path ../data/AM718/ebsd/AM718_ebsd.jpg
        -ang_ref_path ../data/AM718/ang/AM718.ang
        -out_dir ../data/AM718/out
        -conf_path ../conf/AM718.align.conf
        -xp_id 0
Note: Do not forget to unzip the file data/AM718/ang/AM718.zip !
You can also change the mesh properties with the following argument:
 -mesh_step     # number of pixels between two mesh points.
 -mesh_std      # number of pixels (std) that CMA-ES may move the mesh point at each iteration
 -num_sampling  # number of meshes to be generated by CMA-ES
 -polynom       # degree of the polynomial function
You can also change the ang phase name/formula with the following argument:
 -phase_name     # Name of the phase in the ang description
 -phase_formula  # Chemical formula to display in the ang descrition
The authors would like to acknowledge the stimulating research environment of the SequeL Team (Inria Lille France) and the University of California Santa Barbara, materials department. We also thank Olivier Pietquin, Jérémie Mary for helpful discussions. We acknowledge the following agencies for research funding and computing support: CHISTERA IGLU and CPER Nord-Pas de Calais/FEDER The authors gratefully acknowledge a Vannevar Bush Fellowship, ONR Grant N00014-18-1-3031. DATA Advanced data science and technologies 2015-2020.
[1] Hansen, Nikolaus. "The CMA evolution strategy: A tutorial." arXiv preprint arXiv:1604.00772 (2016).