The Snakemake workflow management system is a tool to create reproducible and scalable data analyses. Workflows are described via a human readable, Python based language. They can be seamlessly scaled to server, cluster, grid and cloud environments, without the need to modify the workflow definition. Finally, Snakemake workflows can entail a description of required software, which will be automatically deployed to any execution environment.
With Snakemake, data analysis workflows are defined via an easy to read, adaptable, yet powerful specification language on top of Python. Each rule describes a step in an analysis defining how to obtain output files from input files. Dependencies between rules are determined automatically.
By integration with the Conda package manager and container virtualization , all software dependencies of each workflow step are automatically deployed upon execution. Snakemake itself is easily deployable via the Conda package manager (https://conda.io), as a Python package (https://pypi.io), or a Docker container (https://hub.docker.com/r/snakemake/snakemake).
Rapidly implement analysis steps via direct script and jupyter notebook integration. Easily create and employ re-usable tool wrappers and split your data analysis into well-separated modules. Specific data analysis steps can become quite complicated, for example, when plotting figures or working around idiosyncrasies of external tools. It helps readability to modularize these away such that the reader of a workflow only has to inspect them if interested in the specific step. Some of these steps can be quite specific and unique to the analysis. Others can be common to the scientific field and utilize widely used tools or libraries in a relatively standard way. For the latter, Snakemake provides the ability to deposit and use tool wrappers in/from a central repository. In contrast, the former can require custom code, often written in scripting languages like R or Python. Snakemake allows the user to modularize such steps either into scripts or to craft them interactively by integrating with Jupyter notebooks (https://jupyter.org).
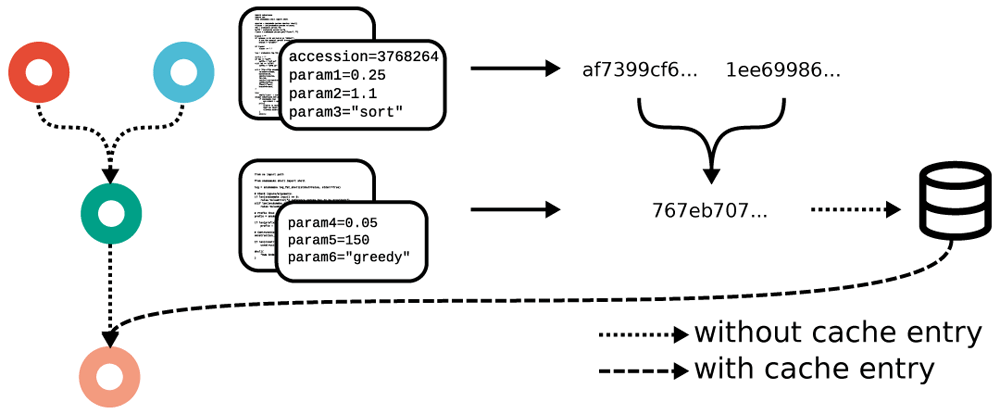
Automatic, interactive, self-contained reports ensure full transparency from results down to used steps, parameters, code, and software. snakemake provides a new, generic approach which ensures transparency. Leveraging workflow-inherent information, Snakemake can calculate a hash value for each job that unambiguously captures exactly how an output file is generated, prior to actually generating the file. This hash can be used to store and lookup output files in a central cache (e.g., a folder on the same machine or in a remote storage). For any output file in a workflow, if the corresponding rule is marked as eligible for caching, Snakemake can obtain the file from the cache if it has been created before in a different workflow or by a different user on the same system, thereby saving computation time, as well as disk space (on local machines, the file can be linked instead of copied).

Workflows scale seamlessly from single to multicore, clusters or the cloud, without modification of the workflow definition and automatic avoidance of redundant computations. Being able to scale a workflow to available computational resources is crucial for reproducing previous results as well as adapting a data analysis to novel research questions or datasets. Like many other state-of-the-art workflow management systems, Snakemake allows workflow execution to scale to various computational platforms, ranging from single workstations to large compute servers, any common cluster middleware, grid computing, and cloud computing (with native support for Kubernetes, the Google Cloud Life Sciences API, Amazon AWS, TES (https://www.ga4gh.org), and Microsoft Azure, the latter two in an upcoming release). Important in job scheduling: Because of their dependencies, not all jobs in a workflow can be executed at the same time. Instead, one can imagine partitioning the DAG of jobs into three sections: those that are already finished, those that have already been scheduled but are not finished yet, and those that have not yet been scheduled.
Python ≥3.5

Snakemake ≥5.24.1

BWA 0.7

SAMtools 1.9

Pysam 0.15

BCFtools 1.9

Graphviz 2.42

Jinja2 2.11

NetworkX 2.5

Matplotlib 3.3
First, install Vagrant following the installation instructions in the Vagrant Documentation. Then, create a new directory you want to share with your Linux VM, for example, create a folder named vagrant-linux somewhere. Open a command line prompt, and change into that directory. Here, you create a 64-bit Ubuntu Linux environment with
vagrant init hashicorp/precise64 vagrant up
First, please open a terminal or make sure you are logged into your Vagrant Linux VM. Assuming that you have a 64-bit system, on Linux, download and install Miniconda 3 with:
$ curl -L https://github.com/conda-forge/miniforge/releases/latest/download/Mambaforge-Linux-x86_64.sh -o Mambaforge-Linux-x86_64.sh $ bash Mambaforge-Linux-x86_64.sh
First, create a new directory snakemake-tutorial at a place you can easily remember and change into that directory in your terminal:
$ mkdir snakemake-tutorial $ cd snakemake-tutorial
First, make sure to activate the conda base environment with
$ conda activate base
The environment.yaml file that you have obtained with the previous step (Step 2) can be used to install all required software into an isolated Conda environment with the name snakemake-tutorial via
$ mamba env create --name snakemake-tutorial --file environment.yaml
If you don’t have the Mamba command because you used a different conda distribution than Mambaforge, you can also first install Mamba (which is a faster and more robust replacement for Conda) in your base environment with
$ conda install -n base -c conda-forge mamba
and then run the mamba env create command shown above.
To activate the snakemake-tutorial environment, execute
$ conda activate snakemake-tutorial
Now you can use the installed tools. Execute
$ snakemake --help
to test this and get information about the command-line interface of Snakemake. To exit the environment, you can execute
$ conda deactivate