-
Install gcloud command line tool
-
Authenticate with Google Cloud:
gcloud auth application-default login -
Create cloud project - choose your unique project name:
gcloud projects create IOT-project(IOT-project is our project name)
-
Add permissions for IoT Core (so a cloud function would be able to publish):
gcloud projects add-iam-policy-binding IOT-project --member=serviceAccount:cloud-iot@system.gserviceaccount.com --role=roles/pubsub.publisher -
Set default values for gcloud:
gcloud config set project YOUR_PROJECT_ID -
Create PubSub topic for board's data (state/config):
gcloud pubsub topics create iot-topicGo to "Registry details" and under "Cloud Pub/Sub topics" make sure "iot-topic" is your device state topic.
-
Create PubSub subscription for board's data:
gcloud pubsub subscriptions create --topic iot-topic iot-subscription -
Create PubSub topic for sensor's live data (telemetry):
gcloud pubsub topics create sensor-dataGo to "Registry details" and under "Cloud Pub/Sub topics" make sure "sensor-data" is your default telemetry topic.
-
Create PubSub subscription for sensor's live data:
gcloud pubsub subscriptions create --topic sensor-data sensor-data-subscription -
Create device registry:
gcloud iot registries create iot-registry --region europe-west1 --event-notification-config=topic=iot-topic -
Create Firebase app:
Run
gcloud app create --region=europe-westAnd then
gcloud alpha firestore databases create --project=PROJECT_ID --region=europe-west
Use ./functions_deploy script to deploy the cloud functions and the database rules each time you make changes to them.
To be able to execute mos commands, you should install Mongoose OS client on your computer.
Please check the following tutorial for help: https://mongoose-os.com/docs/mongoose-os/quickstart/setup.md
mos build- builds the base javascript engine - should be done only oncemos flash- sends the engine to the devicemos gcp-iot-setup- registers the device with Google and sends the certificate to the devicemos put fs/init.jssends the updated .js code to the device - should be called on each change we want to send. A reboot needs to be done in order to make the device run the new code.mos call Sys.Reboot- restarts the device with the updated codemos wifi <SSID> <password>- setups the wifi on the device and reboots it. Write your wifi SSID and the password instead if "" and "".
Use our QR generator (or any other) by running qr_generator/qr_generator.sh with the following arguments:
-
Serial Number: The id of the ESP as it appears in Google IoT-core
-
Public Key: The public key that mongoose created for you (also appears in Google IoT-core)
Note that you are required to remove the preamble
-----BEGIN PUBLIC KEY-----and the appendix-----END PUBLIC KEY-----.
After you scan the QR the authentication proccess starts. If it succeeds, the board is saved in the DB and the user's identifier is set as the board's owner.
Proccess might fail in the following scenarios:
- The board already exists in the DB (either attached to the user who tried to add it or to a different user)
- The board isn't registed to Google IoT-core. In this case you may need to register it again with the following command in the mos console:
mos gcp-iot-setup --gcp-project <YOUR PROJECT ID> --gcp-region europe-west1 --gcp-registry iot-registry - An incorrect public key was inserted (or in a wrong format).
After you connected a device to board and added it in app, you need to configure its pins. The pins can be configured by the setting dialog which can be opened by a long tap on the device icon (in the board screen). From this dialog the device can also be removed.
The ESP32 pins are diveded into categories as explained in this picture:
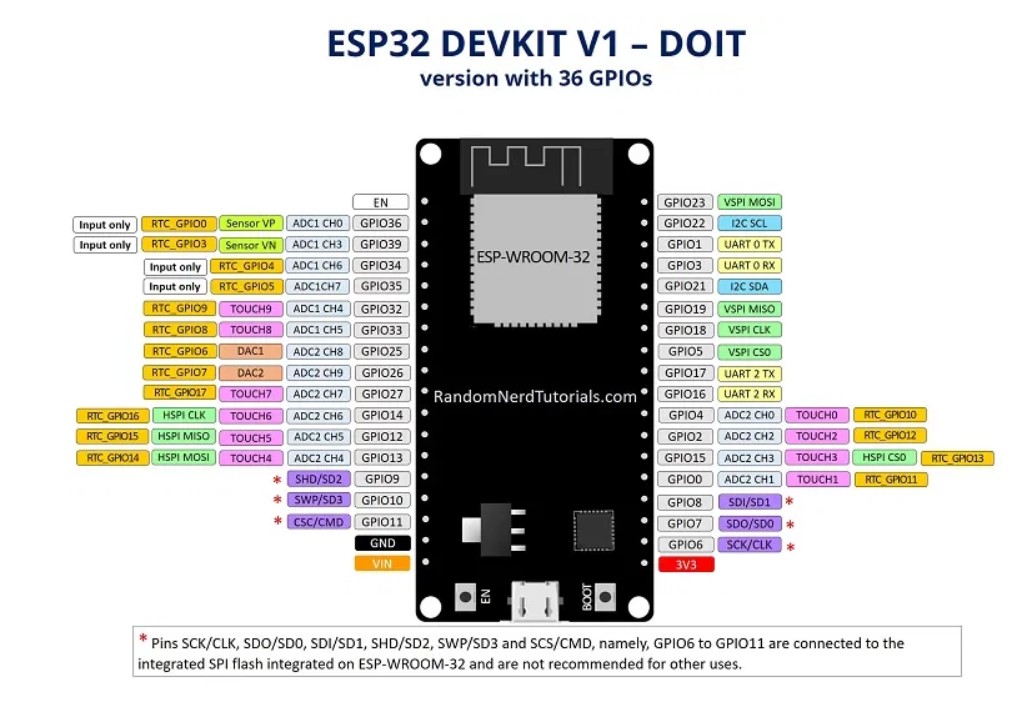
For more information browse to: https://randomnerdtutorials.com/esp32-pinout-reference-gpios/
The cloud will send configuration updates to the following topic:
/devices/<device id>/config
And the device should respond with a corresponding state update to the following topic:
/devices/<device id>/state
The configuration is in the following format:
config/state = {
	"devices": [... list of devices ...]
}
Where each device has the following attributes:
{
	"name": string,
	"active": 0 or 1,
	"pins": [... list of pins ...],
	"type": string
}
And each pin is in the following format:
{
	name: string,
	number: int,
	value: 0 or 1
}
If a pin is missing from the config JSON it will be turned off on the device.
Sensors report data in the following format:
{
	name: string,
	data: []
}
Where the data is comprised form the following attributes :
{
	time: date-"T"-hour-minute-seconds-"Z" (e.g: 2022-02-16T18:04:24Z),
	value: int
}
The data is saved in a different collection named "sensors", and the 10 most recent records are stored in the collection. These records are displayed in a graph in the sensor's screen.
Google sign-in succeed but the app's login proccess gets stuck and the following exception appears in the "run" terminal of android studio: [ERROR:flutter/lib/ui/ui_dart_state.cc(209)] Unhandled Exception: PlatformException(sign_in_failed, com.google.android.gms.common.api.ApiException: 10: , null, null)
You need to create a fingerprint in the firebase console. Go to "Project Setting" and click on "Add fingerprint". Create a SHA1 key by using a tool named "Keytool" which is built-in in windows and linux. In Windows: Open the CMD, if keytool is not included in your PATH, go to your JAVA folder in either program files or program files (x86). Search for Keytool and change your CMD current directory to this folder. run the following command: keytool -list -v -alias androiddebugkey -keystore %USERPROFILE%.android\debug.keystore In Linux/UNIX: run the following command: keytool -list -v -alias androiddebugkey -keystore ~/.android/debug.keystore enter the password: "android", copy the SHA1 key and paste it firebase fingerprint.
You need to download this file from the firebase console. Go to "Project Setting" and click on the button google services.json. Save this file under the path: your project path\App\android\app
You probably have a compilation error in init.js that made the esp crash. You need to replace it to a stable version, and execute the following commands:
- mos build
- mos flash
Lets say your tried to inculde adc library by using this command: load('api_adc.js'). Please make sure you also added the url of the library in your mos.yml file: "- location: https://github.com/mongoose-os-libs/adc"
A previous proccess of mos.exe is still running on your computer. You should open kill it and then try to launch the app again.
In order to be able to run the app on an android phone, you need to enable developer options and USB debugging as explained here:
https://developer.android.com/studio/debug/dev-options
Afterwards, you can plug-in your phone to your computer and run the app on it just like you would if you had a simulator running.
Please follow the instructions in this tutorial:
https://stackoverflow.com/questions/54444538/how-do-i-run-test-my-flutter-app-on-a-real-device