
CF.Cumulus is an Open-Source Metadata-driven Lakehouse Accelerator designed for Data Teams to quickly deploy and use a Lakehouse in Azure. Key features include:
- Deployment of a Lakehouse to Azure within minutes.
- Pre-built connectors to minimise development overhead of ingesting data from variety of data sources.
- Easy-to-use Metadata configuration tables simplifying the onboarding of new data sources to your data lake.
- Robust Data Orchestration Pipelines.
V25.1.0.0
https://github.com/CloudFormations/CF.Cumulus/releases

We offer a variety of different ways to get started with CF.Cumulus, which can be accessed through the Azure MarketPlace here. This includes a variety of deployment and support options for you to use as per your organisation's requirements.
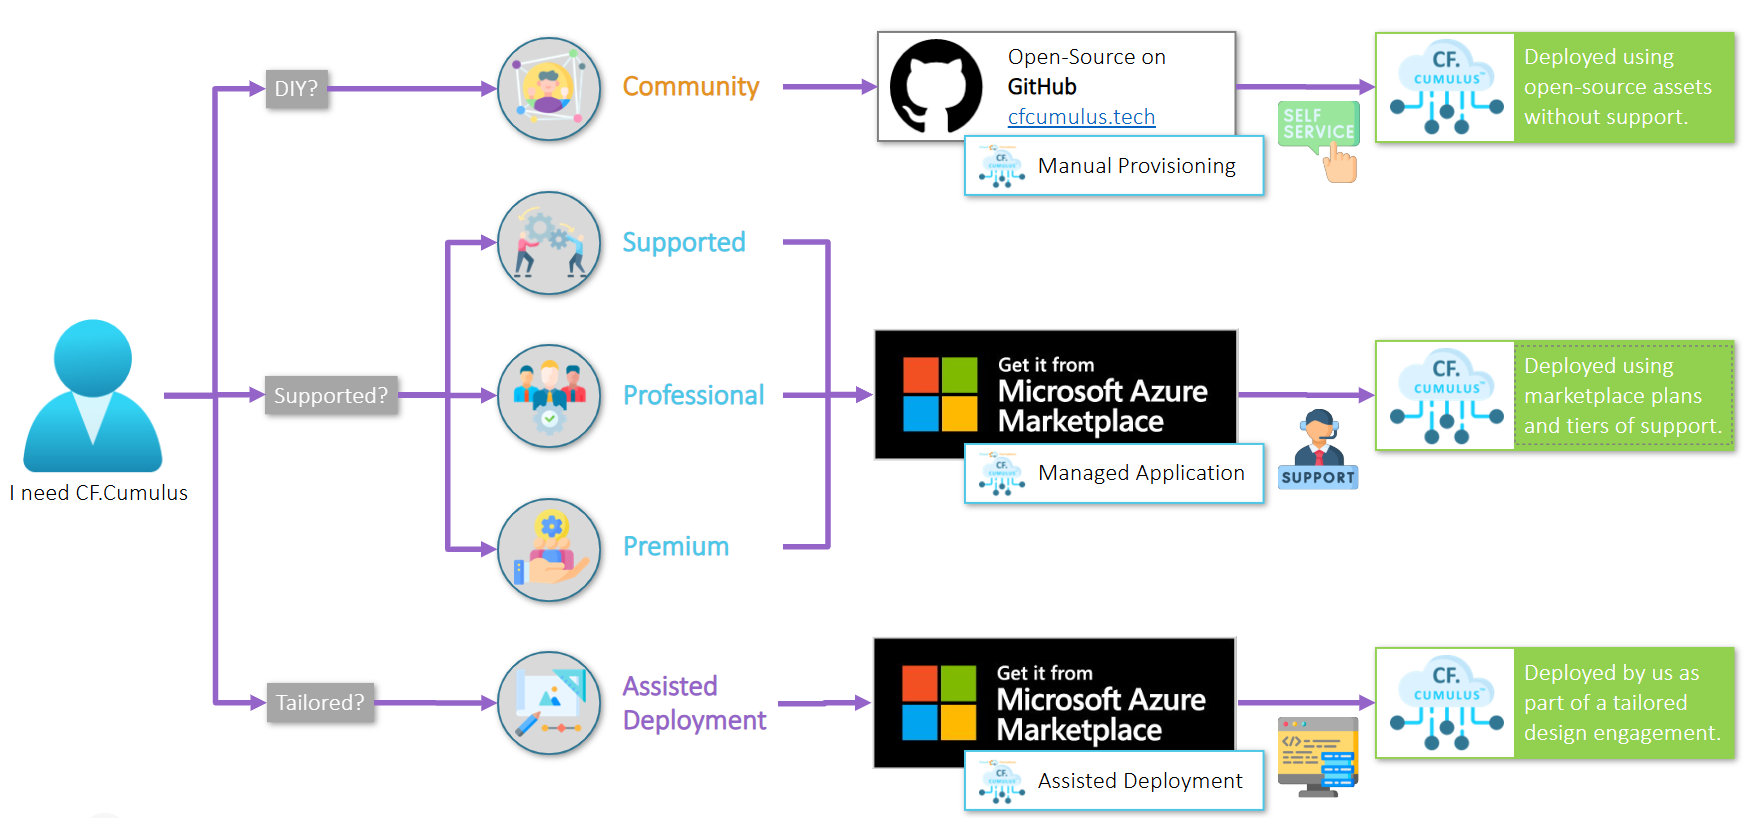
We also have the Community Edition for Developers who want to run with Cumulus for themselves, available here on our Open-Source Repo!
To ensure a seamless deployment of CF.Cumulus in the Azure MarketPlace or via the Community Edition, we recommend registering the following Namespaces in your target subscription:
- Microsoft.AlertsManagement
- Microsoft.Consumption
- Microsoft.DataFactory
- Microsoft.Databricks
- Microsoft.Features
- Microsoft.KeyVault
- Microsoft.Maintenance
- Microsoft.ManagedIdentity
- Microsoft.MarketplaceOrdering
- Microsoft.OperationalInsights
- Microsoft.Portal
- Microsoft.ResourceGraph
- Microsoft.ResourceNotifications
- Microsoft.Resources
- Microsoft.SerialConsole
- Microsoft.Solutions
- Microsoft.Sql
- Microsoft.Storage
- Microsoft.Web
- microsoft.insights
- microsoft.support
In the event any of these missing, please complete the following URL and enable as suggested: https://portal.azure.com/#@organisation.org/resource/subscriptions/subscription-id/resourceproviders
If you would like following information on the topic before doing so, please follow this link from the Microsoft Documentation
For further information on how to get started using the Community Edition of CF.Cumulus can be found in the members area of our website here. It's free to become a member and gives you access to other great content from Cloud Formations.
Below is our Getting Started guide for installing CF.Cumulus in your Azure Subscription. The installation gives you a complete deployment of the Azure Resources required for a Lakehouse, with resource dependencies and objects all included at the click of a button.
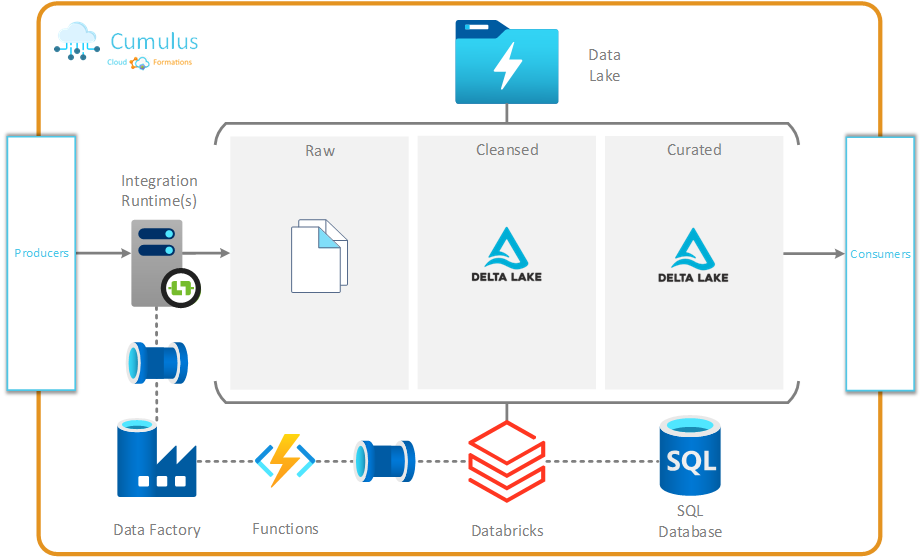
The deployment demonstrated in this guide includes the following:
- Resource Deployment
- Role Assignments
- Azure Function Middleware Published
- Ready-to-Go Data Factory Objects
- Spark Compute Clusters
- Spark Notebooks
- Core Metadata Configurations in your Azure SQL Metadata Database
- Coming Soon! Sample Metadata
- Visual Studio Code with Bicep extension
- PowerShell (Module install/imports handled as part of scripts)
- Azure Entra Account
- Deployment Privileges in Azure
- Subscription Level Contributor Role Assignment
As a user, you're only requirement is to get some details regarding your Azure Tenant and Subscription and specify your resource naming convention. This is achieved through setting a few parameters in the infrastructure/configuration/_installation/main.bicepparam file.
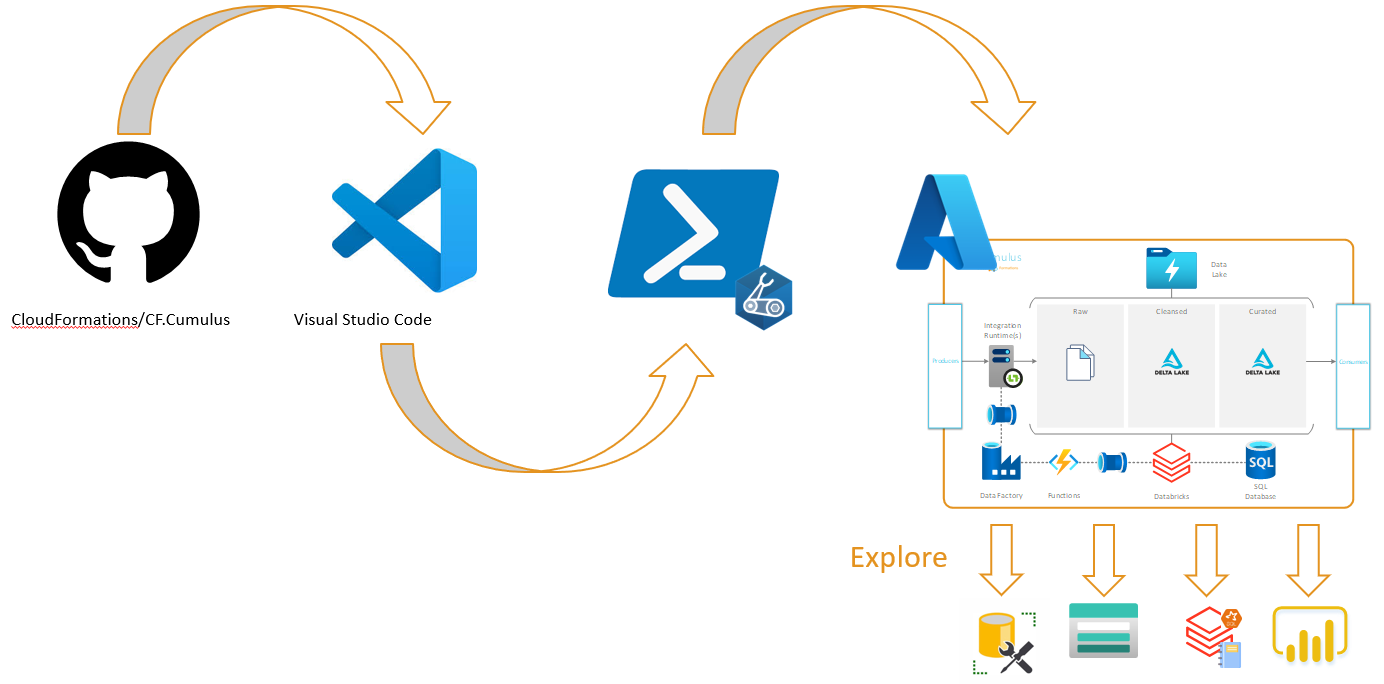
- Navigate to our CF.Cumulus GitHub repository.
- Clone the repo to your local computer and open in Visual Studio Code.
- Open the infrastructure/configuration/_installation/main.bicepparam file and provide your values for the following parameters:
param orgName = 'cf' // Abbreviation of your Organisation's name
param domainName = 'cumulus' // Domain for installation of Cumulus
param envName = 'dev' // Environment name
param location = 'uksouth' // Azure region you are deploying to
param uniqueIdentifier = '01' // Identifier to ensure unique naming
- Specify any additional configuration in the same file. For a "getting started" environment, the additional change we'd recommend is to add your IP for SQL Server connectivity:
// SQL Server: Optional Parameters
param myIPAddress = '1.1.1.1' // For SQL Server Firewall rule
- Save the file!
- Open the infrastructure/deployment/deploy_wrapper.ps1 file to view the PowerShell executor module. Review the parameters listed here and get these from your Azure tenant.
- For ease of use, and confidence you've recorded the right values, input them in to the following PowerShell command:
. 'C:\Users\MyUser\Repos\CF.Cumulus\infrastructure\deployment\deploy_wrapper.ps1' -tenantId 'My Tenant GUID' -subscriptionId 'My Subscription Name' -location 'uksouth'
Note: The deploy_wrapper.ps1 PowerShell script allows you to input these parameters at execution time, but it is also easy to specify them as part of a declarative statement, as above. This allows users to verify the command, path of file and parameters before executing.
- Copy and Paste your command into a PowerShell terminal (such as the integrated terminal in VSCode) and execute.
- Follow the process on screen and in 5-10 minutes you will have a deployment of Cumulus ready to explore.