Flutter game app to demonstrate game design and app development basics.
The presentation that accompanies this repository is here.
Shortcuts to workshop instructions:
- Install a code editor like Android Studio or VS Code.
- Install Flutter using this guide.
- Open terminal. Run
flutter doctorto make sure everything is working as expected. Make sure you have green checkmarks by Flutter, Android toolchain, Chrome, and VS Code/Android Studio. If you want to run your app using iOS, also make sure you have a green checkmark next to Xcode. - Follow the instructions in the guide from step 2 to set up emulators/devices for Android, iOS, and/or Chrome.
Note: The first time you run your app on an iOS device, you need to do it through Xcode by right-clicking
iosfrom the sidebar and selectingFlutter/Open iOS module in Xcode. Afterwards, you can run your app from Android Studio like normal.
❗️
⚠️ If runningfluttercommands aren't recognized you need to add theflutter/binfolder to PATH. For instructions see MacOS, Windows, or Linux .
- In terminal, create an app using
flutter create paint_drop - Navigage to your project folder using
cd paint_drop - Complete setup with
flutter run - Open your project to edit the code
Replace "Android Studio" with "VS Code" if using that instead.
open . -a "Android Studio" - In the side menu at the top, click on
Android" and selectProject" from the dropdown menu to open your project as a Flutter project. If you already have ``Project" listed, don't change anything. Then in the side menu, delete the following directories:macos, `linux`, `windows`, and `test`. - Create a new directory called
assetsand within assets another directory calledimages. The results project path should bepaint_drop/assets/images. Drop the game images into this new folder. - Point your app to this images folder by opening the
pubspec.yamlfile located at the project root, scrolling down, and adding:
  flutter:
    assets:
      - assets/images/
- Run
flutter pub getto get these changes. - Run your app on your chosen device. I usually start with Chrome (web) because it takes the least amount of time to start. You should have a simple, blue button pushing app.
- Back in your code editor, open
lib/main.dart. Try changing your theme to a different color palette by changingprimarySwatch: Colors.blueto some other color scheme, e.g.,Colors.pink. - Hot restart your app to see the theme change. In Android Studio, do this by clicking the
Runtab at the bottom and then the green rectangle arrow icon. - Change the app title and remove the debug banner in the top right by adding the following flag in
main.dart:
    return MaterialApp(
      title: 'Paint Drop',
      debugShowCheckedModeBanner: false,
Also change the app screen name home: const MyHomePage(title: 'Paint Drop'),
- Open
pubspec.yamlfrom the project directory. Change the description toBasic Flutter game app. - Add the
flameas a package as follows:
dependencies:
  flutter:
    sdk: flutter
  flame: ^1.6.0
Check the docs for the latest version.
-
Run
flutter pub getfrom terminal to install the new dependencies or clickPub getin the upper right corner if you are using Android Studio. -
Run your app using your desired device.
-
Navigate to the
libfolder and openmain.dart. Delete everything in this file. We want to create a new game instance. -
Add the following imports to the top of
main.dart:
import 'package:flame/experimental.dart';
import 'package:flame/game.dart';
import 'package:flutter/material.dart';
These allow us to use Flame's game packages and the Material theming packages with Flutter.
- Now define a new
mainfunction as follows that will get executed first when you run your app:
void main() {
  runApp(
    GameWidget(
      game: MyGame(),
    ),
  );
}
- Android Studio (or the IDE of your choice) will yell at you and say
MyGameis not defined, so outside of themainfunction, define theMyGameclass as follows:
class MyGame extends FlameGame {
  @override
  Color backgroundColor() => const Color(0xFF003366);
}
All we have added to the game so far is a background color instead of the default transparent background. Run your app, and you should have a dark blue background. Play around with changing the background color. Save your code and thanks to hot-reload, the new background color should render automatically.
-
Navigate to the
libfolder in the left menu (or via Terminal) and create a new file calledstar.dart. -
At the top, import the following:
import 'dart:math';
import 'dart:ui';
import 'package:flame/components.dart';
import 'package:flame/game.dart';
These are the necessary flame and math packages we need to create the stars that will fall from the sky and be draggable.
- Next create a
Starclass that extends PositionComponent, which is a Flame game component with attributes forposition,size,scale,angle, andanchor. We will instantiate the Star class as follows:
const tau = 2 * pi;
class Star extends PositionComponent {
  Star({
    required int n,
    required double radius1,
    required double radius2,
    required double sharpness,
    required this.color,
    required double speed,
    required double game_width,
    super.position,
  }) {
    _path = Path()..moveTo(radius1, 0);
    for (var i = 0; i < n; i++) {
      final p1 = Vector2(radius2, 0)..rotate(tau / n * (i + sharpness));
      final p2 = Vector2(radius2, 0)..rotate(tau / n * (i + 1 - sharpness));
      final p3 = Vector2(radius1, 0)..rotate(tau / n * (i + 1));
      _path.cubicTo(p1.x, p1.y, p2.x, p2.y, p3.x, p3.y);
    }
    _path.close();

    _speed = speed;
    _game_width = game_width;
    _star_size = radius1;
  }

  final Color color;
  final Paint _paint = Paint();
  final Paint _borderPaint = Paint()
    ..color = const Color(0xFFffffff)
    ..style = PaintingStyle.stroke
    ..strokeWidth = 3;
  final _shadowPaint = Paint()
    ..color = const Color(0xFF000000)
    ..maskFilter = const MaskFilter.blur(BlurStyle.normal, 4.0);

  late final Path _path;
  late final double _speed;
  late final double _game_width;
  late final double _star_size;

  @override
  void render(Canvas canvas) {
    _paint.color = color.withOpacity(1);
    canvas.drawPath(_path, _shadowPaint);
    canvas.drawPath(_path, _paint);
  }

  @override
  void update(double dt) {
    // Use the amount of time that has elapsed to inform position for smooth movement
    super.update(dt);
    position = Vector2(position.x, position.y + _speed * dt);
  }
}
The first section is our constructor. This is where we accept arguments that describe how our stars should look from the parent class (in this case, the game controller). The next section describes variables we care about like the speed our stars will fall at, the width of the game, and the size of the stars. Finally, the update functions tells us how the stars should move. We want them to drop from above, so we use the elapsed time dt to compute the new y-position of the star while keeping the x-position the same.
- Reload the game, but nothing appears! We need to actually add the stars to our Flame Game. Do this by going back to the
main.dartfile and creating a new variable to track the size of the star and then adding the star to our game as follows directly underColor backgroundColor() => const Color(0xFF003366);:
  double size_of_star = 30;

  @override
  Future<void> onLoad() async {
    add(Star(
      n: 5,
      radius1: size_of_star,
      radius2: size_of_star / 2,
      sharpness: 0.2,
      color: const Color(0xFFFDE992),
      speed: 10.0,
      game_width: size.x,
      position: Vector2(50, 0),
    ));
    }
You should have one falling star that looks like this:

Play around with changing the color of the star, the starting position, adding more stars, etc.
CHALLENGE: Try and make the star travel from the left side of the screen to the right side.
- Now we want to make the elements of our game (the stars) draggable with the user's finger or mouse. A couple key things to consider:
- We only want the stars to be draggable horizontally while they continue to fall vertically like Tetris:
Question: How do we ensure these constraints? How do we make components draggable in the first place?
Logic and mixins!
-
Change the class declaration in
main.darttoclass MyGame extends FlameGame with HasDraggableComponentsenable draggable components in our game. Similarly, instar.dart, change the class declaration toclass Star extends PositionComponent with DragCallbacks. -
Still in
star.dart, add the following afterlate final double _star_size;, replacing the existingrenderandupdatefunctions:
bool _isDragged = false;

  @override
  bool containsLocalPoint(Vector2 point) {
    // Checks when we intersect with where the user is tapping
    // Supports dragging functionality
    return _path.contains(point.toOffset());
  }

  @override
  void render(Canvas canvas) {
    // While star is being dragged, indicate this with shadows and a border
    if (_isDragged) {
      _paint.color = color.withOpacity(0.5);
      canvas.drawPath(_path, _paint);
      canvas.drawPath(_path, _borderPaint);
    }
    // When not dragging, star is normal
    else {
      _paint.color = color.withOpacity(1);
      canvas.drawPath(_path, _shadowPaint);
      canvas.drawPath(_path, _paint);
    }
  }

  @override
  void update(double dt) {
    // Use the amount of time that has elapsed to inform position for smooth movement
    super.update(dt);
    position = Vector2(position.x, position.y + _speed * dt);

    // Pause spinning when dragging stars
    if(_isDragged == false){
      angle += dt * 2;
      angle %= 2 * pi;
    }
  }

  @override
  void onDragStart(DragStartEvent event) {
    _isDragged = true;
    priority = 10; // Brings star to front of overlap
  }

  @override
  void onDragEnd(DragEndEvent event) {
    _isDragged = false;
    priority = 0; // Return to default depth
  }

  @override
  void onDragUpdate(DragUpdateEvent event) {
    // While user is dragging and we intersect motion with star, update star position
    double new_pos = position.x + event.delta.x;

    // Don't let star get dragged beyond right side bounds
    if(new_pos > _game_width - _star_size){
      new_pos = _game_width - _star_size;
    }

    // Don't let star get dragged beyond left side bounds
    else if(new_pos < _star_size){
      new_pos = _star_size;
    }

    // Set the new x-position; y-position stays the same
    position = Vector2(new_pos, position.y);
  }
If you stop and restart the app, you should have a single star falling from the sky that you can drag left and right horizontally and not beyond the bounds of the screen.
- To create more stars, update your
main.dartfile with the following:
  @override
  Future<void> onLoad() async {
    // Constants
    int number_of_stars = 20;
    int pixels_between_stars = 100;
    double size_of_star = 30;

    // Use a for-loop
    for (var i = 0; i < number_of_stars * pixels_between_stars;
    i = i + pixels_between_stars) {
      // Create a new random number
      Random rnd = Random();
      int min = size_of_star.toInt();
      int max = (size.x.toInt() - size_of_star).toInt();
      int r = min + rnd.nextInt(max - min);

      // Create new stars positioned evenly height-wise and randomly width-wise
      add(Star(
        n: 5,
        radius1: size_of_star,
        radius2: size_of_star / 2,
        sharpness: 0.2,
        color: const Color(0xFFFDE992),
        speed: 10.0,
        game_width: size.x,
        position: Vector2(r.toDouble(), -i.toDouble()),
      ));
    }
  }
Make sure to import the math package at the top with the following line: import 'dart:math';.
- Restart your code and the final app should look like this:

- In
main.dart, add the following lines underdouble size_of_star = 30;to read in images previously added to ourassetsfolder. If you don't have these files in place, follow the instructions for Workshop 1.
    // Load all images
    final redDrop = await images.load('red_drop.png');
    final blueDrop = await images.load('blue_drop.png');
    final pinkDrop = await images.load('pink_drop.png');
    final yellowDrop = await images.load('yellow_drop.png');

    final redBucket = await images.load('red_bucket.png');
    final blueBucket = await images.load('blue_bucket.png');
    final pinkBucket = await images.load('pink_bucket.png');
    final yellowBucket = await images.load('yellow_bucket.png');
Note: A cleaner implementation (and easier on the memory) would be to use the assets sheet buckets_and_drops.png and offset to the desired image. See how to do that here. We don't have many images, so this isn't super necessary.
2. Still in main.dart, comment out the code that adds a new Star to the screen. Paste in the following code to render our paint drop:
add(SpriteComponent(
   sprite: Sprite(redDrop),
   position: size / 2,
   size: Vector2(size_of_star*0.75, size_of_star),
   anchor: Anchor.center,
));
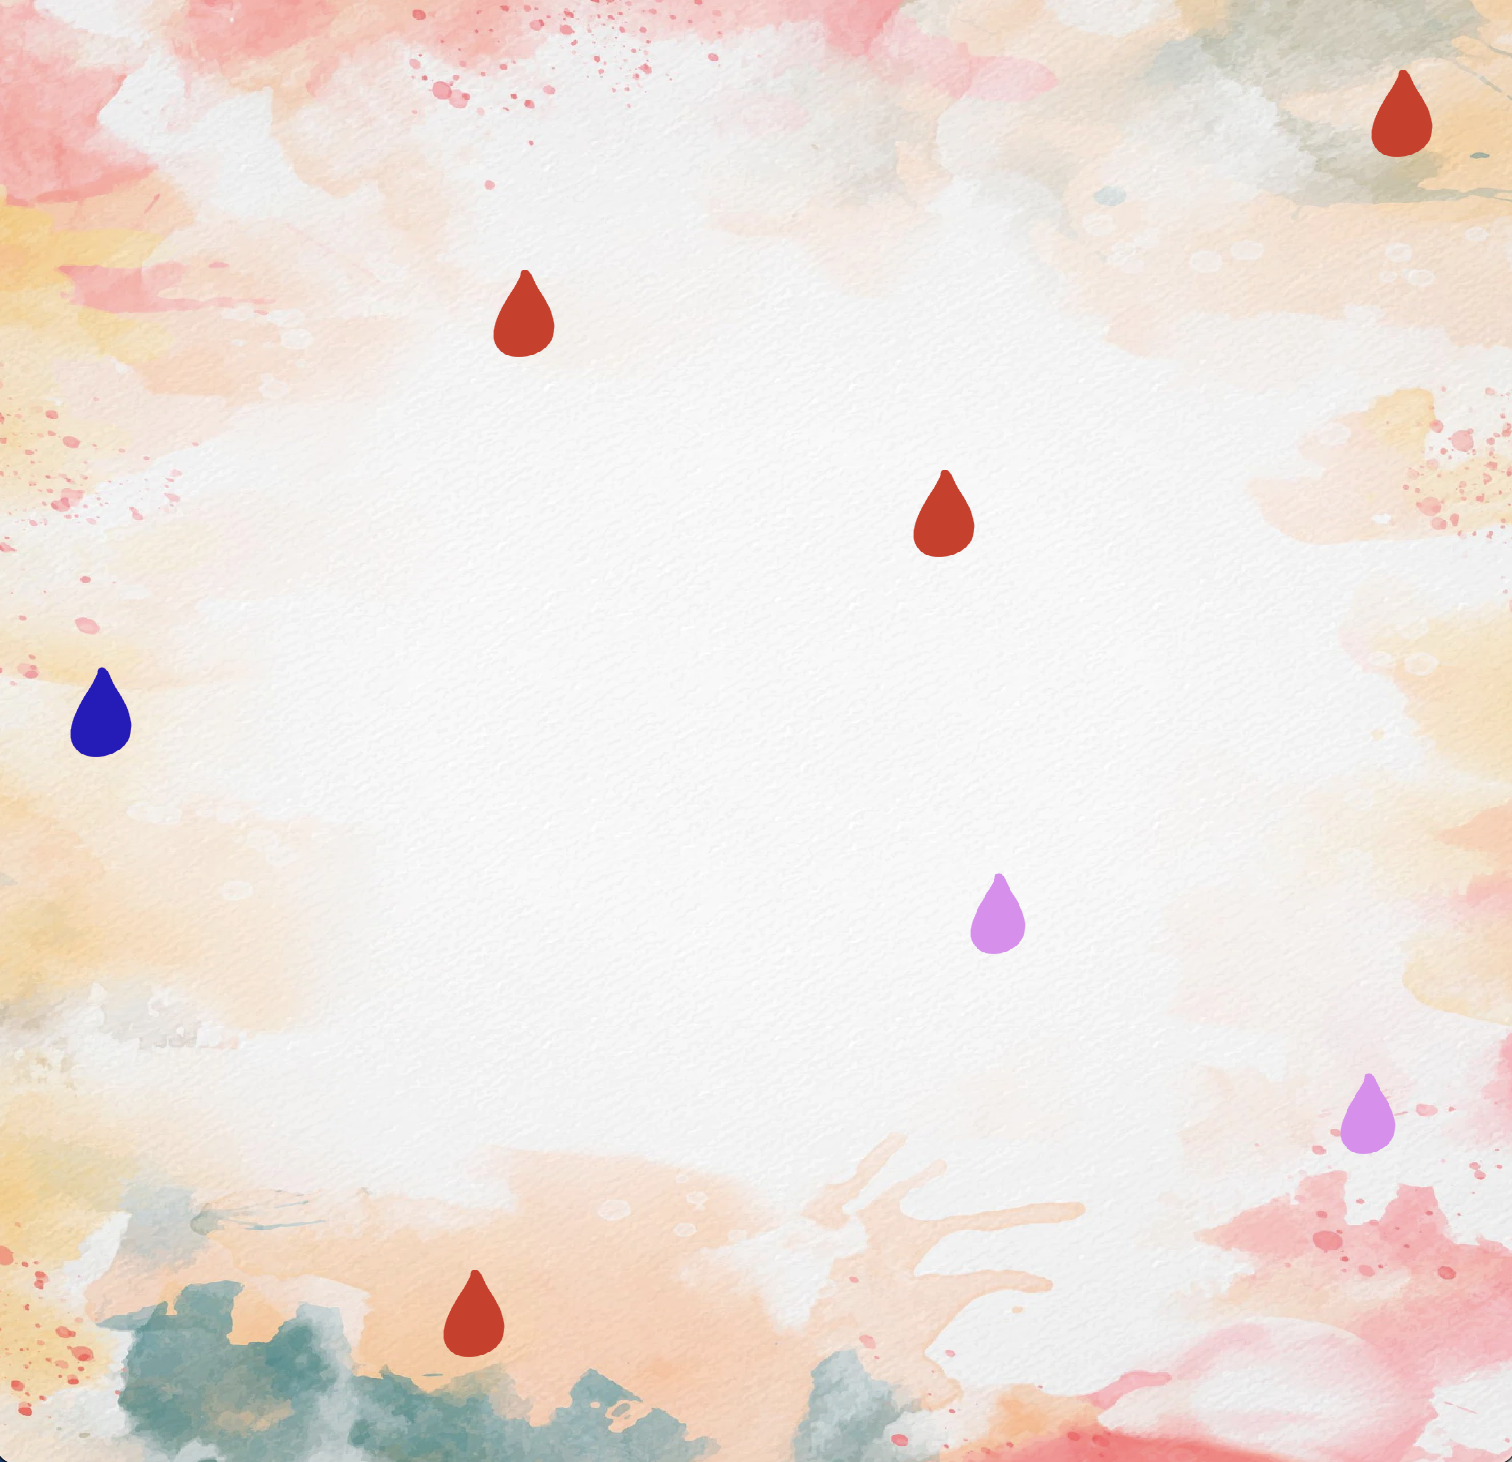
Save and reload your app. You should have what looks like a single red paint drop on your screen.
3. Now we want to create two new classes: one for paint drops and one for paint buckets. Don't worry about the Star class; we'll use the logic as a template for the paint drop class. In the lib folder create two new files called paint_drop.dart and paint_bucket.dart.
4. We want to move the logic from main.dart to our new class paint_drop.dart as follows:
- In
paint_drop.dart, add the following:
import 'package:flame/components.dart';
import 'package:flame/experimental.dart';

class PaintDrop extends SpriteComponent with DragCallbacks {
  PaintDrop({
    super.sprite,
    super.position,
    super.size,
    super.anchor,
  }){}
}
For now, we just pass everything to the parent construction, SpriteComponent.
- In
main.dart, importimport 'package:paint_drop/paint_drop.dart';at the top and comment out where we add theSpriteComponentand add the following:
add(PaintDrop(
   sprite: Sprite(redDrop),
   position: size / 2,
   size: Vector2(size_of_star * 0.75, size_of_star),
   anchor: Anchor.center,
));
Save and restart the app. It should look the same as before with just a single red paint drop in the middle of the screen.
5. With the SpriteComponent logic now in its own file, let's add back in the logic from star.dart. Modify paint_drop.dart to look like the following:
import 'package:flame/components.dart';
import 'package:flame/experimental.dart';

class PaintDrop extends SpriteComponent with DragCallbacks {
  PaintDrop({
    super.sprite,
    super.position,
    super.size,
    super.anchor,
    required double speed,
    required double game_width,
  }){
    _speed = speed;
    _game_width = game_width;
    _buffer = size[0];
  }

  late final double _speed;
  late final double _game_width;
  late final double _buffer;


  @override
  void update(double dt) {
    // Use the amount of time that has elapsed to inform position for smooth movement
    super.update(dt);
    position = Vector2(position.x, position.y + _speed * dt);
  }

  @override
  void onDragStart(DragStartEvent event) {
    priority = 10; // Brings star to front of overlap
  }

  @override
  void onDragEnd(DragEndEvent event) {
    priority = 0; // Return to default depth
  }

  @override
  void onDragUpdate(DragUpdateEvent event) {
    // While user is dragging and we intersect motion with star, update star position
    double new_pos = position.x + event.delta.x;

    // Don't let star get dragged beyond right side bounds
    if(new_pos > _game_width - _buffer){
      new_pos = _game_width - _buffer;
    }

    // Don't let star get dragged beyond left side bounds
    else if(new_pos < _buffer){
      new_pos = _buffer;
    }

    // Set the new x-position; y-position stays the same
    position = Vector2(new_pos, position.y);
  }
}
Most of the above code is directly copied from the Star class. Go back to the explanations for Workshops 2 & 3 if you are confused. If you try to save and reload the app, you will get errors because we have not passed in a speed or game_width to the PaintDrop object created in main.dart. Navigate to main.dart and make the following update:
add(PaintDrop(
   sprite: Sprite(redDrop),
   position: Vector2(r.toDouble(), -i.toDouble()),
   size: Vector2(size_of_star * 0.75, size_of_star),
   anchor: Anchor.center,
   speed: 10.0,
   game_width: size.x,
));
We also add back in the logic to make the paint drops appear at random along the width of the screen.
6. Now for some refactoring to add a background image and mutliple drop colors. The resulting main.dart file looks like this:
import 'dart:math';
import 'package:flame/components.dart';
import 'package:flame/experimental.dart';
import 'package:flame/game.dart';
import 'package:flutter/material.dart';
import 'package:paint_drop/paint_drop.dart';

void main() {
  runApp(
    GameWidget(
      game: MyGame(),
    ),
  );
}

class MyGame extends FlameGame with HasDraggableComponents {
  @override
  Future<void> onLoad() async {
    // Constants
    int number_of_drops = 20;
    int pixels_between_drops = 100;
    double size_of_drop = 50;
    double size_of_bucket = 100;
    int num_colors = 4;

    // Load all images
    final redDrop = await images.load('red_drop.png');
    final blueDrop = await images.load('blue_drop.png');
    final pinkDrop = await images.load('pink_drop.png');
    final yellowDrop = await images.load('yellow_drop.png');

    final redBucket = await images.load('red_bucket.png');
    final blueBucket = await images.load('blue_bucket.png');
    final pinkBucket = await images.load('pink_bucket.png');
    final yellowBucket = await images.load('yellow_bucket.png');

    final background = await images.load('background.png');
    add(SpriteComponent(
        sprite: Sprite(background),
        size: Vector2(size.x, size.y),
        position: Vector2(0, 0)));

    // Use a for-loop
    for (var i = 0;
        i < number_of_drops * pixels_between_drops;
        i = i + pixels_between_drops) {
      // Create a random number to determine where along the x-axis the
      // paint drop should fall
      Random rnd_loc = Random();
      int min_loc = size_of_drop.toInt();
      int max_loc = (size.x.toInt() - size_of_drop).toInt();
      int r_loc = min_loc + rnd_loc.nextInt(max_loc - min_loc);

      // Create a random number to determine which color drop we create on
      // this iteration of the for-loop
      Random rnd_color = Random();
      int min_color = 1;
      int max_color = num_colors;
      int r_color = min_color + rnd_color.nextInt(max_color - min_color);

      // Create corresponding drop color
      Sprite sprite;
      String color;
      switch (r_color) {
        case 1:
          {
            sprite = Sprite(redDrop);
            color = 'red';
          }
          break;
        case 2:
          {
            sprite = Sprite(blueDrop);
            color = 'blue';
          }
          break;
        case 3:
          {
            sprite = Sprite(pinkDrop);
            color = 'pink';
          }
          break;
        default:
          {
            sprite = Sprite(yellowDrop);
            color = 'yellow';
          }
          break;
      }

      // Add the paint drop to our canvas
      add(PaintDrop(
          sprite: sprite,
          position: Vector2(r_loc.toDouble(), -i.toDouble()),
          size: Vector2(size_of_drop * 0.75, size_of_drop),
          anchor: Anchor.center,
          speed: 10.0,
          game_width: size.x,
          color: color));
    }
  }
}
and paint_drop.dart has the added color field like this:
PaintDrop({
    super.sprite,
    super.position,
    super.size,
    super.anchor,
    required double speed,
    required double game_width,
    required String color, // <-- HERE
  }){
    _speed = speed;
    _game_width = game_width;
    _color = color; // <-- HERE
    _buffer = size[0];
  }

  late final double _speed;
  late final double _game_width;
  late final String _color; // <-- HERE
  late final double _buffer;
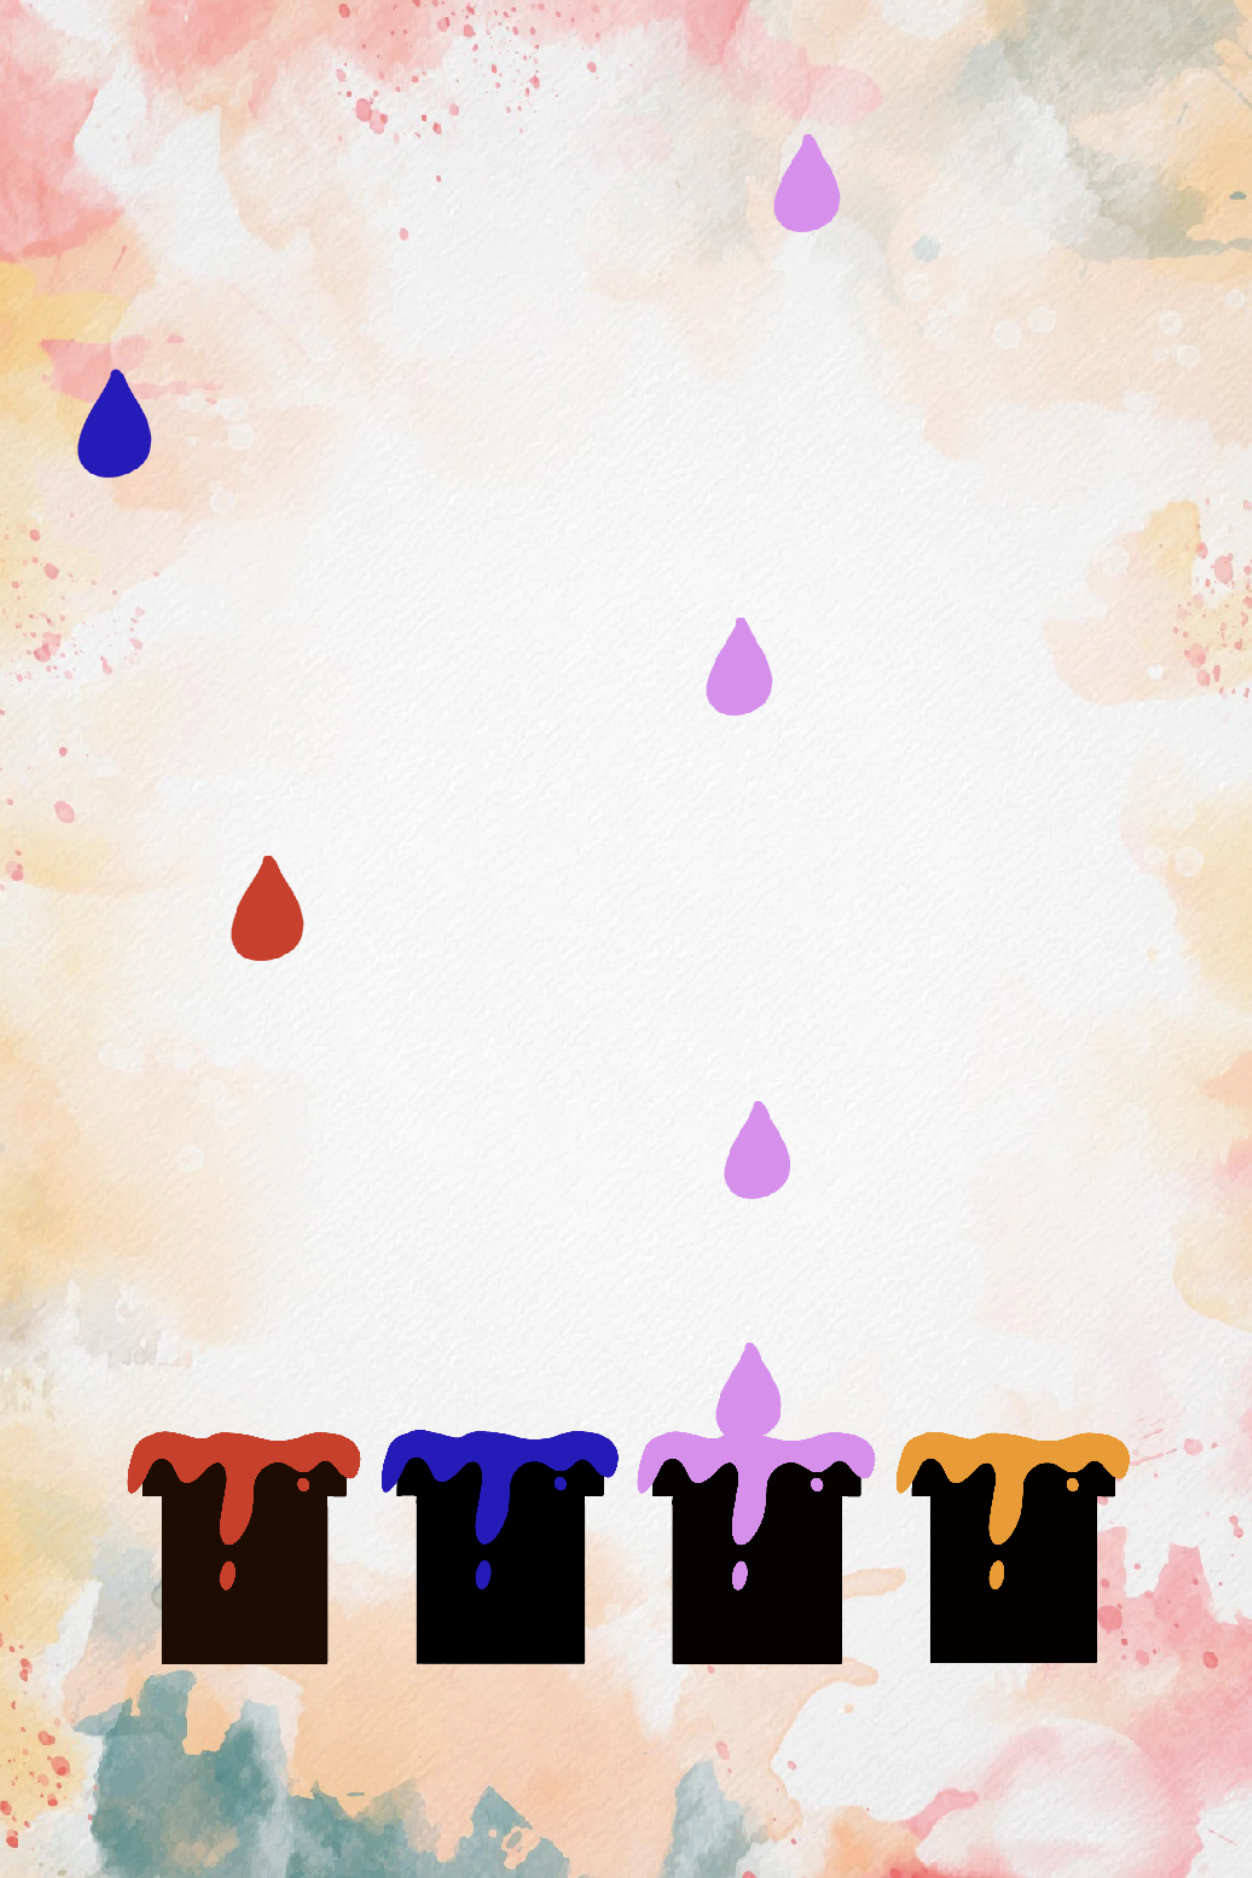
Reloading the app should yield somthing that looks like this:
- At this stage, we are ready to add in our paint buckets. Remember, the goal of the game will be to drag the correct paint drop color above the correct paint bucket. Let's start by creating our
PaintBucketclass. It's much simpler than ourPaintDropclass because the buckets are stationary. For now, we don't even need an update function:
import 'package:flame/components.dart';

class PaintBucket extends SpriteComponent {
  PaintBucket({
    super.sprite,
    super.position,
    super.size,
    super.anchor,
  }){}
}
In main.dart, just under where we set the background image, instantiate new PaintBucket objects:
   // Add the static background image
    add(SpriteComponent(
        sprite: Sprite(background),
        size: Vector2(size.x, size.y),
        position: Vector2(0, 0)));

    //////////////// NEW BELOW ////////////////

    // Add the static paint buckets
    add(PaintBucket(
      sprite: Sprite(redBucket),
      position: Vector2(size.x * 0.2, size.y - size_of_bucket - 50),
      size: Vector2(size_of_bucket, size_of_bucket),
      anchor: Anchor.center,
    ));
    add(PaintBucket(
      sprite: Sprite(blueBucket),
      position: Vector2(size.x * 0.4, size.y - size_of_bucket - 50),
      size: Vector2(size_of_bucket, size_of_bucket),
      anchor: Anchor.center,
    ));
    add(PaintBucket(
      sprite: Sprite(pinkBucket),
      position: Vector2(size.x * 0.6, size.y - size_of_bucket - 50),
      size: Vector2(size_of_bucket, size_of_bucket),
      anchor: Anchor.center,
    ));
    add(PaintBucket(
      sprite: Sprite(yellowBucket),
      position: Vector2(size.x * 0.8, size.y - size_of_bucket - 50),
      size: Vector2(size_of_bucket, size_of_bucket),
      anchor: Anchor.center,
    ));
We add 4 paint buckets for our 4 colors. We also position each bucket equidistance from each other across the screen using the size parameter provided by the game class. Lastly, we set the size and anchor positions.
Here is the result:
Now that our game looks prettier and we have basic dragging logic in place, we want to detect collisions between buckets and paint drops. Why? 2 reasons
- If a paint drop goes "into" a bucket, we want it to disappear!
- We want to keep track of whether paint drops going into the correct color paint bucket to give us a value to keep track of as the score for our game.
- Just like with implementing draggable paint drops, we are going to use Mixins, in particular, the
HasCollisionDetectionmixin. Add this tomain.dart:
class MyGame extends FlameGame with HasDraggableComponents, HasCollisionDetection {
   // ...
}
Now, we can add hit boxes to our components to check for collisions.
2. Next, we navigate to lib/paint_drop.dart to add CollisionCallbacks. We could add our callbacks to either the PaintDrop class or the PaintBucket class, but we want to make the paint drop disappear once it intersects with a bucket, so we choose to use PaintDrop.
3. Finally, we add some logic to paint_drop.dart and paint_bucket.dart to make collisions possible.
- https://docs.flame-engine.org/1.6.0/tutorials/bare_flame_game.html
- https://www.freepik.com/free-photos-vectors/artistic-background
- https://medium.com/simform-engineering/basics-of-game-development-using-flame-bee1b8cf7320
- https://medium.com/simform-engineering/build-collision-based-game-using-flame-in-flutter-ba1fc86702bd
- https://github.com/flame-engine/flame/blob/main/examples/lib/stories/sprites/basic_sprite_example.dart