Install
Please make a full file based + flash backup of your toniebox's flash with cc3200tool. More details on the usage of the cc3200tool and the required hardware can be found here Python 3 is needed! You may use a different COM port or the right device on linux ex. /dev/ttyUSB0.
python cc.py -p COM3 read_all_files targetdir/ read_flash backup.bin
Please check, if you dumped every important file. If not, please check the known problems wiki entry of the cc3200tool for a workaround..
Download the latest version from here. Please unzip the release to your desired directory. You will find a directory called flash there for the file(s) that need to be copied to the flash and a directory called sd for the sd files. If you don't mind a slightly slower boot but want some log output via UART (Baud 921600, TX Pin) use the debug variant (check the ngCfg.json to enable it!).
If you have previously installed the CFW SD Bootloader please use 1b) otherwise for first time installation please use 1a).
First of all you need to copy your just backuped original mcuimg.bin (original bootloader) from your toniebox to a different location (flash:/sys/pre-img.bin) to boot it with the HackieboxNG Bootloader later on. Please don't confuse the mcuimg.bin (ofw bootloader) you are going to dump with the mcuimg.bin within the hackiebox zip package. (/flash/sys/mcuimg.bin)
python cc.py -p COM3 read_file /sys/mcuimg.bin mcuimg.bin
python cc.py -p COM3 write_file mcuimg.bin /sys/pre-img.bin
python cc.py -p COM3 write_file flash/sys/mcuimg.bin /sys/mcuimg.bin
python cc.py -p COM3 read_file /sys/mcuimg.bin mcuimg.bin write_file mcuimg.bin /sys/pre-img.bin write_file flash/sys/mcuimg.bin /sys/mcuimg.bin
The box saves up to 3 different versions of the OFW. It can be found flash:/sys/mcuimgN.bin (replace N with 1, 2 or 3). A command to dump all three versions would be:
python cc.py -p COM3 read_file /sys/mcuimg1.bin mcuimg1.bin read_file /sys/mcuimg2.bin mcuimg2.bin read_file /sys/mcuimg3.bin mcuimg3.bin
To check which version the dumped firmwares are you may just open it with a hex editor (quite at the end) or use our python tool to extract it. If you found a new firmware, let us know by opening a push request for our known firmware listing in the wiki.
You may use the (old) Hackiebox CFW to upload the preloader. This way you can install it over the air without direct access to the flash if you have already installed a previous version of the cfw bootloader/preloader. Just run the Hackiebox CFW and use the webinterface to upload the new /sys/mcuimg.bin.
To verify that you have currently installed the ofw bootloader to /sys/pre-img.bin you may download the file from flash
http://*.*.*.*/api/ajax?cmd=get-flash-file&filepath=/sys/pre-img.bin
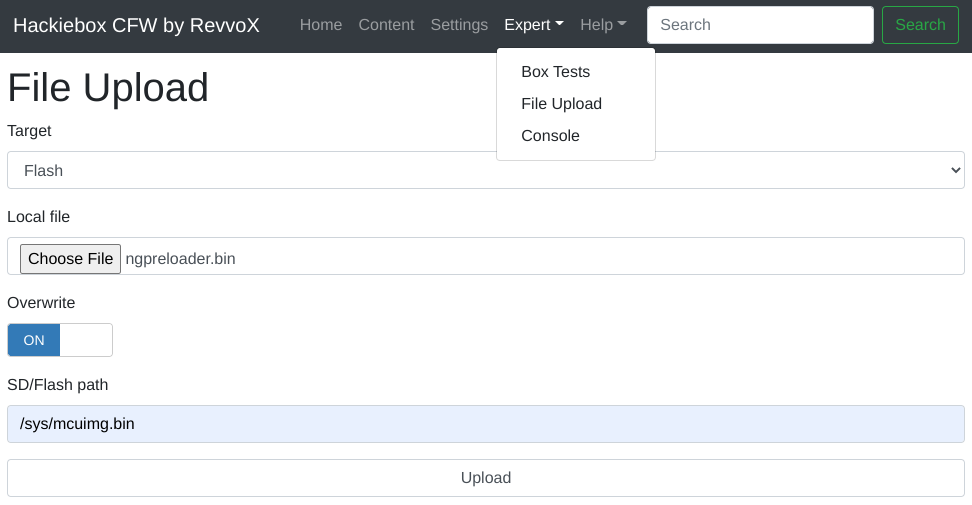
- Select Target "Flash"
- Select Local file "flash/sys/mcuimg.bin"
- Set Overwrite to "on"
- Set SD/Flash path to "/sys/mcuimg.bin"
- Press Upload!
To verify that the upload was successful you can download the mcuimg.bin from flash afterwards and compare it with the flash/sys/mcuimg.bin you have just uploaded.
http://*.*.*.*/api/ajax?cmd=get-flash-file&filepath=/sys/mcuimg.bin
Copy over all the contents of the sd folder the sd card of the toniebox. Copy over the original bootloader (mcuimg.bin from your backup) to the first ofw slot sd:/revvox/boot/ng-ofw1.bin. Now the HackieboxNG bootloader will instantly boot the original bootloader and run the original firmware.
Note: The preloader will load any file placed to sd:/revvox/boot/ngbootloader.bin.
More about the different firmware slots and the configuration here.