Getting Started
This is the Getting Started guide. Here we show how to setup a local KES server that stores keys in-memory. Therefore, all keys will be gone once the KES server has been shut down.
                   ╔══════════════════════════════════════════╗
┌────────────┐     ║   ┌────────────┐          ┌───────────┐  ║
│ KES Client ├─────╫───┤ KES Server ├──────────┤ In-Memory │  ║
└────────────┘     ║   └────────────┘          └───────────┘  ║
                   ╚══════════════════════════════════════════╝
If you haven't installed KES yet, install it first.
A KES server can only be run with TLS - since secure-by-default. Here we use self-signed certificates for simplicity.
The following command will generate a new TLS private key server.key and
a X.509 certificate server.crt that is self-signed and issued for the IP 127.0.0.1
and DNS name localhost (as SAN). You may want to customize the command to match your
setup.
kes tool identity new --server --key server.key --cert server.crt --ip "127.0.0.1" --dns localhostAny other tooling for X.509 certificate generation works as well. For example, you could use
openssl:$ openssl ecparam -genkey -name prime256v1 | openssl ec -out server.key $ openssl req -new -x509 -days 30 -key server.key -out server.crt \ -subj "/C=/ST=/L=/O=/CN=localhost" -addext "subjectAltName = IP:127.0.0.1"
As the root identity we can perform any operation without having to worry about policies for now. A new identity can be created via:
kes tool identity new --key=root.key --cert=root.crt rootThe identity of the new root.crt can be displayed via:
kes tool identity of root.key

Identity: 3ecfcdf38fcbe141ae26a1030f81e96b753365a46760ae6b578698a97c59fd22Here we use a minimal KES server configuration - config.yml- with an in-memory key store
which will not persist keys:
address: 0.0.0.0:7373

admin:
  # Insert the identity of your 'root.crt' here.
  identity: 3ecfcdf38fcbe141ae26a1030f81e96b753365a46760ae6b578698a97c59fd22

tls:
  key:  server.key
cert: server.crtNow, switch to a new terminal window and start the KES server:
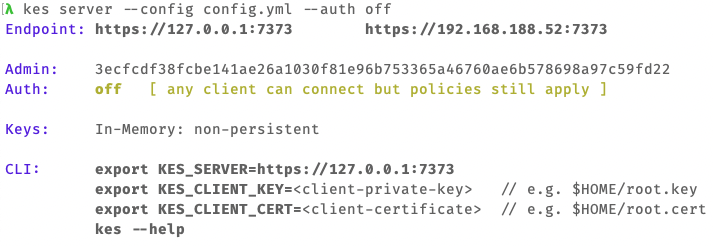
kes server --config config.yml --auth off
--auth=offis required since ourroot.crtcertificates is self-signed
Now, we try to connect to the KES server, create a new secret key, derive a new data key and then decrypt the data key ciphertext.
Switch back to the previous terminal window to set the following environment variables:
export KES_CLIENT_KEY=root.key
export KES_CLIENT_CERT=root.crt
kes key create -k my-key
We have to specify
-ksince we use self-signed certificates.
kes key derive -k my-key
You will see some output similar to:
{
  plaintext : ...
  ciphertext: ...
}
The plaintext is a base64-encoded 256-bit key.
The ciphertext is the plaintext key encrypted with my-key at the server.
kes key decrypt -k my-key <base64-ciphertext>
For more CLI commands see: kes --help
Usage:
    kes [options] <command>

Commands:
    server                   Starts a KES server.
    key                      Manage secret keys.
    log                      Work with server logs.
    policy                   Manage the kes server policies.
    identity                 Assign policies to identities.
    tool                     Run specific key and identity management tools.

    -v, --version            Print version information.
    -u, --update             Update kes to latest release.
    -h, --help               Show this list of command line options.