Customizing Config File
The awesomeshot config file contains a variable which gives you total freedom over customizing how image is edited.
- Config File Location
- Screenshot Result PATH
- Backup Screenshot File
- Convert
- Convert File Screenshot to PNG
- Open Image After Image Edited
The awesomeshot config file is $HOME/.config/awesomeshot/awesomeshot.conf and awesomeshot will generate default config on first run.
NOTE: Awesomeshot will not replace the config file if already exists, if you want back to default config you can regenerate with argument
-cor--config, it will askDo you want to generate default config [y/N]if config already exists.
awesomeshot -cNOTE: This variable work for argument
-aor--auto. Make sure when your phone take screenshot the result file image PATH is same with this variable. Default my phone screenshot result image PATH on/sdcard/Pictures/Screenshots. If not same, edit this variable value
You can check you default screenshot PATH by:
- Take Screenshot
- Go to Gallery
- Select album
Screenshot - Select the last image
- Click menu detail info

This variable serves to function to backup original photo (screenshot result), change this value to blank or whatever for disable function and "yes" for enable function
backup="yes"This variable serves to set the original photo backup PATH
path_backup="${HOME}/.config/awesomeshot/backup"This variable is option for imagemagick execute
This variable serves to convert rounded corner, change this value to blank or whatever for disable convert and "yes" for enable function
convert_rounded="yes"This variable serves to set how many rounded corners
border_radius=10
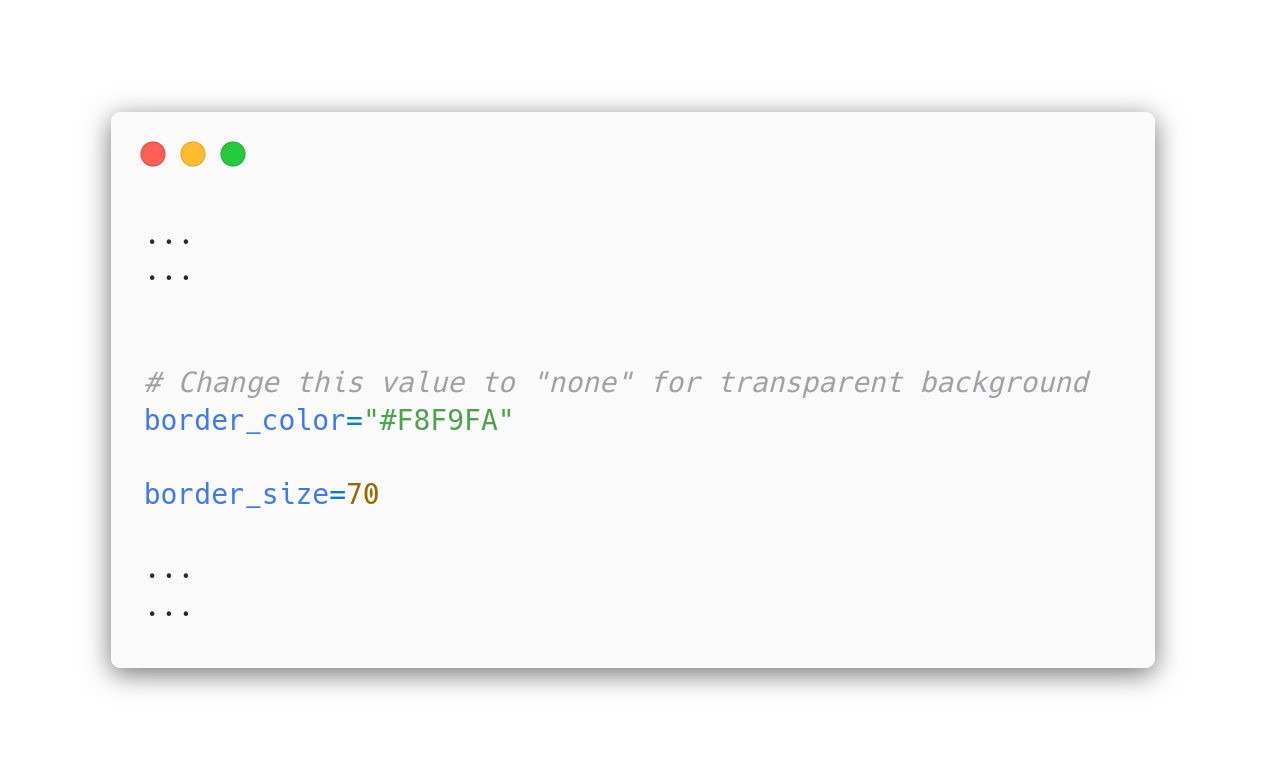
This variable serves to convert border (background image) when editing the image, change this value to blank or whatever for disable convert and "yes" for enable function
convert_border="yes"This variable serves to set border color (background image), change this value to "none" for transparent background, if you want to custom the color, you can change this value with hex color or use the one in the array list.
border_color="${hex_color[0]}"For example I change the Hex Color to Blue Sky
#A8D7FE
| White | Blue Sky |
|---|---|
 |
 |
This variable handle of border background size (Default border-size
70)
For example I change the value to lower, it will give minimize background size

This variable handle shadow color between image and border (background) color
NOTE: This value variable same with
border-color. Yup! using Hex Color (Default value#000000black color)

For example I change the Hex Color to Blue

This variable handle shadow stroke
This variable handle watermark image
This value display text or watermark on the image
Default value :
Shot by Awesomeshot

This variable is to define the position value on the footer, the value contain 8 wind direction.
NorthWestNorthNortEastWestCenterEastSouthWestSouthSouthEast
Default value
South
This variable serves to set the position of X and Y
The first value to define
Xand the second value to defineYDefault value+0+45
This variable is define font.
You can check list font by command
magick convert -list font | grep -iE 'font:.*'Default value is
JetBrains-Mono-Medium-Nerd-Font-Complete

This variable set font weight
Default value is
30
This variable set foreground color font
Default value is
#000000
This variable set background color font
Default value is
none
ImageMagick requires a PNG file type to be able to convert, make sure if your default screenshot is not PNG you have to enable this variable
Default value is
yes
awesomeshot will open the image after convert using imagemagick with Termux:API command termux-open
Default value is
yes